Installation Instructions: MG3 - MG4 CHEVY COLORADO/GMC CANYON 5'2" or 6'4” BED LENGTH NOTE: Most of the images in these instructions are of the short bed, but they apply to both length beds 2015-CURRENT TOOLS REQUIRED • Adjustable wrench (that opens to about 1”) • 1/2” open end wrench • # 2 Phillips screwdriver, • Short 7/32” hex wrench • 7/16” deep socket • 3/8” socket • Electric drill • 9/64" drill bit • Drill stop Watch installation videos at www.DECKED.
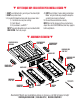
▼ HEY! TORQUE BOY: READ BEFORE YOU INSTALL DECKED ▼ 1. DON'T over tighten bolts, get em' good 'ole hand-tight. 2. DON'T use power tools. 3. If you don't follow directions and do use power tools: 1). Set clutch at a very low setting. 2). Don't blow it. 3). If you blow it, see NOTE.* NOTE* Two extra threaded inserts are included in BAG PREP-EXTRA. That's all you get. 4). DON'T over tighten J-hooks during installation. Make 'em good and snug enough to keep the system from moving in the bed. 5).
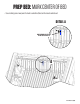
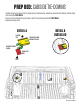
PREP BED: MARK CENTER OF BED • Use a marking pen or wax pencil to mark a centerline (blue) on the raised center bead.
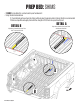
PREP BED: SHIMS • 2 SHIMS that look like this can be found in your hardware kit. • Using the information below: 1) Clean the bed surface where the shims will be located. Isopropyl alcohol (do not drink) is recommended. 2) Remove tape film and apply shim with the strength of 1000 men a.k.a push really hard. DETAIL A DETAIL B Align shim to channel in floor shown 3” from cabside panel of bed (red). Align shim to channel in floor shown. Place shim 7" from rear of bed (red).
PREP BED: CABSIDE TIE-DOWNS • Sandwich the factory driver side tie-down (green) in between the cabside tie-down bracket (yellow) and the clamp plate (red); BAG PREP-MG34 • Fasten securely through the circular holes with 1" bolt and flanged nut; BAG PREP-MG34 • Repeat passenger side.
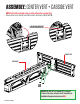
ASSEMBLY: CENTER VERT + CABSIDE VERT NOTE: Perform the next few steps on a flat surface like a garage floor. • Attach center vert to cabside vert with four bolts. Alternate to tighten; BAG S1. PLACE HOOK ON CENTER VERT OVER NOTCH IN CABSIDE VERT CABSIDE VERT CENTER VERT S1 HELPFUL TIP: BAG S1, a.k.a "Bunker Hill," is required for most of the steps, so keep it close! These bolts are highlighted throughout instructions in RED.
ASSEMBLY: LOOSELY ATTACH STUDS (YUP) • LOOSELY attach studs to cabside vert with six bolts; BAG S1.
ASSEMBLY: ALIGN & TIGHTEN STUDS (YUP) NOTE: This step ensures the studs are properly located before tightening bolts. It's important. • Place ammo cans to support tailgate end of deck panels. • Lift deck panels on center vert + stud + cabside vert assembly. • Slide studs around L-R until deck panels are seated. • DETAIL A: Loosely secure four bolts to hold decks onto studs; BAG S1. • Now you can securely tighten the bolts that hold the studs to the cabside vert.
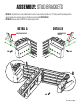
ASSEMBLY: STUD BRACKETS • DETAIL A: Attach driver side stud bracket to driver side stud using three 3 1/2" bolts and three flanged nuts into proper hole locations (green). Tighten securely; BAG PREP-MG34 • DETAIL B: Repeat steps in DETAIL A on passenger side.
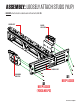
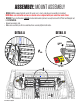
ASSEMBLY: MOUNT ASSEMBLY • DETAIL A: While supporting both ends, lift center vert + stud + cabside vert assembly in truck bed. NOTE: Make sure centerline arrows on cabside vert are aligned with your centerline marks (blue). • DETAIL B: Place stud brackets cabside of cabside brackets (yellow). Loosely fasten with 3/4" bolt and flanged nut; BAG PREP-MG34. • Repeat passenger side. • Make sure assembly is still on centerline, then securely tighten both sides.
INSTALL: C-CHANNEL • Loosely place driver side ammo can at tailgate corner of bed. • Place driver side C-channel on ledge of stud and ammo can with end plate cabside. • DETAIL A: Insert two bolts through C-channel into ammo can and loosely fasten with nut; BAG S2, BAG N1. • DETAIL B: Tightly attach C-channel to stud; BAG S1. • Repeat passenger side.
INSTALL: DECK HALVES • Loosely place driver side deck panel on driver side stud, center vert and ammo can. • Shift ammo can forward, rearward, L-R, as necessary to align with fully seated deck panel. • Loosely assemble: • Five (5'2" bed) or six (6'4" bed) bolts through deck panel into center vert; BAG S1. • Four bolts with O-rings through deck panel into stud; BAG S1, BAG O-RINGS. • Eight bolts with O-rings through deck panel into ammo can; BAG S1, BAG O-RINGS. • Tighten all S1 bolts.
INSTALL: J-HOOKS • Loosely assemble driver side J-hook assembly in order shown through second closest tailgate side hole in ammo can as shown; BAG J5. • Repeat passenger side. DRIVER SIDE AMMO CAN KEEP LOOSE PASSENGER SIDE AMMO CAN KEEP LOOSE J5 J5 ✕ ✕ ✕ ✕ ✕ ✕ TAILGATE TAILGATE HELPFUL TIP: Make sure the hooks open toward tailgate.
DRAWERS: BRACKETS + WHEELS • Each drawer has a left and a right bracket. Bolt brackets into place via bottom two holes in bracket with 3/4" length bolts. Use the 2" length bolt for the upper cabside wall hole in bracket; BAG DRAWER 1. • Install a tube brace in each drawer with two 3/4" length bolts; BAG DRAWER 1, BAG DRAWER 2. • Attach wheels onto drawer brackets with a 7/32" hex wrench; BAG WHEELS.
DRAWERS: AXLE WHEELS + WEATHERSTRIPS • Slide narrow drawer into driver side drawer cavity. NOTE: It is easier to fully install narrow drawer first. • DETAIL A: Install two tailgate wheels onto narrow drawer axles with a 7/32" hex wrench; BAG WHEELS. • Repeat with wide drawer. • DETAIL B: Install weatherstrips on top of drawer edges WITH WIPER BLADE POINTING TOWARD DRIVER.
FINAL STEPS: TORSION BRACE + BOTTLE OPENER • Slide torsion brace under center vert and tailgate ammo cans. NOTE: If you jumped the gun and tightened the J-hooks when installing, loosen them. • Loosely install: • Two bolts with nylon washers through the end holes in torsion brace into ammo cans; BAG S1. • Two bolts with nylon washers through the bottom bottle opener holes and torsion brace into center vert; BAG S1.
BAM BAM: THE RULER • Center ruler in embossed area and screw three 1/2" length Phillips screws through the tailgate side holes directly into deck panels; BAG FINAL MID. NOTE: These are small gauge screws. Tighten to a light snuggle ONLY. • For the three cabside ruler mounting holes, drill each with a 9/64" bit and a drill stop set to 1/2". There is a lateral steel tube that runs on the underside of the deck at this location. (SEE UNDERSIDE VIEW OF DECK).
FINAL STEPS: AMMO CAN LIDS • DETAIL A: Ammo can lids are driver (marked L) and passenger (marked R) side specific. • DETAIL B: Holding lid in orientation shown, insert tab on tailgate end of ammo can lid and push the cabside end of lid down to secure. Don't be afraid to give'r the Fonzi to close, it's rugged. • Insert lock hole plugs, unless you ordered drawer locks! Install drawer locks now (instructions with locks); BAG FINAL MID.
DECKED 3-YEAR LIMITED WARRANTY (a.k.a LEGAL MUMBO JUMBO) DECKED LLC warrants to the original purchaser of this product that the product will be free from manufacturing defects in workmanship and materials for a period of three (3) years from the date of the original purchase. If within three (3) years from the original date of purchase this product fails due to defect in materials or workmanship, DECKED LLC will replace any defective part at its option.