
Installation Guide

Recessed Lighting Kit Installation Instructions
Low voltage 8-piece LED light kit
IMPORTANT SAFETY INFORMATION PERTAINING TO
RISK OF FIRE OR INJURY TO PERSON.
• Do not install within 10 feet (3 m) of a pool, spa or fountain.
• Do not look directly into the light.
• For use with 12-volt, low-voltage outdoor landscape lighting
system only.
• There are no serviceable parts inside the power supply unit.
Do not disassemble.
• Plug the power supply unit directly into a GFCI receptacle
that is marked "wet location."
• The transformer can support a maximum of 16 individual
lights.
Please note: The light system must be installed in accordance
with all local codes and ordinances. If you are experiencing
problems, contact a qualified electrician.
Step 1: Find a location for the transformer and photo sensor.
• Outdoor use, weather-resistant.
• Do not install the photo sensor behind shrubs.
This will affect the photo sensor.
• The photo sensor will not operate properly if
installed too close to a light source.
Step 2: Mount the photo sensor.
Mount the photo sensor with the included
screw on a wall within one foot (30 cm) of
the electrical outlet where the transformer
will be connected (fig. 1).
* Alternate photo sensor installation: If there is no area within 1 foot
(30.5cm) of the transformer to install the photosensor, it is possible to
install the extension wire directly to the transformer and to install the
photo sensor between the extension wire and the first light.
Step 3: Position lights and run wire.
• The wire should run from the photo sensor to each light,
without being cut. Do not run the wire within 10 feet (3 m)
of a pool, spa or fountain.
• Loose wire should be tied up and kept clear of walking
paths and away from children or animals.
• Connect the extension wire and all light fixtures end-to-end,
making one long wire connection. This is the distance
available when positioning your lights.
Please note: Additional light and wire add-ons are available
in packs of two. Additional extension wire is available in 16.4’
length. These add-ons are compatible with and follow the same
installation steps as the lights and wire in the original kit.
• Most common light placements are on step risers to
illuminate stairs, or flat on the deck surface to delineate
extremities and illuminate railings or walls.
• Position the light fixtures, making sure that the extension
wire will reach the photo sensor. Once they are properly
positioned, drill out holes using the included 1" drill bit.
Important note: Please make sure that you
have properly calculated your distances
and are confident of the positioning
of the lights before drilling holes.
extension wire
transformer
LED deck light
photo sensor
drill bit
1"
fig. 3
fig. 1
fig. 2
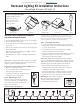
One Recessed Lighting Kit contains:
• Eight (8) LED deck lights
• One (1) transformer
• One (1) extension wire
• One (1) photo sensor
• One (1) drill bit
transformer
photo sensor connector
light fixture
extension
wire
Illustration of fixture is for example only.
For more information, visit our Web site at: http://www.ufpi.com
Continued on reverse