
Installation Guide

Kit Contents:
• 5 Glass balusters
• 20 Stainless steel screws
(You will need 1.5 balusters
per linear foot of railing)
Items You Will Need:
• Drill driver
• Tape measure
• 2-pt. square head drill bit
• Safety glasses
• Carpenter’s pencil
• Clamp
• Support blocks (can be cut
from scrap rail material)
• Scenic baluster connectors
(sold separately)
• Scenic baluster stair connectors
(sold separately)
The diagrams and instructions in this brochure are for
illustration purposes only and are not meant to replace
a licensed professional. Any construction or use of the
product must be in accordance with all local zoning and/or
building codes. The consumer assumes all risks and liabili-
ty associated with the construction or use of this product.
The consumer or contractor should take all necessary
steps to ensure the safety of everyone involved in the
project, including, but not limited to, wearing the appro-
priate safety equipment. EXCEPT AS CONTAINED IN THE
WRITTEN LIMITED WARRANTY, THE WARRANTOR DOES
NOT PROVIDE ANY OTHER WARRANTY, EITHER EXPRESS
OR IMPLIED, AND SHALL NOT BE LIABLE FOR ANY DAM-
AGES, INCLUDING CONSEQUENTIAL DAMAGES.
Prior to construction, check with your local regulatory agency
for special code requirements in your area. Common railing
height is 36" or 42". Structural support should come from
either the continuation of deck support posts that extend
up through the deck floor or from railing posts that are
bolted to the inside of the rim or outer joist. 6' on-center
spacing is recommended. Never span more than 8' between
railing posts.
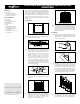
In-Line Railing
Step 1: Measure railing opening from post to post to determine
the length of each rail section.
Step 2: Cut top and bottom rails to the proper length and
clamp together. Locate the center of the rails and
mark. If using an odd number of balusters, the
balusters will start at the center of the rail. For
Frontier Balusters: If using an even number of
balusters, the balusters will start 3-3/4" either
side of center, with all balusters 7-1/2" on-center.
Mark both rails 7-1/2" on-center, starting from the
desired location. For Contour Balusters: If using an
even number of balusters, the balusters will start
3-1/4" either side of center, with all balusters 6-1/2"
on-center. Mark both rails 6-1/2" on-center, starting
from the desired location.*
Step 3: Screw on one Deckorators Scenic baluster connector
(sold separately) on each mark, using the screws
provided.
Step 4: Place the bottom rail between the rail posts,
supported by a 3" block (2x4 scrap material works
best). Secure rail to posts using Deckorators rail
connectors (sold separately). Insert one Scenic
Baluster into each baluster connector.
*6
*3
Step 5: Carefully place top rail over the balusters, making
sure each baluster is seated properly in each baluster
connector. Inspect finished railing for proper baluster
spacing and secure top rail to posts. Attach support
blocks to the bottom of the lower rail an equal
distance from each post.
Stair Railing
Step 6: Follow Step 1 and cut top and bottom rails to length,
with proper angle. Clamp together and mark top and
bottom rails every 9" on-center for Frontier, or every
7-1/2" on-center for Contour.
Step 7: Deckorators Scenic baluster stair connectors (sold
separately) are composed of two parts: the connector
and the adaptor. To install, place the connector on
the adaptor, being sure the groove in the connector
matches up with the knobs on the adaptor. Position
one connector and adaptor on each mark and attach
to the rail using the screws provided. Scenic baluster
stair connectors work for 35-degree stair angles.
Step 8: Attach bottom rail to post. Insert one Scenic Baluster
into each baluster stair connector. Carefully place
top rail over the balusters, and secure top rail to post.
SCENIC GLASS BALUSTER INSTALLATION INSTRUCTIONS
(CONNECTORS)