
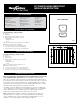
Installation Guide

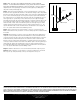

Step 7 Note: this step is for installing the Deckorators square composite
balusters. To install alternative Deckorators styles, please refer to the installation
instructions provided with the balusters. Attach the baluster connectors with stair
adapters (both sold separately) to the bottom rail through the pre-drilled holes
using the screws provided. (fig. 10).
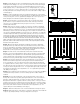
Step 8 Place the proper rail bracket covers and stair brackets on the ends of
the bottom rail. Pay particular attention to the brackets being used as they differ
based on top/bottom rail and up/down angle. Prop the bottom rail between the
posts on the stair treads (fig. 9). You may need to place equal shims between
two stair tread noses to elevate the bottom rail. Check for requirements in your
area. Typically, a 6" sphere may not be allowed to pass through the triangle
formed by the bottom rail, tread and riser (fig. 8). Center the stair bracket on the
post. Using the stair bracket as a guide, mark the screw positions on the post
sleeve and rail on both ends. Pre-drill 1/8" pilot holes through the post sleeve
and rail. Attach the stair bracket to the post sleeve using the #8-15 x 2" - #2
square drive flat head screws and then attach stair bracket to rail using #8-16
x ¾" - #1 square drive wafer head self-drilling screws.
Step 9 Place a baluster over each baluster connector on the bottom rail.
Make sure baluster is fully seated in connector. Gently tap with a rubber mallet
if needed.
Step 10 Attach baluster connectors to the top rail through the pre-drilled holes
using the screws provided. Place the stair rail bracket covers and stair brackets
on the ends of the top rail. Position the top rail by placing the baluster connectors
inside the balusters, while working from one end to the other. Center the stair
bracket on the post. Using the stair bracket as a guide, mark the screw positions
on the post sleeve and rail on both ends. Pre-drill 1/8" pilot holes through the post
sleeve and rail. Attach the stair bracket to the post sleeve using the #8-15 x 2" -
#2 square drive flat head screws and then attach stair bracket to rail using #8-16
x ¾" - #1 square drive wafer head self-drilling screws.
Step 11 Slide the rail bracket cover over the rail bracket and snap into place.
Step 12 Apply a thin line of clear exterior construction adhesive to the inside
rim of a post cap and place firmly on the post. Repeat for each post.
THE DIAGRAMS AND INSTRUCTIONS IN THIS BROCHURE ARE FOR ILLUSTRATION PURPOSES ONLY AND ARE NOT MEANT TO REPLACE A LICENSED PROFESSIONAL. ANY CONSTRUCTION OR USE
OF THE PRODUCT MUST BE IN ACCORDANCE WITH ALL LOCAL ZONING AND/OR BUILDING CODES. THE CONSUMER ASSUMES ALL RISKS AND LIABILITY ASSOCIATED WITH THE CONSTRUCTION
OR USE OF THIS PRODUCT. THE CONSUMER OR CONTRACTOR SHOULD TAKE ALL NECESSARY STEPS TO ENSURE THE SAFETY OF EVERYONE INVOLVED IN THE PROJECT, INCLUDING, BUT NOT
LIMITED TO, WEARING THE APPROPRIATE SAFETY EQUIPMENT. EXCEPT AS CONTAINED IN THE WRITTEN LIMITED WARRANTY, THE WARRANTOR DOES NOT PROVIDE ANY OTHER WARRANTY,
EITHER EXPRESS OR IMPLIED, AND SHALL NOT BE LIABLE FOR ANY DAMAGES, INCLUDING CONSEQUENTIAL DAMAGES.
©2012, 2014 Universal Forest Products. Deckorators is a registered trademark of Universal Consumer Products, Inc. in the U.S. All rights reserved.
933 US Route 202 Greene, ME 04236-3466
8103 CLASSIC-COMPLETE 12/14
www.deckorators.com
Stair Adapter
Baluster
Bottom Rail
•
Baluster
Connector
•
•
BottomStairRail.pdf
•
fig. 10