
Installation Guide

CABLE RAILING INSTALLATION INSTRUCTIONS
Items you will need:
• Drill/power screwdriver
• Assorted drill bits
• Hammer
• Miter or circular saw
with fine-tooth carbide
tip blade
• Construction adhesive
• Marked speed square
• Two clamps
• Carpenter’s level
• Carpenter’s pencil
• Adjustable wrench or
socket wrench
• Safety glasses/goggles
• Assorted fasteners
(see instructions)
• Tape measure
• Wire cutters
For each 6' or 8' on-center railing section, you will need:
• 1 - 6' or 8' Deckorators top rail from CXT Classic, CXT Pro or
ALX Pro
• 1 - Deckorators post sleeve kit per post (there will be more
posts than railing sections)
• Deckorators stainless steel cable rail (sold on spools of 500')
• Cable hardware: 1 pack per cable, which includes
(2) eye lag screws, (1) fork jaw and (1) turnbuckle
• Cable spacer (sold in packs of 2): 1 per 6 ft section,
2 per 8 ft section
Installation instructions:
Prior to construction, check with your local regulatory agency for
special code requirements in your area. Common railing heights
are 36" and 42". Structural support should come from the con-
tinuation of deck support posts that extend up through the deck
floor or from railing posts that are bolted to the inside of the rim
or outer joists. Never span more than 8’ on-center between rail-
ing posts. Install railing posts before deck boards are fastened
to the joists. Predrilling of all railing components is essential to
successful installation. Do not over-tighten screws. Read instructions
completely to get an understanding of how the product goes
together and how each piece affects the other.
We recommend using a new 5/8" chrome-plated socket to protect
the fittings from raw steel. Avoid installing with rusty tools, as they
leave rust deposits on the surface of the fittings almost immedi-
ately. After installation, it is critical to clean the system completely
with a stainless cleaner and a soft clean rag in order to clear the
surface from carbon deposits.
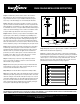
Step 1: Determine the number of railing posts needed for your
deck. Post spacing is 6' or 8' on-center. Corner applications
(fig. 1a): When taking cable railing through a corner, do not bend
the cable past 45º at any time. When turning 90º, a 2-step turn
using a double corner post configuration is required. Example:
A 12'x16' deck attached to a building with a 4' access opening
on one side, and one 90º corner, will require a total of nine
posts (fig. 1b). Or you can stop your run and start a new one.
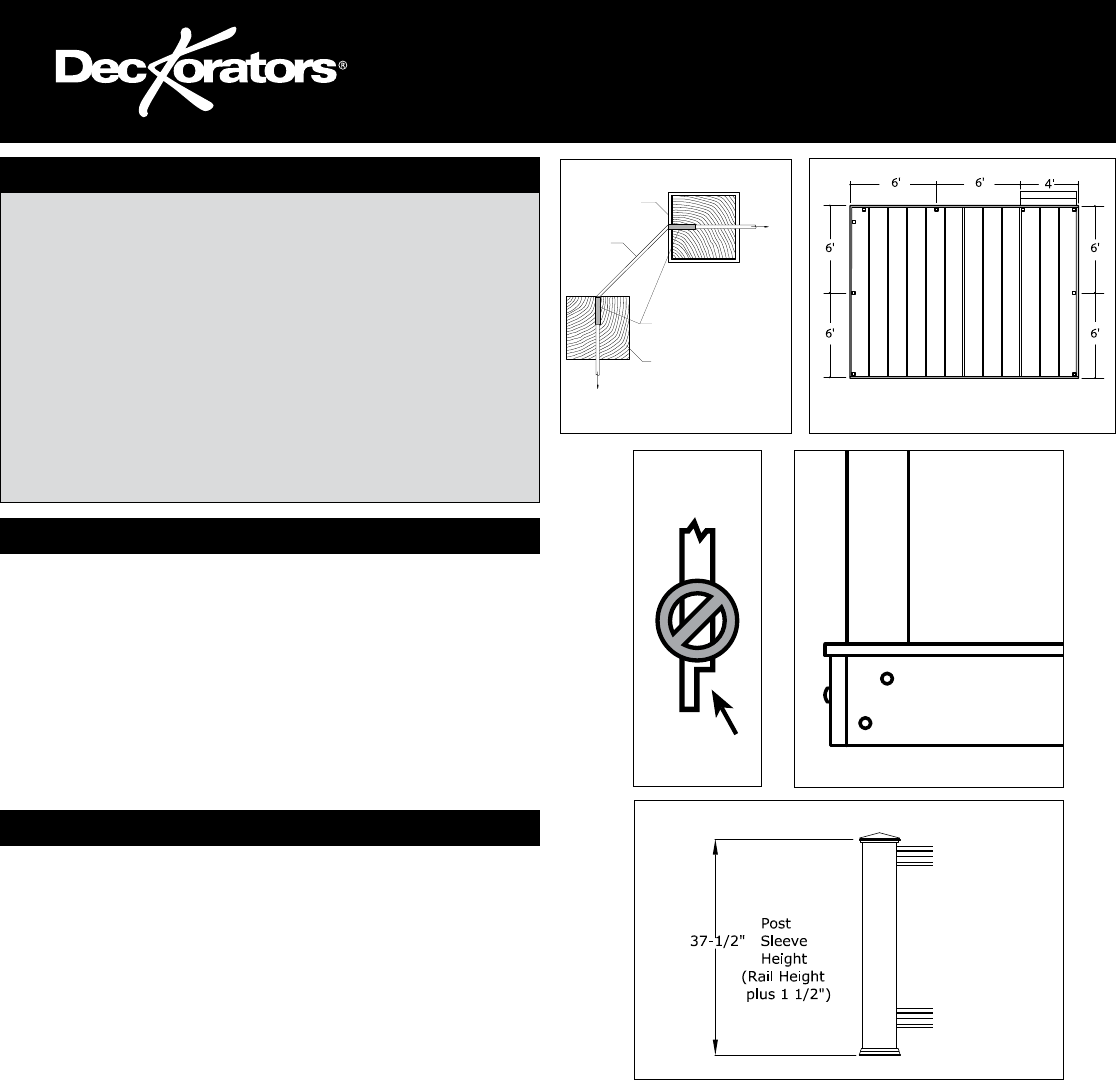
Step 2: Install rail posts prior to installing deck boards. Cedar
or pressure-treated pine 4x4 railing posts provide the structural
strength for the railing. The length of each post is determined by
the total of the joist width (7-1/4") + decking thickness (1") + rail-
ing height (36" or 42") + spacing for post cap (1-1/4") = 45-1/2" or
51-1/2". Important: Do not notch the 4x4 railing posts. Notching
will reduce the strength of the post and could result in railing
collapse or failure (fig. 2a).
Step 3: Position, plumb with a level, and clamp the rail post on
the interior face of the joist. Plumb again. The 4x4 railing post
should be bolted to the inside of the joists using two 1/2"x6"
galvanized carriage bolts. Corner posts use a third carriage bolt
inserted through the adjacent joist (fig. 2b).
fig. 1b
fig. 2a
Fig.3.eps
fig. 2b
fig. 3
To End Post
To
End
Post
Cable
CableCorner4.ai
Wood Post
Wood Post with
Composite Sleeve
Post Protector Tubes
•
•
•
•
•
fig. 1a
*Bottom rail optional