
Installation Guide


Step 8 Assemble the lower inner rail and support block assembly. A support
block is needed every 2' on-center. Check building codes for a maximum
spacing between deck surface and bottom of rail (sweep). A 3" sweep is
recommended, but can be more or less if codes allow (fig. 3). Trim support blocks
to desired height and pre-drill 1/8" holes in the proper locations. Holes must be
centered on the inner rail for support blocks to fit properly. Using the support
block connectors, fasten support blocks to the underside of the inner rail.
Step 9 Mark the height of the brackets on the inside of the post using the
bracket placement template included in the kit. Another option is to use the
inner rail as a guide. The top of the bracket should be even with the top of the
inner rail assembly. Drill two 1/8" holes through the bracket holes shown on the
template and through the post sleeve for both the upper and lower brackets.
Remove the bracket placement template from the post sleeve and fasten the
upper and lower brackets to the post using two 2" countersunk screws. Tip:
For best results, use a long drill bit or add an extension bit to the drill. Repeat
on the adjacent post. Set the inner rail in between the lower brackets and
predrill a 1/8” hole at each bracket hole and into the inner rail. Fasten the rail
to the brackets using 1" countersunk screws.
Step 10 Set the lower rail on the lower inner rail between the posts. Tip:
Set the drill to the lowest setting when installing baluster connectors and
do not overdrive the screws. Using two 2-1/2" countersunk screws, set
the two outermost baluster connectors in place. This will properly align all
pre-drilled holes. Using the 1" screws included with the rail kit, remaining
baluster connectors onto the lower rail assembly. The screws included with the
Deckorators connectors are too long for use with the CXT railing system.
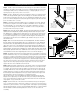
Step 11 Determine the length of the balusters. Figure 3 illustrates how a 36"
high railing might be sized. You’ll need to account for a 3” sweep + 1-7/8" for
the bottom railing + 2-1/8" inches for the top railing, a total of 7". So 36"-7"= 29"
baluster height. If these are the dimensions that you are going to use, cut the
balusters to 29" length using a cut-off or miter saw. Use 35" balusters for 42"
railings. If you want to have your railing at a different height, use figure 3 as a
planning tool to determine the height to cut the post sleeves and the balusters.
Note: If you are using 32" glass balusters, your overall railing height will be 39".
Use a fixture to ensure a consistent length (+/- 1/16"). Trim the balusters to the
required length. Install balusters on each baluster connector. Gently tap the
balusters with a rubber mallet to eliminate any gaps. Check for level end to end.
Tip: Wrap painters tape around the back side of both posts and place balusters
against the tape. The tape will balance the balusters in place until the upper rails
are installed. Remove tape when upper rail is in place.
Step 12 Important: When using Deckorators Designer Baluster Connectors
(both Estate and Classic), the upper inner rail must be inverted (fig. 5). Use
an exterior adhesive on the underside of the Designer Baluster Connectors
to prevent the balusters from spinning. Install the baluster connectors on the
underside of the top inner rail (fig. 6). Set the rail on to the balusters, gently
tapping the rail to remove any gaps. Attach the inner rail to the brackets by
pre-drilling 1/8" holes at each bracket hole and into the inner rail.
Fasten the rail to the bracket using 1" countersunk screws.
Step 13 Measure the distance between the posts and trim the upper top rail to
length and set on the assembly. Taking care not to drill all the way through the
upper rail, use a 1/8" drill bit to pre-drill four 1-1/2"-deep holes, equally spaced,
through the underside of the inner rail and into the underside of the upper rail.
Tip: Place a piece of tape 1-1/2" from the end of the drill bit. Do not drill past the
tape. Fasten cap rail in place using four 1-1/2" pan head screws.
Step 14 Apply construction adhesive to the inside edges of the post caps and
place over each post sleeve.
fig. 4
Designer
Baluster
Connector
Inverted
Inner
Rail
fig. 5
Set balusters
on lower rail section.
Place inner rail
on baluster and
use as a guide
to position the
upper brackets.
Post Cap
fig. 6