
Installation Guide


Prior to construction, check with your local regulatory agency for special
code requirements in your area. Common railing height is 36".
Read instructions completely to get an understanding of how the product goes
together and how each piece affects the other.
Step 1 Determine the number of railing posts needed for your deck. Post
spacing is 6'
or 8' on-center. Example: A 12x16 deck attached to a building with
a 4' access opening on one side will require a total of eight posts.
Step 2 Installing posts: Install posts by attaching the aluminum base to the
surface of the deck. Position the post so the fastener will go into the floor joist,
and make sure the decking is firmly attached to the joist at the location of the
posts. Proper structural blocking/framing under the decking material is required
when attaching the post to a wood frame deck because decking alone is not
approved as structural framing.
Step 3 Position the post assembly onto the location where it will attach to
the deck. Four 3/8" diameter mounting holes are provided on the base. When
the final position is determined, mark the base hole locations. Remove the
post assembly and drill 15/64" holes in the marked locations into the deck and
reinforcement.
Step 4 Reposition the post assembly over the predrilled holes and insert the
fasteners (not included). Secure the base to the deck structure. Make certain
the posts are plumb. If the post requires adjustment, add stainless steel
washers under the base plate.
Step 5 Finish by sliding a post base trim (optional) over each post for a finished
look. Note: Installing the post base trim prior to installing the bottom rail is
recommended. However, the two-piece design does allow the installer to add
the post base trim after the rail has been installed.
Step 6 For a la carte rails: Install baluster connectors using sheet metal screws
included in the a la carte kits. Install using pre-drilled holes. Do not over tighten.
For rail kits: Baluster connectors are attached to bottom and top rail,
but should be fully tightened by hand to railing before being installed.
Do not over tighten.
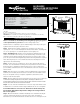
Step 7 Measure the distance between installed posts to determine the length
of the top and bottom rails (fig. 1). Lay bottom rail on deck. The distance
between the post and the first baluster should be less than 4" and equal on both
In-Line Railing Installation Instructions
ALX CLASSIC
INSTALLATION INSTRUCTIONS
Balusters sold separately in à la carte kits
Tools and Items Needed
• Drill/power screwdriver
• Miter or circular saw
with carbide tip blade
• Marked speed square
• Carpenter’s level
• Carpenter’s pencil
• Adjustable wrench
or socket wrench for
bolts, etc.
• Safety glasses/
goggles
• Rubber mallet
• Tape measure
Post
Cap
Post
Post
Base Trim
ALX Classic
Rail
In-line
Bracket
Baluster
Connectors
Baluster
ALXClassic2.ai
ALXBalluster2.ai
fig. 1
fig. 2
Contents
2 - 6’ or 8’ aluminum rails with baluster connectors installed (Connectors not included in a la
carte kits)
1 – level or stair bracket kit
16 - #8 x ¾” screws (8 - #8x3/4”and 8 - #8x1-3/4” screws for stair kits)
15 balusters (12 for stair kits, 20 for 8ft line kits), (balusters not included in a la carte kits)
30 - 1” metal sheet screws (40 for 8ft rail) in à la carte kits only