
Installation Guide

Tools and Items Needed
• Drill/power screwdriver
• Carriage bolts
• Hammer
• Miter or circular saw
with carbide tip blade
• Clear exterior
construction adhesive
• Marked speed square
• Tape measure
• Carpenter’s level
• Carpenter’s pencil
• Adjustable wrench
or socket wrench for
bolts, etc.
• Safety glasses/
goggles
• #1 and #2 square
head drill bits
• 1/8" drill bit
• Rubber mallet
For 6' or 8' On-Center Classic Style Line Railing:
One line rail kit (fig. 1a), which contains:
1 - Top rail
1 - Bottom rail
1 - Support block for 6' rail and two for 8' rail
1 - Classic line rail bracket kit, which contains:
4 - Brackets
4 - Bracket covers
Screws
13 - 32-1/2" Square Composite Balusters for 6'
1 - 40" Post sleeve plus one to end a railing section for 36" rail height.
Use 48" post sleeve for 42" rail height.
1 - Post cap for each post sleeve (sold separately)
1 - Post base trim for each post sleeve (included with post sleeve)
Post sleeve, post cap and trim are not included in rail kit.
One stair rail kit (fig. 1a), which contains:
1 - Top rail
1 - Bottom rail
1 - Support block
1 - Classic stair rail bracket kit, which contains:
4 - Brackets
4 - Bracket covers
Screws
11 - 32-1/2” Square Composite Balusters for 6'
1 - 48" Post sleeve plus one to end a railing section
1 - Post cap for each post sleeve (sold separately)
1 - Post base trim for each post sleeve (included with post sleeve)
Post sleeve, post cap and trim are not included in rail kit.
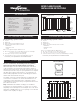
Classic Style Railing
BottomRail.pdf
Top
Bottom
fig. 1b
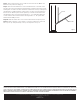
For 6' On-Center Classic Style Stair Railing:
Prior to construction, check with your local regulatory
agency for special code requirements in your area.
Structural support should come from either the continuation
of deck support posts that extend up through the deck floor,
railing posts that are bolted to the inside of the rim/outer joists or
structural post mounts. The post spacing will be less for angled
rail applications. Always measure prior to securing the posts
when installing angled rail sections. Install railing posts before
deck boards are fastened to the joists.
The railing comes pre-routed for balusters. Pre-drilling all other
screw holes is essential for successful rail installation. Do not
over-tighten screws. Read instructions completely to get an
understanding of how the product goes together and how each
piece affects the others.
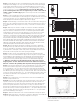
Step 1 Determine the number of railing posts needed for
your deck. Post spacing is either 6' on-center or 8' on-center
depending on the rail length chosen. Example: A 12' x 16' deck
attached to a building with a 4' access opening on one side will
require a total of eight posts (fig. 2).
Line Railing Installation Instructions
fig. 2
MPVC CLASSIC RAILING
INSTALLATION INSTRUCTIONS
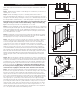
LevelRailAsm.pdf
Top Rail Bracket
and Bracket Cover
Bottom Rail Bracket
and Bracket Cover
Top Rail
Post Cap
Post
Sleeve
Post
Base
Trim
Support
Block
Bottom
Rail
Baluster
•
•
•
•
•
•
•
•
•
fig. 1a