
Installation Guide

Prior to construction:
• If installing low-voltage lighting, wiring must be installed before securing posts
to deck surface.
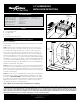
Step 1 Install posts by attaching the aluminum base to the surface of the
deck. Position the post so the fastener will go into the floor joist, and make
sure the decking is firmly attached to the joist at the location of the posts.
If necessary, use wood blocking securely attached to the joist structure as
reinforcement underneath the decking where the posts are located (fig. 1a).
Fasteners that hold the post base to the surface should be able to secure to
joist or reinforcement braces, not just the decking itself. Note: When installing
aluminum post on top of a wood surface, screws must be lagged into at least
3" of solid wood (not including the decking). 5/4" or 1 ½" deck boards do not
provide sufficient material for a safe installation. If necessary, add additional
material to the underside of the surface.
Step 2 Position the post assembly onto the location where it will be attached
to the deck. Four 11/32" diameter mounting holes are provided on the base.
When the final position is determined, mark the base hole locations. Remove
the post assembly and drill 15/64" holes in the marked locations into the deck
and reinforcement (fig. 1b).
Step 3 Reposition the post assembly with the leveling plate inserted between
the deck and the post base, and aligned with the predrilled holes. Insert the
post fasteners (NOT INCLUDED), and partially tighten. Using a level, adjust
the leveling set screws with a 3/16" allen wrench until the post is plumb. Fully
tighten the post fasteners to secure the base to the deck structure. Note:
Recommended 5/16" x 4" or longer lag screws.
STOP – Make sure post base trim is installed before continuing.
Classic Post Installation Instructions
2.5" ALUMINUM POST
INSTALLATION INSTRUCTIONS
Tools and Items Needed
• Drill/power screwdriver
• Miter or circular saw
with carbide tip blade
• Marked speed square
• Carpenter’s level
• Carpenter’s pencil
• Adjustable wrench
or socket wrench for
bolts, etc.
• Safety glasses/
goggles
• Rubber mallet
• Tape measure
• 3/16" allen wrench
Contents
1 – 2.5-in Aluminum Post
1 – Post Base Trim
1 – Post Cap
1 – Leveling Plate and Set ScrewsLeveling Plate and Set Screws
THE DIAGRAMS AND INSTRUCTIONS IN THIS BROCHURE ARE FOR ILLUSTRATION PURPOSES ONLY AND ARE NOT MEANT TO REPLACE A LICENSED PROFESSIONAL. ANY CONSTRUCTION OR USE
OF THE PRODUCT MUST BE IN ACCORDANCE WITH ALL LOCAL ZONING AND/OR BUILDING CODES. THE CONSUMER ASSUMES ALL RISKS AND LIABILITY ASSOCIATED WITH THE CONSTRUCTION
OR USE OF THIS PRODUCT. THE CONSUMER OR CONTRACTOR SHOULD TAKE ALL NECESSARY STEPS TO ENSURE THE SAFETY OF EVERYONE INVOLVED IN THE PROJECT, INCLUDING, BUT NOT
LIMITED TO, WEARING THE APPROPRIATE SAFETY EQUIPMENT. EXCEPT AS CONTAINED IN THE WRITTEN LIMITED WARRANTY, THE WARRANTOR DOES NOT PROVIDE ANY OTHER WARRANTY,
EITHER EXPRESS OR IMPLIED, AND SHALL NOT BE LIABLE FOR ANY DAMAGES, INCLUDING CONSEQUENTIAL DAMAGES.
©2019 Universal Forest Products. Deckorators is a registered trademark of Deckorators, Inc. in the U.S. All rights reserved.
1801 E. Lessard St. Prairie du Chein, WI 53821
10943 12/19
www.deckorators.com
Additional
Wood Blocking
•
Post Cap
•
•
2.5-in
Post
•
Post
Base
Trim
Leveling
Plate
•
•
Post
Base
Set
Screws
•
fig. 1b
fig. 1a