
User Manual


Prior to construction, check with your local regulatory agency for special code
requirements in your area. Common railing height is 36" or 42". Structural support
should come from either the continuation of deck support posts that extend up through
the deck floor or railing posts that are bolted to the inside of the rim or outer joists.
Never span more than 6' on-center between railing posts. Install railing posts before
deck boards are fastened to the joists. Pre-drilling of all railing components is essential
to successful installation. Work area should be kept clean of debris, including metal
shavings that can cause scratching. Do not over-tighten screws. Read instructions
completely to get an understanding of how the product goes together and how each
piece affects the other.
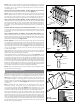
Step 1 Determine the number of railing posts needed for your deck. Post spacing is 6'
on-center. Example: A 12x16 deck attached to a building with a 4' access opening on
one side will require a total of eight posts (Figure 2).
Step 2 Install rail posts prior to installing deck boards. Cedar or pressure-treated pine
4x4 railing posts provide the structural strength for the railing. The length of each
structural post is determined by the total of the joist width (7-1/4") + decking thickness
(1") + railing height (36" or 42")=44-1/4" or 50-1/4".
Important: Do not notch the 4x4 railing posts (Figure 3a). Notching will reduce the
strength of the post and could result in railing collapse or failure.
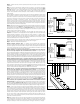
Step 3 Position, plumb with a level, and clamp the rail post on the interior face of the
joist. Plumb again. The 4x4 railing post should be bolted to the inside of the joists using
two 1/2"x6" galvanized carriage bolts. Corner posts use a third carriage bolt inserted
through the adjacent joist (Figure 3b).
6' Railing Installation
Instructions
For each 6' on-center
railing section, you will need:
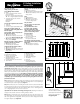
One 6' Railing kit that contains:
• 2 rails
• 1 in-line hardware kit that contains:
4 in-line brackets
8 – #6 x 2" long #2 square head screws
12 – #4 x 1" long #2 square head screws
• 1 support block kit that contains:
1 support block
2 connectors
2 screws
One cap rail kit (optional) that contains:
• 1 cap rail
• 1 insert rail
• 7 – #4 x 1" long #2 square head screws
22.5˚ and 45˚ adaptor wedges are
available for angled railing applications.
Baluster Options
Classic, Estate, Twist or Ellipse baluster
kits that each contain:
• 10 aluminum balusters
• 15 balusters needed per 6' on-center
railing section (Classic, Estate and Twist)
• 18 balusters needed per 6' on-center
railing section (Ellipse)
Baluster connector or designer baluster
connector kits that each contain:
• 20 baluster connectors
• 1 kit needed per 10 balusters
Traditional baluster kit that contains:
• 10 aluminum balusters
• 40 color-matched, stainless steel screws
• 15 balusters needed per 6' on-center
railing section
Baroque or Arc baluster kits that each
contain:
• 5 aluminum balusters
• 20 color-matched, stainless steel screws
• 15 balusters needed per 6’ on-center
railing section
Glass
• 5 glass balusters
• 20 stainless steel screws
• 9 balusters required per 6'
on-center railing section
One post sleeve
One post cap for each post sleeve
(sold separately)
One post base trim for each
post sleeve (sold separately)
Stair rail bracket kits for stair
railing sections. Two kits required
per 6' on-center railing section.
Each kit contains:
• 2 stair brackets
• 4 – #6 x 2" long
#2 square head screws
• 8 – #4 x 1" long
#2 square head screws
Stair baluster connectors kits that
each contain (Classic, Estate, Twist and
Ellipse only):
• 20 stair baluster connectors
• 1 kit needed per 10 balusters
Items you will need
• Drill/power screwdriver
• Miter or circular saw with
carbide-tipped blade
• Adjustable wrench or socket
wrench for bolts, etc.
• Assorted fasteners (see instructions)
• Tape measure
• Hammer
• Marked speed square
• Carpenter’s level
• Carpenter’s pencil
• Safety glasses/goggles
• Two clamps
• Hack saw
• Exterior-grade metal
construction adhesive
Cap Rail
Insert Rail
Support
Block
In-Line
Bracket (4)
Figure 1
Figure 2
Figure 3a
Fig.3.eps
Figure 3b
In-Line Railing Installation Instructions
Scan code to get more
information about installing
Deckorators Alumimum Railing.
Get the free mobile app at
http://gett ag.mobi