
Installation Guide
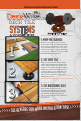

1. Prep the surface
3. Set Additional Tiles
2. Set first tile
Patented; D665,657
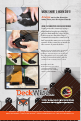
Shadowline black, hardwood brown, & composite grey
> > > > >
See rev
erse for more installation tips! > > > > >
See more online at www.deckwise.com/deck-tile-connector-system.html
INSTALLATION INSTRUCTIONS
Available in 3 colors
3
2
1
Make sure the surface being covered is
relatively at and free of anything that may
get in the way of installation such as sticks,
rocks or furniture. Then choose one corner
of the area to begin working in. Optionally,
you may snap a chalk line to have a straight
line to follow during installation.
Many wood-backed deck tiles are milled
with four pre-drilled holes located in each
corner. The Deck Tile Connector ts each
of these holes with four specially designed
ribbed pins (aka Pine tree fasteners). For a
secure t, simply set one of the tiles onto
the preinstalled fasteners. If your corner
holes are not pre-drilled, see our corner
drilling instructions at
www.deckwise.com/deck-tile-connector-system.html
Once the rst tile is laid, you can
proceed placing the other tiles onto the
remaining pins. The Deck Tile Connector
automatically sets the gap spacing to
3/8" so you won’t have to worry about an
uneven look.
DECK TILE
& CONNECTORS
SYSTEMS