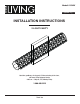
Model# 150WV Español Pg. 5 INSTALLATION INSTRUCTIONS 2-LIGHT VANITY Questions, problems, missing parts? Before returning to the store, call Decor Living Customer Service 9:00 a.m. - 5:00 p.m.
Safety Information WARNING: Turn off the electricity at the main fuse box (or circuit breaker box) before beginning installation by switching the circuit breaker off or removing the fuse. WARNING: If cord is damaged, socket must be replaced by qualified electrician or trained personnel. WARNING: Min 90°C supply conductors. CAUTION: Consult a qualified electrician to ensure correct branch circuit conductor.
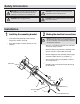
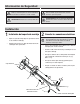
Installation (continued) 3 Installing the backplate □ Align the backplate holes (E) to the mounting screws (D) on the mounting bracket (A). □ Secure the backplate (E) by screwing the decorative mounting nuts (G) to the mounting screws (D). 4 Installing the bulbs and the shade □ Install the light bulbs and twist on the bulb covers (J). Only use a bulb of the specified type and maximum rated wattage or less. • This fixture uses 40 Watt (max.) G9 bulbs.
Care and Cleaning □ To clean the fixture, wipe with a soft, dry cloth. Do not use any cleaners with chemicals, solvents, or harsh abrasives. Troubleshooting Problem Possible Cause Corrective Action The bulb will not light. The bulb is burned out. Replace light bulb. The power is off. Check if power supply is on. Faulty wire connection Check wiring. Faulty wall on/off switch Test or replace wall on/off switch. Exposed wire Discontinue use.
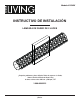
Modelo# 150WV INSTRUCTIVO DE INSTALACIÓN LÁMPARA DE PARED DE 2 LUCES ¿Preguntas, problemas o piezas faltantes? Antes de regresar a la tienda, llame al Servicio al Cliente de Decor Living de lunes a viernes entre 9:00 a.m. y 5:00 p.m.
Información de Seguridad ADVERTENCIA: Apaga la electricidad en la caja de fusibles (o cortacircuitos) antes de comenzar la Instalación desconectando el cortacircuitos o sacando el fusible. ADVERTENCIA: Si el cordón toma corriente es dañado debe ser sustituido por personal del centro de servicio autorizado o personal capacitado. ADVERTENCIA: Conductores de corriente, mínimo 90º C. PRECAUCIÓN: Consulta a un electricista calificado para garantizar una conexión correcta del conductor del circuito derivado.
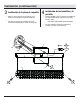
Instalación (continuación) 3 4 Instalación de la placa de respaldo □ Alinee los orificios de la placa de respaldo (E) con los tornillos de montaje (D) en el soporte de montaje (A). □ Fije la placa de respaldo (E) atornillando las tuercas decorativas de montaje (G) a los tornillos de montaje (D). Instalación de las bombillas y la pantalla □ Instale las bombillas y enrosque la tapas de la bombilla (J). Sólo utilice bombilla del tipo especificado y del voltaje indicado o menor.
Mantenimiento y Limpieza □ Para limpiar la lámpara, usa un paño suave y seco. No uses limpiadores con químicos, solventes, o productos abrasivos. Solución de Problemas Problema Causa Posible Acciones Correctivas La bombilla no se enciende. La bombilla está quemada. Reemplace la bombilla. Compruebe si la corriente está activada No hay alimentación. La conexión de los cables es incorrecta. Revise el cableado. El fusible se funde o el cortacircuitos salta cuando se enciende la luz.