
DS2 Setup Guide

Dedicated Micros ©2007
23
DS2
Each device must have a unique address and the last device on the chain must be terminated.
Check with the device documentation for details of addressing and termination and maximum cable
length.
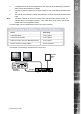
Connecting to an Ethernet network
The unit includes an enhanced video server allowing remote connectivity across an Ethernet
network. Multiple users can connect simultaneously to the unit to view and control live or recorded
video, download recorded images or review database details.
The unit can be connected to a standard 10/100-baseT Ethernet network and using the viewing
application offers full control of the unit from a remote location.
Network connection
Refer to the Network Options in the Conguration section for full details on how to congure the unit
IP address.
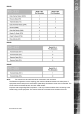
To connect the unit to a network you will need the following items:
• One RJ-45 network cable (CAT5 or equivalent).
• A static or DHCP IP address and Subnet mask (if accessed from beyond the LAN, a Default
gateway IP address will also be needed. Consult the network administrator for advice).
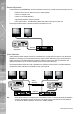
Connecting Audio Devices
The unit supports the option to record high quality audio alongside the recorded video images from
cameras 1 & 2. The audio can then be played back in conjunction with the video locally on the
monitor output or via the network connection using the viewing software.
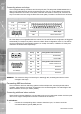
There are two audio channels (Audio 1 and Audio 2) both with Audio IN and Audio OUT connections.
Note:
The audio is linked to video inputs. Audio channel 1 records camera one, audio channel 2
records channel 2.
Connecting a pre-amplier to AUDIO IN
A microphone pre-amplier will provide a line level 1V pk-pk signal that can be connected to the
RCA socket labelled Audio IN on the unit.
The line level input has the following specication:
Audio IN 47 KΩs input impedance, 1V pk-pk.
Connecting the AUDIO OUT to an amplier
Connect the RCA socket labelled Audio OUT to an external amplier or powered loudspeakers (Live
Challenge).
The line level output has the following specication.
Audio OUT 1V pk-pk
Recording audio
Both the Audio in 1 and Audio Out 1 can be enabled for recording.
Once the microphone or pre-amplier is connected to the unit, enable the option to record audio in
the System Options menu.
It is advised that you test the quality of audio playback as it may be necessary to increase the gain
of the microphone.