
DS2 Setup Guide


Dedicated Micros ©2007
71
DS2
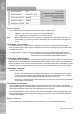
Image Protection
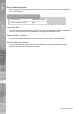
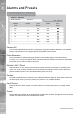
From:
To:
Protect images
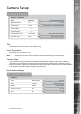
Protect images
Unprotect images
List
Press 1, 2 to page up down
01/11/2005 12:16:00
24/11/2005 12:20:00
01 Days Confirm
Confirm
Confirm
05/11/05 14:39:28 - 05/11/05 16:50:33
05/11/05 09:48:01 - 05/11/05 10:24:15
25/11/05 17:14:54 - 02/11/05 17:51:04
_ _ _ _ _ _ _ _ _ _ _ _ _ _ _ _ _ _ _ _ _ _ _ _
From
Enter the date and start time for the period containing the recorded images.
To
Enter the date and end time for the period to be protected.
Protect Images
Select how long, in days, the images will be protected. Press the button to conrm the settings.
You will be prompted to conrm the settings, highlight ‘Conrm’ and press the Menu or Mode key.
The images within the time period will be displayed within the list section.
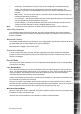
Protect Images
This allows the settings to be conrmed, press the button to conrm, you will be presented with
a prompt to conrm the settings, highlight ‘Conrm’ and press the Menu or Mode key. The images
within the time period will be displayed within the list section.
Note:
It may take some time to add protected images to the list.
Unprotect Images
It is possible to manually un-protect images that have either been automatically protected or
manually protected. Once the time and date information has been entered highlight the ‘Unprotect
Images’ option and press . You will be presented with a prompt. Highlight ‘Conrm’ and press the
Menu or Mode key. The entries within the list section will be removed.
Note:
It may take some time to remove protected images from the list
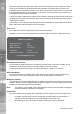
List
This shows all images that are protected. It is possible to highlight one of the entries in the list so
that this can be copied to the Archive List. Using the keys, highlight the relevant entry and
press the COPY button. The le will be saved to the Archive List.
Automatic Archiving
Automatic archiving allows alarms and VMD events to be automatically copied to a remote FTP
server or to a local CD/DVD writer.