NetVu ObserVer User Guide
NetVu ObserVer Contents Introduction ............................................................................................. 3 Installing NetVu Observer Software ........................................................ 5 Configuring NetVu Observer Software ................................................... 6 NetVu ObserVer Controls ..................................................................... 14 Alarm Receiving Functionality ..............................................................
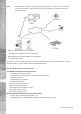
The NetVu Connected range of products consists of image servers, display servers and software applications. There are a number of Dedicated Micros user interfaces available, which have been specifically designed to ensure the NetVu Connected products can fit any network video application. The following describes the functionality of NetVu Observer software which is available with any of the video products in the NetVu Connected DV-IP range; DV-IP, DV-IP Server, DV-IP ATM, TransVu, Eco, DS2A, DS2P, BX2.
NetVu ObserVer Note: The functionality available to the Operator will vary depending on which of the above (NetVu Connected or existing) is being controlled, refer to the Operational Controls section of this manual for details. • NetVu Connected Video Servers and DVR’s New DS2, DV-IP ATM, DV-IP Server, TransVu, etc.
NetVu Observer software is supplied on CD with the NetVu Connected device or alternatively can be downloaded from Dedicated Micros website. The installation process described here works with either of these options Note: It is necessary to install the appropriate JRE file for the PC operating system the software is to be installed on.
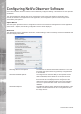
NetVu ObserVer Configuring NetVu Observer Software Each install of NetVu Observer software can be individually configured offering ‘customisation’ for each Operator workstation. This section details the settings that can be configured for each install of the ObserVer application which include; the behaviour and appearance of the application, and configuration options for each image server accessible by the Operator.
Play with Frame Drop? Embedded Data Settings Set ARC options Choose Video Log Server Enter IP address of EDP Enter Port Number of EDP Set Action on Remote Alarm Network Timeout Dedicated Micros ©2006 NetVu Connected devices support live and recorded audio. With the ObserVer application it is possible to connect to an image server and establish an audio connection in Live or Playback mode.
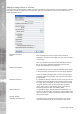
NetVu ObserVer It is possible to change the appearance of the installation of NetVu Observer application, this screen gives access to the options available to change the appearance of the install.
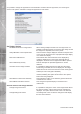
NetVu Observer provides a site tree to allow folders, image servers and cameras to be easily selected. The site tree will display all image servers that the Operator can access, this information will be provided either by using an existing sitetree created with previous versions of NetVu ObserVer or by manually adding (and configuring) image servers to the tree. As detailed an existing sitetree can be accessed via the ‘Choose Root Folder’ option in Tools -> Options -> Behaviour menu.
NetVu ObserVer Adding an Image Server to a Folder An image server can be added to a folder to allow the Operator to easily select the unit and cameras for viewing and control. To add an image server to the site tree, right click on the folder to hold the new connection and select ‘Add Image Server’. Required Information Name IP Address or Domain Name Enter a suitable name of the image server that will be displayed in the site tree (for display only, this does not effect connectivity).
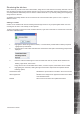
A password can be configured on the image server to ensure only authorised users can establish an FTP connection with the unit, which enables remote archiving of video data only, using the raw archive facility. The username and password can be saved here. Display Settings Show Disconnected Cameras in Tree Note: When making a connection to the image server it is possible to display the enabled cameras only or all cameras on the server. Enabling this option will show all camera inputs.
NetVu ObserVer Initial Connection Settings Start on Camera Use Layout Live and Playback Resolution Request Image format Request Appendices It is possible to select parameters that will be applied when making an initial connection to the image server. This identifies the first display camera, i.e. if a single display is selected this is the camera that will be viewed.
This option is within the Tools menu and allows the Operator to access Web Configuration pages of the image server that is currently selected. When selected a web browser (Explorer, Netscape, etc) will automatically be launched and you will presented with the main menu of the web pages for the unit. View Menu The View menu is used to show or hide sections of the controls.
NetVu ObserVer NetVu ObserVer Controls NetVu ObserVer is the Operator interface which provides access and control of the functionality supported on NetVu Connected devices and existing Eco, DS2 and BX2 DVR’s. The software allows connection to be made to a single or multiple devices offering central monitoring capabilities of one or a number of remote locations.
Select the Browse option alongside the Choose Root Folder and locate the database file 3. Select open, this will add all the database image servers to the site tree. 4. Open the folder that contains the image server to be viewed. Double click the mouse on the image server, this will display the first enabled camera.
NetVu ObserVer Using the Interactive Map Feature The Interactive map software is included within the NetVu Observer installation. The editor, which enables the creation of the maps for this feature, ia available free as a download from the Dedicated Micros website. It comes preloaded with demo images featuring DM offices worldwide. Maps are created for each site using the map editor software.
NetVu ObserVer Double click on one of the cameras to display it in the selected segment in the ObserVer software. Alternatively, the camera icon can be dragged and dropped into a segment to display it. Navigate back to the top level of the map by right clicking on the map. In Multisite mode, it is possible to select another of the sites from the top level. Cameras from one image server can be displayed alongside images from different servers.
NetVu ObserVer Note: If the image server has been configured to identify camera failure, a ‘Camera Fail’ Image will be displayed on the relevant input (displayed as a colour chart with vertical bars) if the camera input is not available or faulty.. Duplicating an Image When a camera is displayed in a multiscreen display it is also possible to create a ‘duplicate’ of that camera.
Note: The selected viewing resolution (high, medium, low) applies to all cameras being viewed. Note: Image servers are able to re-compress recorded images during the playback process; this will reduce the size of the video image when using a slow remote link. High resolution is the optimum video image that will have a set resolution and files size associated – Live and Playback mode. Medium is a lower quality video stream that is sending less information with a reduced file size – Live and Playback mode.
NetVu ObserVer Save/Load a Display Preset NetVu Observer supports the ability to save a Display Preset. The application remembers the image servers being controlled, the cameras inputs being viewed and the position the images are displayed when a display preset is saved. Note: This does not apply to any Temporary image servers that are selected for view, it will only recall the Stored image servers and corresponding cameras.
These controls are only displayed when a camera that has been configured (on the image server) for telemetry control. The image servers support a number of PTZ manufacturer protocols ensuring the system can be easily integrated into any application. It is possible to select and control any PTZ / Dome camera connected to an image server from within NetVu Observer. It is also possible to send ‘star commands’ directly via this console using the numeric keypad.
NetVu ObserVer Iris control – open iris to let more light into the image, close iris to reduce the amount of light. This will override any autoiris function on the camera. Auxiliary control – wash the glass on the camera housing, wipe any water from the glass on the camera housing, switch lamps on and off, etc. The fourth auxilliary can also be used for other functions such as gate control. Patrol Mode – A patrol mode can be stored within the PTZ/dome camera.
Filename - used to name the recorded file Filename using local time - used to automatically name the file using the time on the local PC Filename using UTC time - used to automatically name the file using the time zone specified as local on the unit Therefore if the unit is in a different time zone to the PC, the operator can select which time data to use.
NetVu ObserVer Right clicking on a paused image will enable additional functionality. Save This will allow a jpg in a user specified location. Save as Reference This allows a camera reference image to be saved for future comparison. This can then be used for visual comparison to check camera positioning, or when visibility is poor (fog, night) to identify features. The camera reference image is recalled by right clicking on the camera in the site tree and selecting ‘View Reference Image’.
NetVu ObserVer Note: The event list button is a latched button, when selected the event database for the server will be displayed, selecting again will switch the application back to view mode and remove the Event tab. Selecting Refresh will refresh the event list. Previous Event Next Event If an event has associated video recordings, highlighting and double clicking that event will automatically display the recorded images.
NetVu ObserVer Refresh the Event List. Get Previous 10, 50 or 100 Events. Get Next 10, 50 or 100 Events. Filter events by date, camera or alarm type. Filter Events It is possible to filter the event list by; text (if enabled), date, camera and alarm type using the Filter button in the right hand window. Filter Text by typing the phrase or word required in the search box at the top. This will search for occurances of the text in the recorded video.
When filter by date is selected it is possible to identify the start and end date including the start time. Activity The unit provides the option to search the stored images for activity within defined areas, even if VMD was not enabled on the unit. Select the activity button on the Event screen to open the Activity filter.
NetVu ObserVer Download Images It is possible to download all associated recorded images from the hard drive of the image server to the local PC (or a networked PC) from a specified time and date. These files can then be played back using NetVu Observer software, refer to Additional Features, Replay Server section for details on how this feature operates.
NetVu Observer supports the ability to receive alarm notification from NetVu Connected devices. These alarms can then be managed by the Operator for verification and acknowledgement. NetVu ObserVer also supports the ability to distribute any number of alarms to multiple operators on any PC, within the same subnet, running NetVu Observer software. The NetVu Observer installation for central monitoring stations comprises the NetVu ObserVer viewer and the Event Distribution Point software.
NetVu ObserVer Event Distribution Point Software NetVu Observer supports the ability to receive alarm notification from NetVu Connected devices. These alarms can then be managed by the Operator for verification and acknowledgement. NetVu ObserVer also supports the ability to distribute any number of alarms to multiple operators on any PC, within the same subnet, running NetVu Observer software.
Each operator that will receive alarms via this system needs to be registered as a user on the EDP application. NetVu ObserVer Configuring the EDP Software 1. Launch the EDP software. There are four information panes available, labelled Users, Status, Log and Info.
NetVu ObserVer To create a new user; 1. Click on the ‘New User’ button. A dialog box will open. 2. Add information to all the required fields and click the ‘Add User’ button, or click ‘Cancel’ to abandon the operation. To edit a users details; 1. Highlight the user account to be edited and click on the ‘Edit User’ button. A dialog box will open. 2. Change the information and click the ‘Edit User’ button, or click ‘Cancel’ to abandon the operation. To change a Password; 1.
Enter the original password in the correct box. Enter the new password, and repeat it in the second field. Click on ‘Change Password’ to confirm the change, or ‘Cancel’ to abandon the operation. To delete a user; 1. Highlight the user account and click the ‘Delete User’ button. The account will be immediately deleted. Ensure you select the correct account to delete as there is no confirmation stage.
NetVu ObserVer Receiving Alarms Once the system is configured for receiving alarms, ensure both the NetVu ObserVer software and the Event Distribution Point software are running. When an alarm is triggered, the Primary host will receive the alarm.
NetVu ObserVer Additional Alarm Information It is possible to obtain more detailed information on any of the events within the Event List. Move the mouse over the event until an event window pops up which contains more detailed information.
NetVu ObserVer Additional Functionality Replay Server NetVu Observer can be used as a replay server to allow recorded images that have been downloaded from a NetVu Connected (not supported on non NetVu Connected DVR’s) image server, it also allows removable hard drives from TransVu products to be interrogated. Select File -> Open Video, you will be presented with a number of options to gain access to the downloaded video.
The cameras that have associated video will be displayed in the site tree allowing each to be individually selected for review. The replay server can also display a multiscreen of all recorded cameras. NetVu ObserVer Press the Done button, the imported images will automatically displayed in the application. The VCR controls perform in the same way as they do in Playback mode.
NetVu ObserVer Open Disk Images If images are being reviewed from a removable hard drive within a USB playback station (TransVu), this option will allow all images stored on the removable drive to be selected. Note: Ensure the USB device is connected to the PC before opening NetVu Observer application to ensure the device can be recognised. Locate the new drive and press OK.
NetVu ObserVer Note: The number of pictures per second for the selected camera is also displayed in the bottom left of the embedded data panel. Activity log This window contains information commands sent to the video server as the viewer controls the device. Note: It is possible to configure the activity log to show different levels of messages, if you experience difficulties using the program Technical Support may ask you to select debug mode for all messages to be visible.
NetVu ObserVer Relays NetVu Connected devices support on-board relays with the option to add more relays via the 485-bus. These relays can be controlled locally or remotely using NetVu Observer software. To control any associated relays, highlight the image server in the site tree and select ‘Relay’ option from the View menu. The Relay panel will be displayed. Select the relay to be switched by placing a tick alongside the relay, then click OK to activate.
Display Options There are a number of screen displays supported within the viewer, any of these can be selected from the drop down list The following shows the screen displays along with the default camera positions when the associated display option is selected.
NetVu ObserVer 42 Appendix B Selection of User Star Commands Command *1xx (where xx is the range) Range 01 - 02 Function Select Monitor 1 or 2 BBV Telemetry Equivalencies NOT IMPLEMENTABLE Pelco Equivalencies NOT IMPLEMENTABLE Command *2xx (where xx is the range) Range 01 - 16 Function Select Camera 1 to 16 BBV Telemetry Equivalencies Select Camera to apply telemetry information Pelco Equivalencies Select Camera to apply telemetry information Command *4nx (where n is the function, x enables or disables) Ra
Activity .................................................................................................................................................................................27 Activity log ............................................................................................................................................................................39 Activity Log, Embedded Data and Relays ................................................................................................
Dedicated Micros Ltd. 11 Oak Street, Swinton, Manchester.