..... ·~ 14t Instructions For Use a*~£--y.:::.. :2. 7 fv Gebrauchsanweisung [v2.o] ~ usa@deerc.com (USA) eu@deerc.com (EU) jp@deerc.
English 01-29 B*~ 30-54 Deutsch 55-81 ~---------------------------------------· ~-------------------------------------- -· ·---------------------------------------·
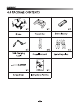
Contents 1.0 Disdaimer&Warning ................................................................................. 01 2.0 Safety Guidelines........................................................................................ 01 3.0 Maintenance ·······-···-·············-···-·············-···-·············-···-······················ 05 4.0 Package Contents...................................................................................... 06 5.0 Drone's Details ................................, ...
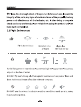
1.0 DISCLAIMER &WARNING 1. Please read this Disclaimer & Warning and Safety Guidelines carefully before using our product. This product Is not recommended for people under the age of 14. By using this product. you hereby agree to this disclaimer and signify that you have read it fully. You agree that you are responsible for your own conduct and any damaged caused while using this product. and its consequences.
@ Please do a thorough check of the product before each use. Inspect the Integrity of the parts, any signs of cracks and wear of the propeller, battery power and effectiveness of the indicator, etc. If after doing a complete check any issues are found, please refrain from using the product until the issue has been resolved. 2.2 Flight Environment •• ...
2.3 Operations Requirements (!) Do not follow moving vehicles. @During the flight, only turn off the motor in case of an emergency. @ Please flight the drone back to you as soon as possible when the battery Is running low. @ This product should not be used while drinking alcohol, if you are feeling fatigued, taking medicine, or feeling any physical discomfort. @Beware of the noise volume the drone produces. Keep your distance to avoid ear damage.
® If the device is not going to be used for an extended period of time, remove batteries to prevent potential damage from battery leakage. ® It is recommended to only use the USB charging cable that comes with the drone to charge the battery. ®Don't connect the battery directly to wall outlets or car cigarette -lighter sockets. ®> Don't attempt to disassemble or modify the battery in any way.
3.0 MAINTENANCE 1. Clean the product after each use with a clean, soft cloth. 2. Avoid prolonged exposure to direct sunlight and avoid buildup of heat on the drone. 3. This device is not waterproof and must not be submerged in water under any circumstance. Failure to maintain the device completely dry will result in the failure of the unit 4. Check the charging plug and other accessories for signs of damage frequently.
4.
5.
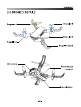
6.0 TRANSMITTER DETAILS Power Switch ----+~===~===rhbJr=~===IW----Trimmer [long press) Power Indicator One Key take off/Landing & Emergency stop ~·---Speed Switch [Longpress) _ -1 • [1. 360" Flip & Headless Mode Take Photo & '--------.:.
~....-,c 7.0 JOYSTICK MODE ~ 7.1 MODE 2 (Default Setting) ~ ~ A Aland Dawn Ll!ft~ Des
8.0 CHARGING THE BATTERY ~ USB Adopter ·······... ~ ······:~ ~ . ~ ~ - . .· . w . Com put« USB Port 1) When the drone battery runs low, the indicator lights on the drone will blink continuously. About one minute the drone will automatically land on low battery power. 2) Remove the battery and connect the USB charging cable to the battery charging interface. 3) Plug the USB charging cable into a USB charging port on the computer, power bank or USB adapter (SV I 0.5 to 2.0A ).
9.0 INSTALLATION .... 9.1 Propeller Pic 1 CD Pic2 Install the propeller on the motor shaft according to the •A I s· corresponding position. (Pic1) ® Use a screwdriver to twist and tighten the screw by pressing the clockwise direction. (Pic2) .... 9.2 Propeller Guard )) As shown in the picture, install the propeller guard to the motor base.
~ 9.3 Drone's Battery Pic3 Pic4 Installation: Push the battery correctly into the drone battery compartment. Make sure the battery Is rn place to ensure that the battery Is jammed in the battery compartment. (Pic3) Removal: Press the lock on the bottom of the battery and pull it back to remove the battery from the fuselage. (Pic4) ~ 9.4 Camera Angle Adjustment By rotating the drone's camera manually, the shooting angle of camera will be adjusted.
.... 9.5 Transmitter's Battery 3x1.5VM. !Nollndudedl As shown above, insert the battery into the transmitter. Please pay attention to the positive and negative polarity of the battery to ensure the correct Installation of the battery. When the transmitter battery runs low, the power indicator of the transmitter will blink continuously• .... 9.6 Install the Phone Holder As shown above, open the Phone Holder and put the phone. Then you can use the FPV real-time transmission function.
10.0 OPERATION GUIDE ~ 10.1 Download APP iOS Android APP on Google play Scan the QR code, connect to the App Store"' or Google'M Play and download the " DE FPV" application for free. Required Operating Systems: iOS 9.0 or later I Android S.l or later ~ 10.2 Connect Wi-Fi Networks Connect your smart phone to the Wi-Fi of the Drone and check the drone's status on the " DE FPV" App. CD Your smart phone will launch a search of the available Wi-Fi networks; @ Select the Wi-Fi network: DeercFPV-******.
All of the following operations on this manual takes MODE 2 for example. ~ 10.3 Pairing
~ 10.4 Calibrating the Gyro Push both joysticks down to the bottom right to calibrate the gyro. The indicator lights on the drone will blink quickly and turn solid, indicating calibration is completed. Tips: To ensure a stable flight, we suggest that the pilot calibrates the gyro every time after pairing the drone and after a crash.
11.0 FUNCTIONS DETAILS ~ A 11.1 EmergencyStop The Emergency Stop function can be only used in case of emergency during the flight to avoid any of damage or injury. Press and hold the Emergency Stop button ( !!)of the transmitter for 2 seconds, the motors will stop Immediately. ~ 11.2 Speed Switch This drone comes with 3 speed modes (Low/ Medium/ High). Short press the Speed Switch button ( @)on the transmitter to switch the speed.
~ 11.3 Trimmer Function FIB Sideward Fly Trim: Short press the Trimmer button ( Trlml to enter the Trimmer function. If the drone drifts forward, push the direction joystick down to balance the drone. If the drone drifts backwards, push the direction joystick up to balance the drone. LIR Sideward Fly Trim: Short press the Trimmer button (Trim! to enter the Trimmer function. If the drone drifts left. push the direction joystick rightto balance the drone.
~ 11 .4 Take Photo I Video Take Photo: Press the PhotoNideo button ( :J on the transmitter to take pictures. One beep can be heard from the transmitter, and the light flashes once indicating the camera has successfully taken a picture. Record Video: Press and hold the PhotoMdeo button ( ) o~e transmitter for 2 seconds, one long beep from the transmitter will be heard and the indicator lights will flash twice. This tells you that the camera has started recording video.
~ 11.5 360° Flip When you get familiar with all the functions of the drone, you can try this amazing flip mode. When you fly the drone at least 10 feet short press the 360• Flip button ( ~,.) on the transmitter, then push the right joystick Forward! Backward or Left/ Right, and the drone will do a flip towards the corresponding direction. If you are in MODE 1, push the right joystick Left/ Right or push the left joystick Forward! Backward, and the drone will do a flip towards the corresponding direction.
~ 11.6 Headless Mode 1. After pairing/calibration, long press the the Headless Mode button <,f.,) on the transmitter to enter the Headless Mode. The indicator lights on the drone continue to flash to indicate that it is in Headless Mode. 2. Press the Headless Mode button again, and you will hear a beep, the indicator lights on the drone will turn solid which indicates the drone exits the Headless Mode. \ t/ ~ Please make sure the pilot to stay in the same orientation as the drone head faces when the d
12.0 SPECIFICATIONS • DRONE Modei:D20 Weight: 69g/2.4oz Max Flight Time: 10 minutes (per battery) Motor Model: 716 Operating Temperature Range: 32" to 104"F (0" to 40"0 Size: 196*162*43 mm • DRONE BATIERY Capacity: SOOmAh Voltage: 3.
• TRANSMITTER Operating Frequency: 2.4 GHz Max Flight Distance: 131 feet I 40m (outdoors and unobstructed) Operating Temperature Range: 32" to 104"F (0" to 40"C) Battery Type: 1.
13.0 TROUBLE SHOOTING Problems The indication lights of tne drone are flasning and does not respond to the transmitter. Reasons Solutions 1.Communlcatlon between 1. Refer to the preparation the drone and transmitter Is for flight and pair again. notcom!Cl 2. Recharge the battery. 2. Battery power is low. The propellers spin but 1. The propellers are assembl- 1. Replace the propellersaccorthe drone is unable to ed in wrong orientation. ding to the motors. take off. 2. The propellers are damaged 2.
14.0 GENERAL INFORMATION FCC Notice: This device complies with Part 15 of the FCC Rules. Operation is subject to the following two conditions: (1) This device may not cause harmful Interference. (2) This device must accept any interference received, including interference that may cause undesired operation. NOTE: This equipment has been tested and found to comply with the limits for a Class B digital device, pursuant to Part 15 of the FCC Rules.
RF Exposure For Quadcopter The equipment complies with FCC radiation exposure limits set forth for an uncontrolled environment. This device should be installed and operated with minimum distance 20cm between the radiator & your body. RF Exposure For Controller The device has been evaluated to meet general RF exposure requirement. The device can be used In portable exposure condition without restriction.
recommended that you do not to use any other charger than the one provided with the product. 5. The battery temperature must never exceed 60"C(1 40"F) otherwise the battery could be damaged or ignite. 6. Never charger on a flammable surface, near flammable products or inside a vehicle(perferably place the battery in a non-flammable and nonconductive container). 7. Never leave the battery unattended during the charging process. Never disassemble or modify the housing's wiring, or puncture the cells.
EU RF Power(EIRP): <1 0 dBm (2413MHz- 2461 MHz) Caution l.The max operating of the EUT is 45"C. and shouldn't be lower than -lO"C. 2.The device complies with RF specifications when the device used at Omm form your body. 3.Declaration of Conformity We, Xiamen Huoshiquan Import & Export CO.