IMPORTANT! PLEASE READ! NEED HELP? DO NOT RETURN THIS PRODUCT TO THE STORE Please contact a DEFENDER® customer support representative first regarding any additional information on product features, specifications or assistance with setup. Please contact us via one of the methods below: Support: www.defender-usa.com/support Online live web chat: Visit www.defender-usa.com For more product information visit www.defender-usa.com Note: This is manual version 1.
WARRANTY INFORMATION PRODUCT WARRANTY INFORMATION Please visit our website at www.defender-usa.com for information about your product’s warranty. We take quality very seriously. That is why all of our products come with a one-year warranty from the original purchase date against defects in workmanship and materials. If you have warranty or support issues please contact us using any of the following methods: Support: www.defender-usa.com/support Website: www.defender-usa.
TABLE OF CONTENTS TABLE OF CONTENTS..................................................................................................................................................... 4 INTRODUCTION............................................................................................................................................................. 6 WHAT IS INCLUDED.........................................................................................................................................
TABLE OF CONTENTS System Setup............................................................................................................................................... 37 General Tab...................................................................................................................................... 38 User's Tab........................................................................................................................................ 41 Version Tab.........................
INTRODUCTION Congratulations on your purchase! This user-friendly system will allow you to monitor and protect your home or business. The coaching SmartMenu makes setting up and using your DVR very easy with helpful information to assist you. The DVR comes equipped with H.264 compression which allows you to record and store more footage using less space; therefore never missing an event. This manual was written to ensure that you get the most out of your purchase.
FEATURES Extremely Easy to Set Up and Use You'd expect a system that keeps such a close eye over all you hold dear to be complex. You'll be surprised how easily this DEFENDER® system operates. It functions like a computer, with a mouse for pointing and clicking and in intuitive icon-based Smart Menu™ that provides prompts and coaching to assist you in navigating the system. It's so simple to use, it will even begin recording as soon as you plug it in.
CONNECTIONS DVR BACK 1 2 3 4 5 8 9 1. Camera Connect: 2. 3. 4. 5. 6. Camera connections for cameras. Video Output: Connects to a monitor. Audio Input: Accepts a microphone and/ or audio-supported camera (not included). Mouse input: Connect the USB (before power up). LAN Connection: Connects to router. Power Connection: Connect DVR to power source. 10 7. Power Switch: 8. Audio Output: 9. Audio Input: 10. VGA: 11. USB Connection: 12. PTZ: 6 7 11 12 Turns DVR power ON and OFF.
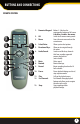
BUTTONS AND CONNECTIONS REMOTE CONTROL 1 2 3 5 6 8 9 10 4 7 11 12 13 1. Numerical Keypad: Buttons 1-8 displays the corresponding camera on full screen. 0 disables / enables the mouse. 2. All: Switch to all camera viewing mode. 3. Menu: Access the main menu and exit the current menu. 4. Select/Enter: Allows you to select options. 5. Directional Keys: Allow you to navigate through the menu. 6.
BASIC SETUP Things to Consider Before Installation • • • • • • • • • • The camera should be installed between 8 and 13ft above the area to be monitored. Before screwing in the mount for the camera ensure there are no obstructions in the camera’s view. Place cameras in the most strategic places where they can provide detailed, recorded video of every visitor. Having the camera in the open for people to see can help deter criminals.
BASIC SETUP Wired Camera Installation Wireless Camera Installation Wireless Cameras - Pairing Press quickly Press quickly CH 1 CH 3 30 CH 2 CH 4 CH 1 CH 2 CH 3 CH 4 If appears on the screen, disconnect the power supply from the camera and repeat PAIRING steps. Optimum range is150ft when signal is passing through walls or floors.
BASIC SETUP CONNECTING ADDITIONAL DEVICES Connecting a USB Mouse Plug Mouse into top USB port 1. Plug the USB connection on the mouse into the top USB connection on the back of the DVR. Connecting a Monitor Connect BNC to RCA connector 1. Connect the BNC to RCA connector to the top VIDEO OUT connection on the back of the DVR. 2. Plug the RCA cable into the BNC connector. 3. Attach the other end of the RCA cable to a yellow RCA video input on your TV/monitor. 4.
GETTING STARTED GETTING STARTED Now that you have powered up the DVR and connected it to a TV or monitor you are ready to begin setting up and using the DVR. You will notice the coaching SmartMenu information bubbles at the bottom of the screen describing the settings that you will find in the menu. As an added convenience the DVR will automatically begin recording once it is powered on as long as at least one camera is connected.
FUNCTION TOOLBAR FUNCTION TOOLBAR The Function Toolbar can be accessed 3 different ways: 1. 2. 3. By right clicking the mouse anywhere on the screen. To access items on this menu with the mouse move the mouse pointer over the option to highlight it and left-click. To exit, move the pointer off the menu and right click. Moving the mouse to the bottom of the screen. To access items on this menu with the mouse move the mouse to the bottom of the screen and a menu bar will appear.
FUNCTION TOOLBAR PTZ Camera This shortcut opens the PTZ menu. PTZ stands for Pan, Tilt, Zoom cameras (not included). This menu option only controls compatible PTZ cameras that are properly setup in the device management section of the menu. The PTZ camera controls are: Directional keys: Moves the camera in the direction of the arrow Zoom: The + zooms in and the – zooms out. Focus: The + focuses the picture and the – removes the focus.
FUNCTION TOOLBAR Start Cruise This option prompts the PTZ cruise to start (if you have set up the PTZ cruise). Click it again to stop the PTZ cruise. Record Search This shortcut prompts the video search menu to appear. It allows you to search through the previously recorded footage. For more information on the video search menu, please see the PLAYBACK section of this manual. Start / Stop Record This shortcut prompts the DVR to start or stop recording.
MAIN MENU 1. The MAIN MENU can be accessed by pressing the MENU button on the remote control or by right clicking the mouse, then selecting the MENU icon. 2. To make a selection from the MAIN MENU, left-click the mouse or press SELECT on the remote. 3. When access any sub-menus, there are a few options available at the bottom of the screen: 1. Default: Restores all of the settings on the current page to the default settings. 2. Apply: Applies and saves changes made to the current menu page. 3.
MAIN MENU DISPLAY SETUP The DISPLAY SETUP menu has 3 tabs; Live, Output and Privacy Zone. This menu allows you to name each camera, adjust where the title of the camera appears on screen, adjust the color of each camera, turn cameras on and off as well as decide on where the time will be displayed on screen. Live Tab The LIVE TAB allows you to customize the name and position of the camera name. Customizing camera names allow for easy recognition of locations you are monitoring.
MAIN MENU Color Setup Clicking this button will allow you to adjust the image settings for an individual camera. To adjust the COLOR on a camera: 1. Select the COLOR SETUP button and a full screen view of the selected camera will appear along with scroll bars to adjust Hue, Brightness, Contrast and Saturation. 2. To turn the settings up and down, click and drag the bar in the center. 3. Once you have adjusted the color to your liking, select APPLY and then EXIT to return to the camera menu. 4.
MAIN MENU Copy This DVR gives you an option to copy all display selections from one camera to another, or to all cameras. To COPY settings from one camera to other cameras: 1. Select the COPY option and choose a camera number or ALL cameras. 2. The settings from the currently viewed camera will now be copied to the camera(s) selected from the drop down list. 3. Select APPLY to save settings.
MAIN MENU Transparency This allows for the appearance of the menu to appear either clear or solid. To adjust the TRANSPARENCY: 1. Click and drag the bar in the center next to TRANSPARENCY. 2. Click on APPLY to confirm settings. Volume and Margin These options let you customize the look and sound of your recordings. Margin To adjust MARGINS: 1. Select the MARGINS option and the margin screen will appear. 2. Slide the cursor from 0 to 36 to set each margin, 0 being the lowest, 36 being the highest. 3.
MAIN MENU RECORD SETUP This option allows you to turn recording for each camera ON or OFF, set video quality, adjust the frame rate, set the resolution, enable or disable audio recording, pick a recording mode (scheduled or continuous), set the file pack time (recorded video size in minutes) and copy settings from one camera to another.
MAIN MENU Schedule Tab Record Schedule Setup The DVR allows you to choose whether it always records, or if it records based on a set schedule or only when motion is detected.Your DVR is set to record always by factory default. Schedule Record: (Green) Sets schedule or constant recording Motion Record: (Yellow) Settings for motion recording No Record: (Transparent) Footage will not record at this time To program your DVR to constantly record (24/7): 1. Select the channel you wish to constantly record.
MAIN MENU To set your DVR for SCHEDULE record: 1. Select the channel and the day you wish to set a record schedule. 2. Click on the top line of the time graph if you would like SCHEDULE RECORD. Schedule record will record constantly. Each box represents one hour. One click selects the box. To de-select, click the box again. The box needs to be GREEN for the hour(s) you want recorded. 3. Click on the bottom line of the time graph if you would like MOTION RECORD to be set.
MAIN MENU SEARCH This option allows you to search through your previously recorded footage and find footage recorded from particular dates and times. You can access the VIDEO SEARCH menu by pressing PLAY on the remote control, PLAYBACK on the FUNCTION TOOLBAR or going into the MAIN MENU under SEARCH. Playback Screen Playback Tab To access and play back footage from a particular date and time: 1. Select the CHANNEL you would like to view recorded footage from. 2.
MAIN MENU Event Search Tab This DVR allows you to view the file list for each day that you have recorded footage. The file list allows you to see what type of recording it was (NORMAL, MOTION DETECTION), the date and time the footage was recorded, the size of the footage, as well as gives you the option to backup particular recorded events. To access the file from the video search menu: 1. Select a channel you would like to view footage from. 2.
MAIN MENU Backup Tab Your DVR allows you to backup footage to a USB device, USB HDD, or a USB CD/DVD burner and play it back on your computer. To Backup footage onto USB device: 1. Make sure a USB device or USB burner is plugged into the proper USB connection on the back of the DVR. 2. Access the file list from the particular day you would like footage backed up. 3. Select the box under the word BAK next to the video clip(s) you would like backed up. 4. Select the BACKUP button. 5.
MAIN MENU NETWORK SETUP The NETWORK SETUP menu is your gateway to viewing your footage online. This menu holds the information you need to set up online viewing. The DVR is preconfigured to work with most basic network setups and the values shown on the screen are the values you will be using to set up and view the DVR on a computer. Network Tab The NETWORK SETUP menu allows you to configure all the settings necessary to view your DVR online.
MAIN MENU Client Port: This port is used to transmit images from the DVR. It is recommended that this port remain on port 9000. HTTP Port: This port is used to initiate communication to the DVR. The HTTP port is entered at the end of the IP address to connect to the DVR. If using the default port (80), your Internet browser will automatically add port 80 at the end of the address, even though it may not be visible.
MAIN MENU Gateway: This is the IP address of your router. If the box is populated with numbers other than all zeros, this is a confirmation that you are connected to the router. DNS1 and DNS2: Stands for Domain Name System and is for advanced network setup. DNS is used to convert common names into website IP Addresses. It is best to leave these settings as it is usually the same as the router. To Change the DNS address: 1. Highlight and select the starting number next to DNS and a keyboard will appear.
MAIN MENU To setup your DDNS on the DVR: 1. Highlight and select DDNS setup. 2. Highlight DDNS and change from DISABLE to ENABLE. 3. Highlight SERVER, this should be set to DynDNS. Choose your DDNS provider from the list. 4. Highlight HOST NAME and press SELECT, the keyboard will appear to input your host name. 5. Highlight USER NAME and press SELECT, the keyboard will appear to input your user name. 6. Highlight PASSWORD and press SELECT, the keyboard will appear to input your password. 7.
MAIN MENU To adjust the user name, password and server port for mobile login: 1. Select the column next to the setting you would like to change and a keyboard will appear. 2. Type the user name, password and port you would like then select ENTER to close the keyboard. (User name and passwords are case sensitive.) 3. Select APPLY from the main camera menu to save your changes. 4. For more information about mobile setup please see MOBILE VIEWING section.
MAIN MENU Copy settings to other camera channels: 1. On the channel drop down menu select which settings you want to copy. 2. Select which channels to apply the settings to in the TO drop down box. 3. Click the COPY button. 4. Select APPLY to save changes. To change the SENSITIVITY of motion detection for each camera: 1. Select the SENSITIVITY drop down list under the camera you would like to adjust the motion detection sensitivity. 2.
MAIN MENU DEVICE SETUP This menu allows you to select and configure the HDD and PTZ camera (not included). HDD Tab This menu option gives you information about your Hard Disk Drive (HDD), allows you to enable overwrite mode, and format the hard drive and/or USB drive. Your options are: • State: • • • Avail/Total: Avail Time: Select : Displays the current operating status of the hard drive. If the hard drive is functioning normally it will display OK.
MAIN MENU Format HDD Formatting the HDD erases all recorded video and audio on your HDD. To Format the HDD: 1. Select the box next to the HDD that you want to format. 2. Click the FORMAT HDD button. An alert screen will appear indicating "FORMAT WILL REMOVE ALL DATA FROM HDD". 3. Select OK to format the HDD or CANCEL to prevent formatting. 4. Formatting the HDD may take a few minutes. Formatting cannot be stopped once it has started. 5.
MAIN MENU Connecting a PTZ Camera The DVR supports a 2-wire RS-485 connection for a PTZ camera to be connected (PTZ camera not included). Please see your PTZ camera manual for further instructions on required connections and settings. To connect a two-wire PTZ camera: 1. With a small flat head screwdriver, unscrew the screw on the top of the opening. 2. Insert the wire into the hole below the top screw while it is still unscrewed. 3. Re-tighten the top screw, to lock the wire into place.
MAIN MENU General Tab The General Tab alllows for you to change the date and time, language, as well as daylight saving time. Date and Time This menu option allows you to set the date and time, to change the format of the displayed date, and time. Set the DATE FORMAT: 1. Select the scroll bar next to DATE FORMAT and a list will appear. 2. Highlight and select your preferred DATE FORMAT. 3. Select APPLY to save your changes. Set the DATE: 1. Click on the DATE box and a keyboard will appear. 2.
MAIN MENU DST (Daylight Saving Time) You can program the DVR to automatically switch to Daylight Saving Time. To customize the DVR’s DAYLIGHT SAVING TIME settings: 1. Select the the DST SETUP box next to DST. 2. Select the drop down box next to Daylight Saving Time and list will appear. Select ENABLE. 3. Select the drop down box next to TIME OFFSET and select if you would like your clock to go forwards or backwards by 1 hour or 2 hours. 4.
MAIN MENU Network Time Protocol (NTP) You have the option of setting your DVR to sync its time to various web servers. This ensures your DVR is set to the correct time. It will also automatically adjust to Daylight Saving Time. NTP Options To set the DVR to sync with an NTP time server: 1. Select NTP SETUP and select ENABLE. 2. Select the Server drop down box and choose one of three time servers. 3. Select the Time Zone drop down box and select your time zone. 4. Select the UPDATE button. 5.
MAIN MENU Users Tab The USERS Tab allows for you to setup 7 different users on the DVR. You can also customize their username, password, and permission levels. Permission levels include the ability to change settings, view cameras, and footage. Password and Permission Setup The default username is admin and the default password is 123456. Setting the ADMIN PASSWORD: 1. Click the box below SEL in the No. 1 line. It should be set to ADMIN by default. 2. Click the EDIT button and a box will appear. 3.
MAIN MENU Version Tab The VERSION tab allows you to view information about your DVR: • Device Name • Software Version • Device ID • IE Version • Device Type • Hardware Version • MAC Address ADVANCED SETUP Maintain Tab The MAINTAIN tab allows you to load system default settings, set up your DVR for automatic maintenance, adjust system reboot, manually reboot the system, as well as update the system with a USB device. Turning AUTO MAINTENANCE on or off: AUTO MAINTENANCE activates the AUTO REBOOT function.
MAIN MENU Default Settings Loading default settings will restore all settings on your DVR to the default settings except for the date and time. The DEFAULT USERNAME is admin and the DEFAULT PASSWORD is 123456. To LOAD DEFAULT: 1. Click LOAD DEFAULT, a screen will appear. 2. Click the box for each function that will be restored to default parameters or click ALL to select them all. Click CLEAR to uncheck the boxes. 3. Select APPLY to continue. 4. A screen will appear asking "ALL SETTINGS WILL BE LOST.
PLAYBACK PLAYBACK There are two types of files available for playback ; RECORD SEARCH files or EVENT SEARCH files. These searches allow you to find footage recorded from particular dates and times. There are three ways to access the SEARCH menu for playback: 1. Press the PLAY button on the DVR remote. 2. Right click the mouse on the screen and select the RECORD SEARCH icon from the FUNCTION TOOLBAR. 3. Access the MAIN MENU and select SEARCH.
PLAYBACK Event Search Tab This DVR allows you to view the file list for each day that you have recorded footage. The file list allows you to see what the type of recording it was (MOTION DETECTION or SCHEDULED RECORDING), the date and time the footage was recorded, the size of the footage, as well as gives you an option to backup particular recorded events. To access the file from the EVENT SEARCH menu: 1. Select a CHANNEL you would like to view footage from. 2. Select the SEARCH DATE box.
PLAYBACK Playback Screen PLAYBACK THROUGH DVR Click the file you have selected to view, and the footage will automatically play. Upon playing back the recorded footage, options at the bottom of the screen appear to manipulate the video. These options are also available on the remote control.
PLAYBACK COMPUTER PLAYBACK When you backup footage to a USB device, you can view the backed up footage on your computer. Viewing your footage from your computer allows you more options for manipulating the video as well as for backing up footage directly to your computer. To view footage though your computer: 1. Insert included software CD into disk drive and double click to install the playback software. 2. Follow the installation guide until the end. 3.
PLAYBACK File Viewing Be sure that the playback software is open on your computer. Instructions differ depending on what files you would like to open and play: To add one video: 1. Select and then FILES. Find the USB device file, or any other area where backed up footage would be stored on your computer. 2. Make sure to view .264 Files. 3. Select the file you would like to view and select OPEN. 4. Once you have selected OPEN, the video will NOT play automatically. You must prompt the video to play. 5.
PLAYBACK Software Functions The software has many functions. The drop down menus allow you to adjust the video, the file menu allows you to open video files, and settings allows you to adjust certain settings in the software. Play Menu 1 4 5 6 7 8 9 10 11 12 2 13 3 14 The video functions from the play menu are as follows: 1. Add Videos: Add a single video or a folder of multiple videos to the playback list. 2. Remove Videos: Remove a single unwanted video clip from the playback list. 3.
NETWORK GUIDE REQUIREMENTS You will need to have: The DVR connected to a router. The router connected to the Internet. A PC or laptop that is connected to the same router as the DVR. The PC can be connected by a wired or wireless connection. Internet Explorer® (IE) 6.0 or higher (to check your version of Internet Explorer® open IE. In the top Menu bar select HELP and then select ABOUT INTERNET EXPLORER®. The version of IE will be displayed).
NETWORK GUIDE FINDING YOUR DVR’S IP ADDRESS By default, the DVR IP mode is set to DHCP. This means the DVR will automatically retrieve an IP address from the router that it is connected to. Unless your network requires a static IP address leave the DVR IP mode set as DHCP. 1. From the MAIN MENU, select NETWORK. 2. Confirm that the IP MODE is set to DHCP. This setting is acceptable for most users.
NETWORK GUIDE Method 1: 1. Open up Internet Explorer. 2. Click on TOOLS. 3. Click on INTERNET OPTIONS. 4. Click on the SECURITY tab, then the CUSTOM LEVEL button. 5. Change the ActiveX settings listed below.
NETWORK GUIDE Method 2: Add the DVR’s IP address to the Trusted Sites in Internet Explorer. 1. Open up Internet Explorer. 2. Click on TOOLS. 3. Click on INTERNET OPTIONS. 4. Click on the SECURITY Tab. 5. Click on TRUSTED SITES. 6. Click on the SITES button. 7. Type in the IP address of the DVR in the following format: http://192.168.0.108 and click ADD. 8. If "Require server verification (https:) for all sites ..." is selected you will need to uncheck the selection box.
NETWORK GUIDE Log into the DVR (Using Internet Explorer): 1. By default the DVR will require a user to input a username and password before being able to view the DVR online. The default username is: admin and the password is: 123456 Installing the ActiveX controls: 2. There will be a yellow information bar that pops up below the address bar in Internet Explorer. Click on the yellow information bar and then select INSTALL THIS ADD-ON FOR ALL USERS ON THIS COMPUTER….
NETWORK GUIDE VIEWING YOUR DVR FROM OUTSIDE OF YOUR NETWORK Now that you have successfully viewed your DVR and cameras from a computer connected to the same router, it is time to set up your router to view the DVR while at a remote location. This process is called PORT FORWARDING and you can find detailed instructions on how to complete the required steps at: Option 1 - www.defender-usa.com/network Option 2 - www.portforward.
NETWORK GUIDE Option 1 (Recommended): This option gives you an audio-enabled video that has step-by-step instructions on how to port forward your DVR for your specific router. Open up your web browser and go to: http://www.defender-usa.com/network-product.php Once the site has loaded you will see a list with photos of different DEFENDER® DVR models. Select your model. You will then see a list with photos of different types of routers. Select the router most similar to yours.
NETWORK GUIDE Option 2: 1. Open up your web browser and go to: www.portforward.com 2. Once the site has loaded, scroll down to the large list of routers. 3. Find the type of router you have and select it. • If you cannot find your exact router, select one that is similar to your router or made by the same company. 4. Once you select a router an advertisement will appear – select the CLICK HERE TO SKIP THIS ADVERTISEMENT text in the top right corner. 5.
NETWORK GUIDE Testing Port Forwarding To confirm that your port forwarding is successful, follow these steps : 1. Open a web browser and type in www.whatsmyip.org 2. Your External IP address will be listed on the top center of the screen. Be sure to write it down. This is the address that you will use to connect to your DVR when you are not at the DVR location. 3. Open another web browser. 4. Type in www.canyouseeme.org. This site also allows you to see your external IP address. 5.
NETWORK GUIDE If You Cannot Connect If the remote viewing does NOT connect, please check the settings below: 1. Make sure the browser is Internet Explorer 6.0 or higher and is on a Windows PC. 2. Make sure you forwarded both port 80 AND 9000 for TCP and UDP. 3. Make sure all controls are properly installed .(Selected the yellow pop-up bar and run all controls.) 4. Check all your network connections and go through the above steps again to make sure a configuration error was not made.
NETWORK GUIDE To View Online Software Using External IP Address 1. From your computer at the DVR's location, open Internet Explorer and type in www.whatsmyip.org and press ENTER. This will direct you to a website that lists your external IP address on the top of the page. Write down your external IP address. 2. From a computer outside of your DVR's network, open Internet Explorer and type in your external IP address, followed by the port you forwarded for your DVR in the following format: http://74.123.3.
NETWORK GUIDE LOGGING INTO SOFTWARE 1. 2. 3. 4. 5. If you created a DDNS account, type in your account’s host name in the Internet Explorer address bar. If you didn’t create an account, you can use your external IP address (if on a different computer) or your DVR’s internal IP address (if on a computer connected to the same router). Before you view the online software you are asked to login with a password. You can either use the admin or your own user password and the footage will appear.
ONLINE SOFTWARE LIVE MODE The LIVE tab at the top of the online viewing screen allows you to view the DVR in LIVE mode. In LIVE mode, the available functions on the right are: 1. PTZ Camera Controls: Selecting this function opens up PTZ control menu. For more information refer to PTZ options in this manual . 2. Cruise Setup: This function allows you to set up directions for the PTZ to follow. The PTZ camera will cruise through your set positions and times. Not all PTZ cameras have this function.
ONLINE SOFTWARE PTZ OPTIONS The PTZ camera controls are: Zoom: Pressing the + zooms in and pressing the – zooms out. Focus: Pressing the + focuses the picture and pressing the – takes the focus away. Many PTZ cameras do this automatically. Iris: Pressing the + lets in more light and pressing the – takes light out of the picture. Many PTZ cameras do this automatically. Directional Keys: Clicking on the directional arrows moves the camera around.
ONLINE SOFTWARE PLAYBACK This tab allows you to search, view and backup previously recorded footage that is stored on your DVR’s HDD. You can also narrow down your search by type of footage and what camera it was recorded from. To SEARCH your footage: 1. The DVR menu cannot be accessed by two people using the same Administrator using the same username and password .
ONLINE SOFTWARE PLAYING BACK FOOTAGE: When you press play, it may take a few minutes to load. The footage will begin playing automatically. The playback options are located at the bottom of the screen. The PLAYBACK options (from left to right on the screen) are as follows: Play: Pauses playback. Pause: Prompt the video to begin playing. Stop: Pressing this will stop the footage from playing and a blank screen will appear.
ONLINE SOFTWARE Video Clips: Displays specific portions of a file. Click the icon to begin. Select again to stop. The file will be saved in the location that you set. Capture: Takes pictures of specific portions of a file. Select the save location in local settings. Start All Playback: Starts playing all channels that have recordings. Stop All Playback: Stops playing all channels that have recordings. Stop All Menu: Stops all playback, stops all downloads, and stops all windows.
ONLINE SOFTWARE REMOTE SETTINGS - ONLINE SETUP The REMOTE SETTINGS tab allows you to make some adjustments to certain DVR settings. The menu options that can be adjusted include: • • • • • • Alarm Parameters PTZ Parameters Network Parameters Device Parameters Device Management Local Settings Each function works much like the MAIN MENU options on the DVR. Display You can adjust the display name, the position, as well as the record time. You can also enable and set up a privacy zone.
ONLINE SOFTWARE To turn the LIVE VIEWING of a camera on or off: 1. Select the channel you would like to view live. 2. Click the box next to COVERT. 3. Select ENABLE to turn on the camera or DISABLE turn off the camera. 4. Repeat for all desired cameras. 5. Select SAVE in the upper right corner to save your changes. To turn SHOW TIME display or RECORD TIME display off or on: 1. Select the SHOW TIME option or RECORD TIME option and choose either ENABLE or DISABLE . 2. The time display will now be changed. 3.
ONLINE SOFTWARE Record The RECORD option allows you to record from your computer. Here you can set which channel to record as well as set up a recording schedule and recording resolutions. Rec. Parameters To adjust the DVR record parameters: 1. Select the REC PARAMETERS tab. 2. Choose the channel you wish to record using the drop down box. 3. Select SAVE to save settings. Record Schedule Schedule To set your RECORD SCHEDULE: 1. Select the SCHEDULE tab. 2. The top row represents SCHEDULED RECORDING.
ONLINE SOFTWARE Network The NETWORK tab is your gateway to viewing your footage online and contains the DVR information you need to set up online viewing. Since you have already set up your networking viewing, the NETWORK menu can be used for reference purposes. The options and selections in this NETWORK menu are the same as the settings on your DVR. For more networking information see the NETWORKING GUIDE in this manual.
ONLINE SOFTWARE Email To receive EMAIL notifications: 1. Select the drop down box next to EMAIL, select ENABLE. 2. Select the ENABLE drop down box next to SSL. 4. Select the SMTP Port and input the port number provided by your email provider using the keyboard. (For emails the port number is 25. The Gmail port number is 465). 3. Select the SMTP Server box and input the SMTP server address provided by your email provider using the keyboard. (Gmail SMTP address: smtp.gmail.com). 4.
ONLINE SOFTWARE Device The DEVICE tab allows you to view hard drive information such as HDD status and available space. You can also set the overwrite setting. This is a useful menu when troubleshooting your DVR. HDD HDD options are: • HDD Status: • • • Displays the current operating status of the hard drive. If the hard drive is functioning normally it will display OK. Avail Space: Tells you how much space is available to record on the HDD. Total Space: Tells you the total amount of space on your HDD.
ONLINE SOFTWARE System The SYSTEM tab allows you to view your device name and serial number, as well as the hardware and software versions. This is a useful menu when troubleshooting your DVR. General This menu option allows you to adjust the date and time, change the format of the displayed date, adjust the time format, set time zones and adjust the DVR for daylight saving time. To adjust the DATE FORMAT: 1. Select the scroll bar next to DATE FORMAT and a list will appear. 2.
ONLINE SOFTWARE DST DST stands for Daylight Saving Time. You can adjust the DVR to change its time for you when daylight saving time approaches, so you don’t have to go back and do it yourself. You can also customize when the DVR changes for DST. To turn the DVR DST on: 1. Select the checkbox next to DST and a box will appear. 2. Select the checkbox next to DAYLIGHT SAVING TIME to enable. 3.
ONLINE SOFTWARE Users The USERS tab allows you to customize passwords and set different authority levels for other users. Authority settings: 1. Select the USERNAME you wish to change settings for. 2. The password status and information will come up under the list. 3. Here you can enable users and customize the type of authority they are allowed to access. Authority Screen To change the password: You have the option to change the password for the user and the administrator.
ONLINE SOFTWARE Advanced Adjust the device alarms for disk errors, video loss, or when your HDD is full. Events To enable ALARM settings: 1. Select the drop down menus to select whether the DVR alarm will sound when the HDD is low on memory or is not working properly or if there is video loss. 2. Select the ENABLE checkbox to turn on the alarm for the specific issue. 3. Select the drop down box next to BUZZER to select the buzzer length. 4.
ONLINE SOFTWARE Local Settings Save Paths You can select where to save the files you capture, record and back up on your computer. To change where the files are saved: 1. Click the (…) box next to the RECORD PATH area and a folder browse screen will appear. 2. Find the location you want the files to be saved to and double click the area. 3. Select OK. 4. The file you want the footage/pictures saved to will appear in the box. 5. Select SAVE to save settings.
ONLINE SOFTWARE MOBILE VIEWING This DVR is compatible with iPhone®, BlackBerry®, and Android™ operating systems on 3G networks. Before you can access your DVR on a mobile phone you must make sure that the DVR has the proper network settings, has been port forwarded, and that you have the proper viewing software on your phone. Set username, password and port on DVR: 1. From the MAINTAIN MENU, select NETWORK then click the MOBILE tab. 2.
MOBILE VIEWING From your iPhone®: 1. Open and Run the Asee application. 2. Select the setup icon in the bottom right corner of the screen. 3. Fill in the following information: Server IP: Input your DVR’s IP address. Port: Input the port you forwarded in the MOBILE setup. Ensure that this port is also listed under mobile settings on your DVR. Default Port:18004 Default username: admin Default password: 123456 User ID: Input the user ID that you have set under MOBILE settings on your DVR. 4.
Download from App World™: 1. Open BlackBerry App World™. 2. Search Asee. 3. Select the Asee application and select download. 4. Go to MyWorld and select the Asee application to install. 5. When prompted, select Reboot Device Now. 5. Go to your Downloads folder to launch the Asee application. From your computer: 1. Connect your BlackBerry® to your computer and open up the BlackBerry® desktop manager. 2. Select the APPLICATION LOADER option from the main menu.
MOBILE VIEWING Android™ Viewing From your Android™ phone: The easiest way to download and install the Asee application is directly from your Android™ phone's marketplace. A WI-FI network or 3G network must be available to your phone to download using this method. 1. Turn on the phone and enter the main menu. 2. Select the MARKET icon, and select the SEARCH icon on the top right hand of the screen. 3. In the search field, type in Asee. The application will come up in the results. Asee is a free application.
TROUBLESHOOTING Mouse is not working • Be sure the mouse is connected to the proper USB port. The proper port for the mouse is the top USB port on the back. • Try connecting the mouse to a different USB port. Remote control is not working • Be sure the batteries are installed correctly. • Be sure you are pointing the remote at the IR sensor. • Point the IR Remote at the camera lens and press a button. You should be able to see the IR LED flicker through the DVR monitoring device.
TROUBLESHOOTING Cannot see all/one of the camera(s) on the monitor • Check if the cameras are properly connected to the back of the DVR and to a power source. • If using the 4 to 1 power connector, make sure it is plugged into a power source and each of the cameras. • Check CAMERA SETUP from the MAIN MENU to see if any of the cameras are turned off. I have lost video footage • The cameras might have been tampered with. Be sure to check that all connections are secure and properly set.
TROUBLESHOOTING Cannot view online footage using my external IP address • Sometimes your router will not allow you to view the footage with your external IP address because the DVR is connected to the same router. Try typing the DVR's internal IP address in the address bar. • If using a port other than 80, add your port forwarded port to the end the IP address. • See the NETWORK SETUP section for setup instructions.
Disclaimer DEFENDER® does not endorse the use of any DEFENDER® products for illegal activities. DEFENDER® is not responsible or liable in any way shape or form for any damage, vandalism, theft or any other action that may occur while a DEFENDER®product is in use by the consumer.