
Use and Care Manual


72
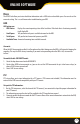
system
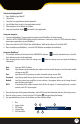
The SYSTEM tab allows you to view your device name and serial number, as well as the hardware and software versions.
This is a useful menu when troubleshooting your DVR.
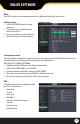
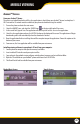
General
This menu option allows you to adjust the date and time, change the format of the displayed date, adjust the time
format, set time zones and adjust the DVR for daylight saving time.
To adjust the DATE FORMAT:
1. Select the scroll bar next to DATE FORMAT and a list will appear.
2. Highlight and select the type of date format you would like.
3. Select SAVE to save your changes.
To adjust the DATE:
1. Select the box next to the date you would like to change and a keyboard will appear.
2. Type the date in the order of the selected format (listed above time format) then select ENTER to close the keyboard.
3. Select SAVE to save your changes.
To adjust the TIME FORMAT:
1. Select the scroll bar next to TIME FORMAT and a list will appear.
2. Highlight and select the type of time format you would like. Choose between a 12-hour clock or a 24-hour clock.
3. Select SAVE to save your changes.
To adjust the TIME:
1. Select the column next to the time you would like to change and a keyboard will appear.
2. Type the time in the order of the selected format (listed below date format) then select ENTER to close
the keyboard.
3. Select SAVE to save your changes.
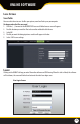
To adjust the LANGUAGE:
1. Select the drop down menu beside LANGUAGE.
2. Highlight the language you would like and select.
3. Select SAVE to save your settings and exit the menu.
4. The system will restart and open with your set language settings.
To change the VIDEO FORMAT:
1. Select the drop down bar next to VIDEO SYSTEM and list will appear.
2. Highlight the video system you would like, NTSC or PAL.
3. Select SAVE to save your changes. The system will restart.
ONLINE SOFTWARE