
Use and Care Manual


26
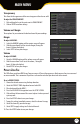
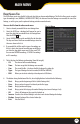
File List Menu
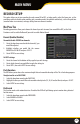
eVent searCh taB
This DVR allows you to view the le list for each day that you have recorded footage. The le list allows you to see what
type of recording it was (NORMAL, MOTION DETECTION), the date and time the footage was recorded, the size of the
footage, as well as gives you the option to backup particular recorded events.
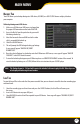
To access the le from the video search menu:
1. Select a channel you would like to view footage from.
2. Select the DATE box; a keyboard will appear for you to
input the date that you would like to see footage from.
Selec the ENTER key.
3. Select SEARCH to open up the available les for that date.
The days and times that have recorded footage stored on
them are shown in this list.
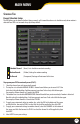
4. If you would like to lter out the types of recordings on
this list, select what type of recording you would like to
see from the drop down menu next to the word TYPE.
You can view MOTION recordings, SCHEDULE recordings
or ALL recordings.
5. The list displays the following information (from left to right).
• CH: The channel with recorded footage.
• Time: The time range that the footage was recorded .
• Size: The size of the le – the larger the le the longer the video clip.
• Type: The type of footage that was recorded (ALARM or NORMAL).
• BAK: Allows you to select video clips to backup onto a USB device .
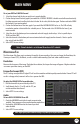
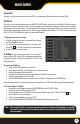
6. The buttons along the bottom of the list, when highlighted and selected do the following:
• First: Brings you the beginning of the list (oldest footage rst).
• Prev: Brings you back a page if not already on the rst page.
• Next: Brings you forward a page.
• Last: Brings you to the last page of recorded footage (most recent footage is last).
• All: Selects all footage on the page to be backed up .
• Inverse: Deselects the selected footage and selects non-selected footage for backup.
• Backup: Prompts backup of the selected video clips.
• Exit: Exits the le list.
MAIN MENU