
Use and Care Manual


51
Networking Guide
DDNS (Dynamic DNS) Setup
Instead of having to type in the IP address to access the DVR online, you can use DDNS to create an easy-to-remember
website name. The DVR has a DDNS provider web address built into it.
Configuring the DVR to work with DDNS:
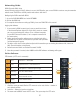
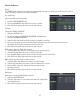
1. Access the DVR MAIN MENU and select NETWORK.
2. Click on the DDNS tab.
3. For complete instructions on setting up DDNS, please see DDNS TAB in this manual.
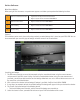
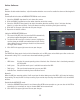
Logging Into Software
1. If you created a DDNS account, type in your account’s host name
in the Internet Explorer address bar. If you didn’t create an account,
you can use your external IP address (if on a different computer)
or your DVR’s internal IP address (if on a computer connected to
the same router).
2. Before you view the online software you are asked to login with a
password. You can either use the admin or your own user password
and the footage will appear.
3. The login screen also has the option to adjust which connection you are viewing the software with (internet or
LAN). Leave this option set to Internet.
4. Default username: Admin and Default Password:123456
5. Once the password is inserted, select LOGIN and the DVR software and footage will appear.
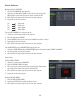
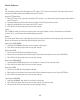
Online Software
PTZ Controls (if PTZ cam is connected)
1 Zoom
+ Zooms In / — Zooms Out
2 Focus
+ Improves Focus / — Decreases Focus
3 Iris
+ Lets light in / — Reduces light in image
4 Arrow Keys Moves the camera around
5 Speed Bar
Located above the zoom buttons, the SPEED bar sets the
speed of the PTZ camera
6 Default Restores Default Settings
Setting up cruise:
1. Select the areas you would like the PTZ camera to cruise and click the + button at
each desired position.
2. Select the – button, to clear the set position.
3. The arrow next to CRUISE starts the PTZ cruise. The square stops the PTZ cruise.
1
2
3
4
5
6