Covert DVR w/ Built-In Color Camera INSTRUCTION MANUAL V1.1 www.defender-usa.
IMPORTANT INFORMATION PRODUCT WARRANTY INFORMATION Please visit our website at www.defender-usa.com for information about your product’s warranty. We take quality very seriously. That is why all of our products come with a one year warranty from the original purchase date against defects in workmanship and materials. If you have warranty or support issues please contact us using any of the following methods: Phone: Fax: Email: Website: 1.866.946.7828 1.888.771.1701 support@defender-usa.com www.
TABLE OF CONTENTS WHAT IS INCLUDED.......................................................................................................................... 1 INTRODUCTION............................................................................................................................... 2 FEATURES....................................................................................................................................... 2 BUTTONS AND CONNECTIONS..........................................
INTRODUCTION Congratulations on your purchase of the STEALTH1! This system is a Digital Video Recorder (DVR) hidden inside an imitation motion sensor, with a built-in high quality pinhole camera. This device allows you to record video footage discreetly using 3 different recording modes: manual, scheduled, and motion detection. Record footage directly to the included SD card and view your captured video by connecting to a TV, computer or laptop (SD card reader required).
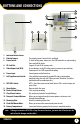
BUTTONS AND CONNECTIONS 9 10 7 8 11 12 1 6 3 4 13 14 5 15 2 1. Imitation Motion Sensor 2. Pinhole Camera: 3. Power Switch: 4. SD Card Slot: 5. Video Output Jack (RCA): 6. Power Input: 7. Full Stop/Overwrite Switch: 8. NTSC/PAL Switch: 9. 10. 11. 12. Menu Button: Record & Stop Button: Play & Pause button Reverse & Forward Buttons: 13. Mounting Hole : 14. Flush Wall Mount Holes: 15.
INSTALLATION Installing the Mounting Bracket 1. Screw and attach the camera bracket into the bracket base. 2. Screw the bracket base into a wall using the 3 included screws, be sure to use the included wall anchors. 3. Tighten the camera angle adjustment on the top of the bracket to lock the camera in place. Using the Extended Mounting Bracket 1. Screw and attach the camera bracket into the mount extender. 2. Screw and attach the mount extender into the bracket base. 3.
BUTTON FUNCTIONS There are 5 buttons that control the DVR. Depending on if the menu is open or if the footage is paused, the buttons have different functions. The buttons operate as follows: Menu: • • Pressing the menu button opens the main menu When the menu screen is open the menu button exits the menu Record and Stop: • Pressing the record button starts and stops recording.
POWERING ON 1. To turn the device on, first connect the power cable or insert batteries into the battery compartment. 2. Slide the power switch on the top of the device to the ON position. 3. To view the menus and adjust settings you will have to attach the included RC A cable to the video output of the covert camera, and connect it to the video input jack on the back of your television. 4. After power on, the system will automatically enter live monitoring.
RECORDING MODES There are three different recording modes available: Manual, Continuous, and Motion Detection. • Manual Record Start and stop recording anytime manually. Press the to stop recording. • Continuous Record Schedule a start and stop time, and the DVR will record continuously during the set time period. • Motion Detection Record Set a time period to record only when movement is detected.
RECORDING MODES Different recording modes have different recording settings, including video size, frame rate and video quality. When a recording mode is triggered, the system starts recording according to that specific setup. This ensures efficient recording duration and video quality. For example: To schedule the unit to record while you are at work (9:00AM-5:00PM), you can set up the schedule to record at low video quality with less frames per second to extend recording time.
PLAYBACK MODE There are two playback modes: • Normal Playback: Search and Play: • Press the play button on the back of the DVR, the unit will play back all footage starting with oldest footage Accessed through the main menu, this option allows you to search and play footage from a particular date and time, organized by type of recording (manual, continuous or motion) NORMAL PLAYBACK DISPLAY 1. To start normal playback, press the play/pause button starting with the oldest footage first.
PLAYBACK MODE SEARCH AND PLAY MENU • • To access the search footage list go to the main menu and select Search and Play The Search and Play screen will list all of the recordings you have, starting with the oldest footage 1. Date/Time/Files - The footage directory shows dates and the number of video files recorded on that date. Press the record and play buttons to move the cursor up or down. 2. 3. Page number - shows the current and total number of pages that have recorded footage.
MENU SETUP MAIN MENU 1. Menu Layer Indication. The device consists of three menu layers: First Menu (Main Menu) Second Menu Third Menu 2. MENU Content: Basic Menu Operations. or Play buttons to move the highlight bar ( ) up or down. 1. Press the Record 2. When the menu option you want is highlighted press the fast forward button 3. When in a menu screen with adjustable settings, press the fast forward (+) buttons to increase or decrease the setting that is highlighted. 4.
MENU SETUP DATE/TIME SETUP 1. Date Format: The format options are: • Year / Month / Day • Month / Day / Year • Day / Month / Year 1 2 2. Date/ Time Adjustment: Clock is 24 hr (example: 16:00 would be 4:00 pm) and the year range is 2000 to 2099. To adjust Date/Time and Play 1. Use the Record buttons to scroll to the digit you want to change. 2. Press the fast forward (+) buttons to and rewind (-) increase or decrease the value.
MENU SETUP Manual Record This menu allows you to adjust the video size (resolution), frame rate and image quality of manual record footage. • To start or stop manual record, press the record button. Video Size/Frame Rate: Resolution: Frame Rate (Max.
MENU SETUP Motion Record This menu allows you to enable or disable motion record as well as adjust the record time and video settings Record: Enable or disable scheduled recording by selecting ON or OFF with the fast forward rewind (-) buttons. (+) and Schedule: This function is based on a 24 hour clock. For example, Setting the clock to 08:00-12:00 will record between 8 AM and 12 PM.
MENU SETUP SD CARD OPTIONS The SD card is the included memory card that stores your recorded video. This menu shows how much total space is on the SD card, how much space is currently available, and allows you to format the SD card. Formatting the SD card will erase all footage on the DVR. 1. 2. 3. Total space available on the SD Card Remaining space left on SD Card Format the SD card (delete all video) 1 2 3 Formatting the SD card: 1. Highlight FORMAT. 2.
MENU SETUP FACTORY DEFAULT This menu allows you to restore the settings on your DVR back to original default settings. Once you enter this menu the words "RECALL DEFAULT NOW?" appear on screen: 1. Press the fast forward (+) button to restore the DVR back to factory default settings. 2. Press the menu button to exit and keep your settings, this will return you to the main menu and no changes will be made. Note: Returning to factory default will erase all your settings (except date and time setup).
DVR SPECIFICATIONS OSD Language Display English Disk Full Warning Full Stop / Overwrite (Selectable) Automatic Overwrite Option Yes LED Indicators Power, Record, Play, Menu Housing Material ABS Plastic Battery Operable Yes, 4 x AA Battery Life 12 hours (lithium batteries) Power Input DC 12V 180mA Power Adapter Input AC 110-240V (switching mode) Operating Temperature 41°F ~ 113°F Operating Humidity 80% Dimensions 5" x 3" x 2.75" Weight 0.
VISIT US ON THE WEB! ► Product Information ► Specification Sheets ► User Manuals ► Firmware Upgrades www.defender-usa.com Disclaimer Defender does not endorse the use of any Defender products for illegal activities. Defender is not responsible or liable in any way shape or form for any damage, vandalism, theft or any other action that may occur while a Defender product is in use by the consumer. www.defender-usa.
VISITEZ-NOUS SUR LE WEB! ► Informations de produits ► Fiches techniques ► Manuels d’utilisateurs ► Mises à jour de micrologiciels www.defender-usa.com AVERTISSEMENT Defender n’approuve aucune utilisation illégale des produits DEFENDER. Defender n’est pas responsable en aucune manière en cas de dommage, de vandalisme, de vol ou toute autre action qui pourrait se dérouler durant l’utilisation d’un produit Defender. www.defender-usa.
SPÉCIFICATIONS DVR Langue d'affichage à l'écran Anglais Avertissment disque rempli Arrêt complet / écrasement (sélectionnable) Option d'écrasement automatique Oui Indicateurs DEL Alimentation, enregistrement, lecture, menu Matériel du boîtier Plastique ABS Alimenté par piles Oui, 4 x piles AA Autonomie des piles 12 heures (piles au lithium) Entrée d'alimentation cc 12V 180mA Entrée de l'adaptateur secteur ca 110-240V (alimentation à découpage) Température de service 41°F ~ 113°F Seuil d'
MENU PRINCIPAL PARAMÈTRES PAR DÉFAUT Ce menu vous permet de restaurer les paramètres de votre DVR aux réglages par défaut. Une fois que vous entrez dans ce menu les mots " Retour aux réglages par défaut maintenant?" (RECALL DEFAULT NOW?" ) apparaissent à l'écran: 1. Appuyez sur la touche avance rapide (+) pour restaurer les paramètres de votre DVR aux réglages par défaut. 2.
MENU PRINCIPAL OPTIONS DE CARTE SD La carte SD est la carte mémoire incluse qui stocke vos vidéos enregistrées. Ce menu vous montre combien d’espace total est sur la carte SD, combien d’espace est actuellement disponible, et vous permet de formater la carte SD. Le formatage de la carte SD efface toutes les séquences enregistrées sur le DVR. 1. 2. 3. Espace total disponible sur la carte SD Espace restant sur la carte SD Formater la carte SD (efface toute la vidéo) 1 2 Formater la carte SD: 1.
MENU PRINCIPAL Préréglage (schedule): Cette fonction est un affichage sur 24 heure. Par exemple, régler l’horloge de 08:00 à12:00 va enregistrer de 8h00 AM et 12h00 PM. Pour régler le temps que vous voulez que le DVR enregistre en utilisant la détection de mouvement, utilisez les touches d’enregistrement et de lecture pour passer à la mise à l’heure, puis appuyez sur les touches avance rapide (+) et retour rapide (-) pour le mettre à l’heure que vous voulez qu’il enregistre.
MENU PRINCIPAL Enregistrement manual Ce menu vous permet de régler la taille de la vidéo (résolution), la cadence de prise de vue et la qualité d’image des séquences d’enregistrement manuel. • Pour démarrer ou arrêter l’enregistrement manuel, appuyez sur la touche d’enregistrement. Taille de la vidéo/cadence de prise de vue: Résolution: 320x240 640x480 Cadence de prise de vue (Max.
MENU PRINCIPAL CONFIGURATION DE DATE/HEURE 1. Format de date: Les options sont: • année/mois/jour • mois/jour/année • jour/mois/année 1 2 2. Régler la date/heure: Affichage sur 24 heure (exemple: 16:00 est 4h00 pm) et 2000 à 2099 pour la gamme année. Régler la date/heure 1. Utilisez les touches d’enregistrement voulez modifier. 2. Appuyez la touche avance rapide (+) la valeur.
MENU PRINCIPAL MENU PRINCIPAL 1. Parties du menu. Le menu a trois sections: Le menu principal Le deuxième sous-menu Le troisième sous-menu 2. Naviguer le menu. ou de lecture pour déplacer la barre de sélection ( ) 1. Appuyez sur la touche d’enregistrement vers le haut ou vers le bas. 2. pour faire Lorsque l’option de menu que vous voulez est souligné, appuyez la touche avance rapide votre sélection.
MODE DE LECTURE MENU RECHERCHE ET LECTURE • • 1. Pour accéder à la liste de recherche des vidéos, allez au menu principal et choisissez recherche et lecture (Search and Play) L’écran de Recherche et Lecture énumérera tous les enregistrements que vous avez, commençant avec les plus vieilles images 1 Date/Heure/Fichiers - Le répertoire de vidéo montre les dates et le nombre de fichiers vidéo enregistrés à cette date.
MODES DE LECTURE Il y a deux modes de lecture: • Lecture normale: Recherche et lecture: • Appuyez sur la touche de lecture à l’arrière de l’enregistreur, l’appareil lira toutes les séquences enregistré commençant avec les plus vieilles images Accessible par le menu principal, cette option vous permet de rechercher et de lire des images à partir d’une date et une heure, organisées par type d’enregistrement (manuel, continu ou par mouvement) AFFICHAGE DE LECTURE NORMALE 1.
MODES D’ENREGISTREMENT Les différents modes d’enregistrement ont des paramètres d’enregistrement distinct, y compris la taille de la vidéo, le taux d’images et la qualité de la vidéo. Quand un mode d’enregistrement est déclenché, le système commence à enregistrer selon cette configuration particulière. Ceci assure une durée d’enregistrement efficace et la qualité vidéo.
MODES D’ENREGISTREMENT Il y a trois modes d’enregistrement différents: manuel, programmé et par détection de mouvement. • Enregistrement manuel Démarre et arrête l’enregistrement manuellement à tout moment. Appuyez la touche d’enregistrement pour démarrer l’enregistrement. Appuyez une fois de plus pour arrêter l’enregistrement.
ALIMENTATION 1. Pour allumer l’appareil, branchez le câble d’alimentation ou insérez des piles dans le compartiment à piles. 2. Faites glisser l’interrupteur sur le dessus de l’appareil à la position ON. 3. Pour voir les menus et régler les paramètres vous devrez joindre le câble RCA à la sortie vidéo du DVR dissimulé et le connecter à l’entrée vidéo à l’arrière de votre téléviseur. 4. En allumant le système, il entrera automatiquement à la surveillance en direct.
FONCTIONS DES TOUCHES Il y a cinq touches qui contrôlent le DVR. Les touches ont des fonctions différentes, tout dépendant si le menu est ouvert ou si la vidéo est en pause.
INSTALLATION Installation du support de montage 1. Visser et attacher le support de la caméra dans la base du support. 2. Visser la base du support dans un mur en utilisant les 3 vis fournies, soyez sûr d’utiliser les accroches incluses. 3. Serrer le réglage d’angle de la caméra sur le dessus du support pour verrouiller la caméra en place. Utilisation du support de montage prolongé 1. Visser et fixer le support de la caméra dans le support de montage prolongé. 2.
TOUCHES ET CONNEXIONS 9 10 7 8 1 6 3 4 11 12 13 5 14 15 2 1. Capteur de mouvement simulé 2. Caméra sténopé: La caméra sténopé se trouve dans ce petit trou 3. Interrupteur: Pour éteindre le pouvoir, appuyez toujours sur la touche STOP (Arrêt) en premier pour arrêter l’enregistrement, ensuite éteignez l’appareil 4. Fente pour carte SD: Compatible avec les cartes mémoire SD et SD-HC 5. Jack de sortie vidéo (RCA): Pour visionner votre vidéo, utilisez la sortie vidéo RCA pour connecter à votre téléviseur.
INTRODUCTION Félicitations pour votre achaT du STEALTH1! Ce système est un enregistreur vidéo numérique (DVR) dissimulé à l’intérieur d’un capteur de mouvement simulé qui comprend une caméra sténopé de qualité supérieure intégré . Cet appareil vous permet d’enregistrer des séquences vidéo discrètement en utilisant trois modes d’enregistrement: manuel, programmé et la détection de mouvement.
TABLE DES MATIÈRES CE QUI EST INCLUS............................................................................................................................ 1 INTRODUCTION................................................................................................................................ 2 DISPOSITIFS..................................................................................................................................... 2 TOUCHES ET CONNEXIONS......................................
IMPORTANT ! LISEZ S’IL VOUS PLAÎT! INFORMATIONS DE LA GARANTIE DU PRODUIT S’il vous plaît visitez notre site web à www.defender-usa.com pour des informations sur la garantie de votre produit. Nous prenons la qualité très sérieusement. C’est pourquoi tous nos produits sont livrés avec un an de garantie de la date d’achat originale contre les défauts de fabrication et de matériaux.
DVR dissimulé Avec caméra de couleur intégrée MANUEL D’INSTRUCTIONS V1.1 www.defender-usa.