
Instruction manual
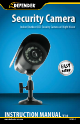


SP301-C
2
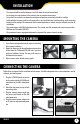
1. Screw the mounting bracket into the camera’s mounting
hole, turning it clockwise.
2. Mount the camera in the desired location no more than
60 feet from the TV/Monitor/VCR DVR unless you have
purchased additional wiring. You may wall mount or
desk mount these cameras.
3. Adjust cameras to the desired viewing angles.
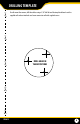
1. Plug the 4 PIN DIN female connection
on the camera into the 4 PIN DIN male
connection on the 60ft video/power
wire.
2. Match the two arrows on top of both
connecting cables.
3. Plug the camera’s power supply into
the power jack located on the 60ft
video/power wire.
4. Plug the camera’s power adapter into
an AC outlet or surge protected power
bar.
1 2
3 4
• The camera should be installed between 8 and 13ft above the area to be monitored
• Ensure there are no obstructions in the camera’s view, to maximize viewing area
• Ensure that the sunshade is positioned to avoid glare and position camera away from direct sunlight
• Decide whether the camera will be wall-mounted or sit on a desk/table top. If wall mounting, use the mounting
hardware in the package. We recommend that the mounting bracket is secured using the included screws for all
installations
• This camera comes with 60ft of video/power wire. Please make sure that you mount the cameras no more than
60ft from the TV/monitor/VCR/DVR
• We recommend using a surge protected power bar to protect the cameras internal circuitry
MOUNTING THE CAMERA
Follow these instructions for the installation of each camera. The 60ft video/power wire has two connections: one for
video out, and one for power.
CONNECTING THE CAMERA
INSTALLATION