
Specifications

GENERAL FITTING INSTRUCTIONS
Ei
ST1031
M
ST1032M
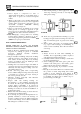
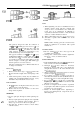
The greatest danger lies with the confusion of
10
mm and
2
in
UNF
pipe
nuts
used
for
in (or
4,75 mm) pipe. The
3
in
UNF
pipe nut
or
hose can
be screwed into a
10
mm port but is very slack and
easily stripped. The thread engagement is very
weak and cannot provide an adequate seal.
The opposite condition, a
10
mm
nut in a in port,
is
difficult and unlikely to cause trouble. The
10
mm
nut will screw in
1;
or
2
turns and seize. It has a
crossed thread ‘feel’ and it
is
impossible to force the
nut far enough to seal the pipe. With female pipe
nuts the position is of course reversed.
The other combinations are
so
different that there is
no danger
of
confusion.
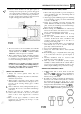
KEYS
AND
KEYWAYS
-
-
,’
1.
Remove burrs from edges of keyways with a fine
file and clean thoroughly before attempting to refit
key.
2.
Clean and inspect key closely; keys are suitable for
refitting only
if
indistinguishable from new,
as
any
indentation may indicate the onset of wear.
TAB WASHERS
1.
Fit new washers
in
all places where they are used.
2.
Ensure that the new tab washer is
of
the same
Always renew a used tab washer.
design as that replaced.
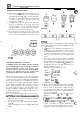
SPLIT
PINS
ST1030M
NUTS
1.
When tightening a slotted or castellated nut never
slacken
it
back
to
insert split pin or locking wire
except in those recommended cases where this
forms part
of
an adjustment. If difficulty is
experienced, alternative washers or nuts
should
be
selected, or washer thickness reduced.
2.
Where self
-
locking nuts have been removed
it
is
advisable to replace them with new ones
of
the
same type.
NOTE:
Where bearing pre
-
load
is
involved nuts
should be tightened in accordance with special
instructions.
LOCKING
WIRE
1.
Fit new locking wire of the correct type
for
all
2.
Arrange wire
so
that its tension tends to tighten the
assemblies incorporating it.
bolt
heads,
or
nuts,
to
which
it
is fitted.
SCREW THREADS
1.
Both UNF and Metric threads
to
IS0
standards are
used. See below for thread identification.
2.
Damaged thrcads must always be discarded.
Cleaning
up
threads with
a
die or tap impairs the
strength and closeness of fit of the threads and is
not
recommcndcd.
3.
Always ensure that replacement bolts are at least
equal
in
strength
to
those rcplaced.
4.
Do not allow oil, grease or jointing compound to
enter blind threaded holes. The hydraulic action on
screwing
in
the bolt or stud could split the housing.
5.
Always tighten
a
nut
or
bolt to the recommended
torque figure. Damaged or corroded threads
can
affect the torque reading.
6.
To
check
or
re
-
tighten a bolt
or
screw to a specified
torque figure, first slacken a quarter
of
a turn, then
re
-
tighten to
the
correct figure.
7.
Always oil thread lightly before tightening
to
ensure a free running thread, except in the case of
self
-
locking nuts.
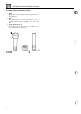
1.
Fit
new
split pins throughout when replacing any
unit.
2.
Always
fit
split pins where split pins were originally
used.
Do
not substitute spring washers: there is
always a good reason for
the
use of
a
split pin.
3.
All split pins should be fitted as shown unless
otherwise stated.
.
7:
... ..
::.
;a
...
,
.
...
5