
Full Product Manual

Use and Care Guide
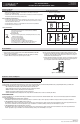
DAYLIGHT ADJUSTING INDOOR DIGITAL TIMER
Item #1002-229-532
Model #32648
UPC #030878326483
3 HOMEDEPOT.com
Please contact 1-844-871-8796 for further assistance.
Programming Instructional Video
To view an instructional video on how to program this product:
1. Go to www.homedepot.com and enter either the Item or Model number found in the top right corner
of this instruction sheet in the search field.
2. Click on your product from the list of search results and click on the video link in the Product
Overview section.
Initial Setup
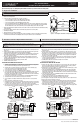
PRODUCT DESCRIPTION
Part Description
A PROGRAM (prg): Press to set daily on/off times.
B
MODE/DELETE (mod/del): Press to choose from auto, manual, or random modes. When the timer
is in Program mode (prg), this button deletes program settings.
C RESET: Push to reset the timer to default settings.
D
ON/OFF and TIMER OVERRIDE: Press to turn load on/off and press and hold to start the
Countdown function.
E SET: Press to set the calendar, clock, dusk, dawn, and daylight savings settings.
F UP/DOWN BUTTONS: Press to scroll through timer setting options.
G TIMER DOOR: Close after programming. Press to turn ON/OFF (timer override).
prg
set
r
down
mod/del
up
C
A
E
D
G
B
F
1
SETTING THE TIMER UP FOR THE FIRST TIME
2
SETTING THE DAWN/DUSK REGION (ZONE)
NOTE: This timer will automatically return to the clock mode if a button is not pushed for 20 seconds. Push
the Set button (E) once to return to program mode if this happens.
a. Using a toothpick or a pencil, gently
press reset (C) to clear all programming
and set the timer to default settings.
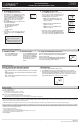
b. Press the SET (E) button to begin setting
the time and calender. The time “12:00
am” will be ashing. See Figure 7.
c. Use the UP/DOWN buttons (F) to set the
current time, taking note of the AM and
PM on the display. Press SET (E) when
the current time is displayed.
d. Use the UP/DOWN buttons (F) to select
the year then press SET (E).
e. Use the UP/DOWN buttons (F) to set the
month then press SET (E).
f. Use the UP/DOWN buttons (F) to set the
day then press SET (E).
g. When DST appears on the display (see
Figure 8), use the UP/DOWN buttons (F)
to turn DST On/Off then press SET (E).
NOTE: Choose DST ON if your local area
observes Daylight Saving Time. The timer will
automatically adjust backwards and forwards
an hour. Choose DST OFF if your local area
does not observe Daylight Saving Time.
h. If you selected DST ON, the display
ashes “ZONE”. Proceed to step 2
- SETTING THE DAWN/DUSK REGION
(ZONE).
Figure 7
AM
Figure 8
ON
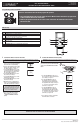
IMPORTANT: This step does not set your time zone. In this step you are identifying your location based on
this map to ensure an accurate dawn and dusk time for your area.
View Figure 9 and determine which zone best ts
your location. The options are NOR: North, CENT:
Central, SOUT: South, HAWA: Hawaii, and ALAS:
Alaska.
a. Use the UP/DOWN buttons (F) to select
the zone where the timer is installed then
press SET (E). See Figure 10.
b. Use the UP/DOWN buttons (F) to set
the dusk time then press SET (E). The
approximate dusk time will be ashing.
The approximate time may be changed +
or – 2 hours in order to nd the desired
dusk time. See Figure 11A.
c. Use the UP/DOWN buttons (F) to set
the dawn time then press SET (E). The
approximate dawn time will be ashing.
The approximate time may be changed +
or – 2 hours in order to nd the desired
dawn time. See Figure 11B.
d. Press SET (E) to complete setup and the
timer will return to clock mode.
Figure 9
NORTH
CENTRAL
SOUTH
NORTH
ALASKA
CENTRAL
SOUTH
HAWAII
Figure 10
Figure 11A
PM
Figure 11B
AM
CONTINUE TO PAGE 4 TO COMPLETE SET UP AND PROGRAMING