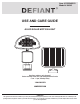
Item # 1000048551 Model # 84045 USE AND CARE GUIDE 48 LED SOLAR MOTION LIGHT Questions, problems, missing parts? Before returning to the store, call Defiant Customer Service 8 a.m. - 6 p.m., Monday-Friday 1-866-308-3976 HOMEDEPOT.COM THANK YOU We appreciate the trust and confidence you have placed in Defiant through the purchase of this solar motion light. We strive to continually create quality products designed to enhance your home.
Table of Contents Table of Contents. . . . . . . . . . . . . . . . . . . . . . . . . . . . . . . . . . . . 2 Safety Information. . . . . . . . . . . . . . . . . . . . . . . . . . . . . . . . . . . 2 Warranty. . . . . . . . . . . . . . . . . . . . . . . . . . . . . . . . . . . . . . . . . . . 2 What is Covered. . . . . . . . . . . . . . . . . . . . . . . . . . . . . . . . . . . . 2 Pre-Installation . . . . . . . . . . . . . . . . . . . . . . . . . . . . . . . . . . . . . 3 Planning Installation . . . . . . .
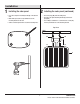
Pre-Installation PLANNING INSTALLATION For the best result, locate the solar panel in a position where it receives direct sunlight and is generally free from cover and shade. Be aware and consider foliage and building overhangs, which will affect the solar panel’s ability to charge. Solar Panel Solar Panel NOTE: Face the solar panel due south for maximum sun exposure.
Pre-Installation (continued) PACKAGE CONTENTS B A Part Description Quantity A 48 LED Motion Light 1 B Solar panel with wire 1 4
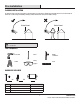
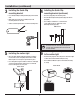
Installation 1 2 Installing the solar panel □□ Place the solar panel mounting bracket (B) on the desired wall. Installing the solar panel (continued) □□ Place four plugs (BB) in the mounting holes. □□ Place the solar panel mounting bracket (B) over the four plugs (BB). □□ Mark with a pencil, the four pre-drilled holes in the mounting bracket on the wall. □□ Use a Phillips screwdriver to screw in the four screws (AA) into the pre-drilled holes of the mounting bracket.
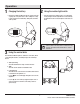
Installation (continued) 3 4 Installing the Quick-Clip mounting bracket □□ Place the Quick-Clip mounting bracket (CC) on the desired wall. Installing the Quick-Clip mounting bracket (continued) □□ Place two plugs (BB) in the mounting holes. □□ Place the Quick-Clip mounting bracket (CC) over the two plugs (BB). □□ Mark with a pencil, the two pre-drilled holes in the mounting bracket on the wall.
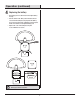
Operation 1 2 Charging the battery □□ Before the 48 LED Solar Motion Light can operate to its full capacity, the solar panel needs to be in sunlight for 3 days to fully charge the included battery. Charge the unit in the “OFF” position. Using the motion light switch □□ Turn the switch to the “AUTO” position, once the battery is fully charged. Then the light will turn on automatically at night when motion is detected by the motion detector head.
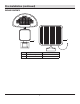
Operation (continued) 4 Replacing the battery □□ The battery pack is located in back of the light’s battery housing. □□ Turn the switch to the “OFF” position. Remove the four screws from the battery housing. Separate the battery pack connector. Remove the old battery pack and replace it with a new identical rechargeable battery pack. □□ Replace the cover of the battery housing and secure it with the four screws. Battery Pack Battery Pack NOTE: Please contact www.homedepot.
Maintenance Periodically check the connection from the solar panel to the light. Ensure this plug is correctly inserted. □□ Some seasonal adjustment of the solar panel may be required to offset shorter charge days during the winter. □□ Ensure the solar panel is free from any obstruction such as trees or buildings. Care and Cleaning □□ The solar panel should be cleaned on a regular basis. This will ensure the 48 LED Solar Motion light charges consistently.
Questions, problems, missing parts? Before returning to the store, call Customer Service 8 a.m. - 6 p.m., Monday-Friday 1-866-308-3976 HOMEDEPOT.COM Retain this manual for future use.
Artículo # 1000048551 Modelo # 84045 GUÍA DE UTILIZACIÓN Y CUIDADO LÁMPARA SOLAR DE 48 LED CON SENSOR DE MOVIMIENTO ¿Preguntas, problemas o partes faltantes? Antes de regresar a la tienda, llame al servicio al cliente de Defiant 8:00 AM a 6:00 PM, de lunes a viernes 1-866-308-3976 HOMEDEPOT.COM GRACIAS Agradecemos la confianza que ha depositado en Defiant al adquirir esta lámpara solar con sensor de movimiento. Nos esforzamos para seguir creando productos de calidad diseñados para mejorar su casa.
Tabla de contenidos Tabla de contenidos . . . . . . . . . . . . . . . . . . . . . . . . . . . . . . . . . . 2 Información de seguridad . . . . . . . . . . . . . . . . . . . . . . . . . . . . . 2 Garantía. . . . . . . . . . . . . . . . . . . . . . . . . . . . . . . . . . . . . . . . . . . 2 Cobertura. . . . . . . . . . . . . . . . . . . . . . . . . . . . . . . . . . . . . . . . . 2 Pre-Instalación. . . . . . . . . . . . . . . . . . . . . . . . . . . . . . . . . . . . .
Pre-Instalación PLANIFICACIÓN DE LA INSTALACIÓN Para mejores resultados, ubique el panel solar en un lugar donde reciba luz solar directa sin obstrucción y generalmente libre de sombras. Tenga en cuenta follaje y estructuras salientes que puedan afectar la capacidad de carga del panel solar. Panel Solar Panel Solar NOTA: Oriente el panel hacia el sur para mayor exposición al sol.
Pre-Instalación (Continuación) CONTENIDOS DEL PAQUETE B A Parte Descripción Cantidad A Lámpara de 48 LED 1 B Panel solar con cable 1 4
Instalación 1 2 Instalación del panel solar □□ Coloque el soporte de montaje del panel solar (B) en el muro deseado. Instalación del panel solar (continuación) □□ Coloque cuatro taquetes (BB) en los agujeros de montaje. □□ Coloque el soporte de montaje del panel solar (B) sobre los taquetes (BB). □□ Marque con un lápiz en la pared los cuatro agujeros preperforados del soporte de montaje.
Instalación (continuación) 3 4 Instalación del soporte de enganche □□ Coloque el soporte de enganche (CC) en el muro deseado Instalación del soporte de enganche (continuación) □□ Coloque dos taquetes (BB) en los agujeros de montaje. □□ Marque con un lápiz en la pared los dos agujeros preperforados del soporte de enganche. □□ Coloque el soporte de enganche (CC) sobre los dos taquetes (BB). □□ Utilice un taladro eléctrico estándar para crear los agujeros de montaje.
Operación 1 2 Carga de la batería □□ Para que la lámpara solar opere a máxima capacidad, el panel solar necesitará 3 días de carga bajo el sol para cargar la batería incluida. Realice esta carga con el interruptor en la posición de apagado (OFF). Uso del interruptor de la lámpara □□ Coloque el interruptor en la posición de AUTO una vez la batería esté completamente cargada. La lámpara se encenderá automáticamente durante la noche cuando el detector de movimiento la active.
Operación (continuación) 4 Reemplazo de la batería □□ El paquete de baterías está ubicado en la parte posterior de la lámpara. □□ Coloque el interruptor en la posición de apagado “OFF”. Quite los cuatro tornillos del compartimento de la batería. Saque el paquete de baterías y desconéctelo. Reemplace con un paquete recargable nuevo e idéntico. □□ Cierre el compartimento de baterías y ajuste los tornillos. Paquete de bateria Paquete de bateria NOTA: Por favor contacte www.homedepot.
Mantenimiento Verifique periódicamente la conexión entre el panel solar y la lámpara. Verifique que el panel esté conectado correctamente. □□ Puede ser necesario ajustar el panel solar durante periodos diurnos de carga más cortos durante el invierno. □□ Asegúrese de que el panel solar está libre de cualquier obstáculo como árboles o edificios. Cuidado y limpieza □□ El panel debe ser limpiado regularmente. Esto asegura que la lámpara solar reciba cargas de manera consistente.
¿Tiene preguntas, problemas o partes faltantes? Antes de regresar a la tienda, llame al servicio al cliente 8:00 AM a 6:00 PM, de lunes a viernes 1-866-308-3976 HOMEDEPOT.