
Use and Care Manual

6
Installation (continued)
3
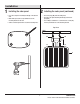
Installing the Quick-Clip
mounting bracket
□ Place the Quick-Clip mounting bracket (CC) on the desired
wall.
□ Mark with a pencil, the two pre-drilled holes in the
mounting bracket on the wall.
□ Utilize a standard power drill to create the mounting holes.
CC
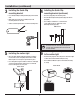
4
Installing the Quick-Clip
mounting bracket (continued)
□ Place two plugs (BB) in the mounting holes.
□ Place the Quick-Clip mounting bracket (CC) over the two
plugs (BB).
□ Use a Phillips screwdriver to screw in the two
screws (AA) into the pre-drilled holes of the
Quick-Clip mounting bracket.
Wall
Side View
AA
CC
BB
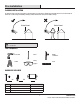
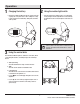
5
Installing the motion light
□ Once the Quick-Clip mounting bracket (CC) is installed,
ensure all the screws are tightly fastened. The 48 LED
Motion Light is now ready to be positioned into place.
□ Place the light hook (pre-installed on the back of the light)
over the mounting bracket. At this point, a click will be
heard as the light secures into place.
Wall
Side View
A
CC
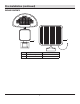
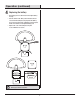
6
Connecting the solar panel
to the motion light
□ Insert the wire plug from the solar panel to the motion light
socket located underneath the battery housing.
□ The 48 LED Solar Motion Light is now installed and ready
to charge.
Front View
NOTE:
The beveled side of the Quick-Clip mounting bracket
should be facing downwards and the at side should
be facing outwards.