Item #1002366598 Model #DFI-5999-WH USE AND CARE GUIDE MOTION SECURITY LIGHT Questions, problems, missing parts? Before returning to the store, call Defiant Customer Service 8 a.m.-7 p.m., EST, Monday-Friday, 9 a.m. - 6 p.m., EST, Saturday 1-866-308-3976 HOMEDEPOT.COM THANK YOU We appreciate the trust and confidence you have placed in Defiant through the purchase of this motion security light. We strive to continually create quality products designed to enhance your home.
Table of Contents Tools Required........................................3 Hardware Included..................................4 Package Contents...................................4 Installation.................................................5 Operation...................................................8 Care and Cleaning...................................10 Troubleshooting.......................................10 Table of Contents.......................................2 Safety Information..................
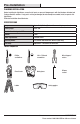
Pre-Installation PLANNING INSTALLATION Before installing the light fixture, ensure that all parts are present. Compare parts with the Hardware Included and Package Contents sections. If any part is missing or damaged, do not attempt to assemble, install, or operate this light fixture. Estimated installation time: 30 minutes SPECIFICATIONS Range Up to 40 ft. (12.
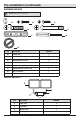
Pre-Installation (continued) HARDWARE INCLUDED NOTE: Hardware shown to actual size.
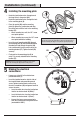
Installation the mounting 1 Determining location NOTE: The light fixture should be mounted approximately 8 ft. (2.4 m) above the ground. If the light fixture is mounted higher than recommended, aiming the sensor down will reduce the coverage area. Wall Mount □□ Determine the mounting location – wall or eave mount. □□ Position the lamp heads (A) in the general direction of the desired light coverage.
Installation (continued) 4 Installing the mounting plate FF UP /H □□ Route the junction box wires through one of the large holes in the gasket (HH). GN Te D □□ Route the junction box wires through the holeTierrre ra in the mounting plate (D). □□ Place the gasket (HH) and the mounting plate (D) against the junction box and align the center holes with the hole in the mounting bracket (FF). □□ When mounting to a wall, the “UP” arrow must point upward.
Installation (continued) 6 Mounting the light fixture D NOTICE: The two pins on the rear of the light fixture must be inserted into the terminal block for the light to work. B □□ Align the top edge of the light fixture (B) with the top edge of the mounting plate (D). Tilt the light fixture (B) toward the mounting plate (D), making sure the light fixture (B) is centered on the mounting plate (D). □□ Tighten the large mounting bolt (EE) securely through the center of the mounting plate (D).
Operation 1 Adjusting the lamp heads WARNING: Risk of fire. Keep the lamp heads at least 2 in. (51 mm) from combustible materials. CAUTION: Keep lamp heads 30° below horizontal to avoid water damage and electrical shock. □□ Turn the power on at the circuit breaker or fuse and turn on the wall switch. □□ If needed, gently grasp the lamp heads (A) and tilt them up or down or side to side to adjust the light coverage area.
Operation (continued) 4 Adjusting the SENS control Test □□ To increase the sensitivity, turn the “SENS” control counterclockwise. □□ To decrease the sensitivity, turn the “SENS” control clockwise. 10Min + C SENS – NOTE: The motion sensor (C) is more sensitive to motion moving across the front of the sensor. The motion sensor (C) is less sensitive to motion moving directly toward the front of the sensor. NOTE: The higher the “SENS” setting (sensitivity), the greater the possibility of false triggering.
Care and Cleaning □□ To prolong the original appearance, clean the light fixture with clear water and a soft, damp cloth only. □□ Do not use paints, solvents, or other chemicals on this light fixture. They could cause a premature deterioration of the finish. This is not a defect in the finish and will not be covered by the warranty. □□ Do not spray the light fixture with a hose or power washer. Troubleshooting Problem Possible Cause Solution The light will not come on.
Troubleshooting (continued) Problem Possible Cause Solution The lights stay on continuously. □□ The motion sensor may be picking up a heat source, such as an air vent, dryer vent, or brightly painted, heat-reflective surface. □□ Decrease the “SENS” setting or reposition the motion sensor. □□ The motion sensor is in motion off mode (the red LED behind the motion sensor lens is not blinking). □□ Switch the motion sensor to motion on. See Switching motion detection off and on on page 9.
Questions, problems, missing parts? Before returning to the store, call Defiant Customer Service 8 a.m.-7 p.m., EST, Monday-Friday, 9 a.m. - 6 p.m., EST, Saturday 1-866-308-3976 HOMEDEPOT.COM Retain this manual for future use.
Articulo #1002366598 Modelo #DFI-5999-WH GUÍA PARA EL USO Y CUIDADO LUZ DE SEGURIDAD POR MOVIMIENTO ¿Tiene preguntas, problemas o piezas faltantes? Antes de devolverlo a la tienda, llame a Servicio al Cliente de Defiant de 08 a.m.-7 p.m., EST, Lunes - Viernes, 09 a.m.-6 p.m., EST, sábado. 1-866-308-3976 HOMEDEPOT.COM GRACIAS Agradecemos la fe y la confianza que usted ha depositado en Defiant al comprar esta luz de seguridad por movimiento.
Contenido Herramientas Requeridas.....................15 Ferretería Incluida.................................16 Contenido del Paquete..........................16 Instalación...............................................17 Operación.................................................20 Cuidado y limpieza..................................22 Análisis de averías..................................22 Contenido.................................................14 Información de seguridad.......................
Antes de la instalación PLANIFICACIÓN DE LA INSTALACIÓN Antes de instalar el aparato de luz, esté seguro que estén todas las piezas. Compare las piezas con la Ferretería incluida y las secciones de Contenidos del paquete. Si cualquier pieza falta o está dañada, no intente ensamblar, instalar ni operar este aparato de luz.
Antes de la instalación (continuación) FERRETERÍA INCLUIDA NOTA: La ferretería se muestra en su tamaño real AA BB CC DD EE FRONT FF GG HH Pieza Descripción Cantidad AA Tapón de caucho 1 BB Tornillo del soporte de montaje 2 CC Tornillo del soporte de montaje 2 DD Tornillo pequeño de montaje 1 EE Tornillo grande de montaje (pre-instalado) 1 FF Soporte de montaje (no está a escala) 1 GG Mini-destornillador 1 HH Empaque (no está a escala) 1 CONTENIDO DEL PAQUETE A B C D Piez
Instalación del sitio de 1 Determinación montaje NOTA: Esta lámpara debe ser instalada aproximadamente a 8 pies (2,4 m) por encima del suelo. Si se la instala a una altura más alta de la recomendada, se reducirá la zona de cobertura si apunta el detector hacia abajo. Montaje en pared □□ Determine el sitio de montaje – pared o alero. □□ Coloque los cabezales de la lámpara (A) en la dirección general de la cobertura de luz deseada.
Instalación (continuación) de la placa de 4 Instalación montaje FF UP /H □□ Pase los cables de la caja de conexiones por uno de los agujeros grandes del empaque (HH).GND Te □□ Pase los cables de la caja de conexiones por Telierrrre a agujero que está en la placa de montaje (D). □□ Coloque el empaque (HH) y la placa de montaje (D) sobre la caja de conexiones y alinee los agujeros centrales con el agujero en el soporte de montaje (FF).
Instalación (continuación) 6 Montaje del aparato de luz D AVISO: Las dos clavijas de la parte posterior de la lámpara se deben insertar en el bloque de terminales para que la luz funcione. B □□ Alinee el borde superior de la lámpara (B) con el borde superior de la placa de montaje (D). Incline la lámpara (B) hacia la placa de montaje (D), asegurándose de que la lámpara (B) esté centrada en la placa de montaje (D).
Operación de los cabezales de la 1 Ajuste lámpara ADVERTENCIA: Riesgo de incendio. Mantenga los cabezales de la lámpara por lo menos a 2 pulgadas (51 mm) de materiales combustibles. PRECAUCIÓN: Mantenga los cabezales de la lámpara 30° debajo de la línea horizontal para evitar daños por agua y descargas eléctricas. □□ Conecte la energía eléctrica en el disyuntor o en el fusible y encienda el interruptor de la pared.
Operación (continuación) 4 Ajuste del control SENS NOTA: Mientras mayor sea la calibración del “SENS” (sensibilidad), mayor será la posibilidad de falsas alarmas. Para reducir las falsas alarmas, gire el control “SENS” hacia la derecha. □□ Para aumentar la sensibilidad, gire el control “SENS” en sentido antihorario. □□ Para disminuir la sensibilidad, gire el control “SENS” en sentido horario.
Cuidado y limpieza □□ Para prolongar la apariencia original, limpie la lámpara solo con agua limpia y un paño suave y húmedo. □□ No use pinturas, solventes ni otros químicos en este aparato de luz. Podrían ser la causa de una prematura deterioración del acabado. Esto no es un defecto del acabado y no será cubierto por la garantía. □□ No rocíe la lámpara con una manguera o lavadora a presión. Análisis de averías Problema Causa Probable Solución La luz no se enciende.
Análisis de averías (continuación) Problema Causa Probable Solución Las luces permanecen encendidas constantemente. □□ El detector de movimiento puede estar absorbiendo calor de una fuente de calor como una ventosa de aire, una secadora de aire, o una superficie pintada con colores brillantes y que refleja el calor. □□ Reduzca la calibración del alcance (“SENS”) o vuelva a colocar el detector de movimiento.
¿Tiene preguntas, problemas o piezas faltantes? Antes de devolverlo a la tienda, llame a Servicio al Cliente de Defiant de 08 a.m.-7 p.m., EST, Lunes - Viernes, 09 a.m.-6 p.m., EST, sábado. 1-866-308-3976 HOMEDEPOT.COM Guarde este manual para uso futuro.