
Instructions / Assembly


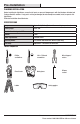


6
D
HH
D
DD
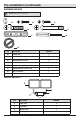
Installation (continued)
4
Installing the mounting plate
□ Route the junction box wires through one of
the large holes in the gasket (HH).
□ Route the junction box wires through the hole
in the mounting plate (D).
□ Place the gasket (HH) and the mounting
plate(D) against the junction box and align
the center holes with the hole in the mounting
bracket (FF).
□ When mounting to a wall, the “UP” arrow
must point upward.
□ When mounting to an eave, the “UP” arrow
must point toward the building.
□ Insert the small mounting bolt (DD) through
the mounting plate (D) hole located below the
threaded hole and through the gasket (HH)
hole, and thread it into the center hole of the
mounting bracket (FF). Tighten the bolt (DD)
securely.
□ Firmly pull on the mounting plate (D) to
verify it is securely attached to the mounting
bracket(FF).
NOTICE: Ensure the gasket (HH) is wrinkle-free and centered
between the mounting plate (D) and the mounting surface.
FRONT
N (White/
Blanc/Blanco)
GND
Terre
Tierra
UP/Haut/Arriba
L (Black/
Noir/Negro)
FRONT
N (White/
Blanc/Blanco)
GND
Terre
Tierra
UP/Haut/Arriba
L (Black/
Noir/Negro)
NOTICE: When attaching this light to an external, surface mount
junction box, ensure the gasket (HH) is centered on the junction box
and the mounting plate (D) presses against the gasket (HH) evenly.
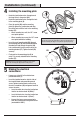
5
Making the electrical
connections
□ If necessary, strip 3/8" of insulation from
junction box wires (1).
□ Insert the junction box wires into the side of
the terminal block and around the ground
screw. Tighten terminal block screws using
the mini-screwdriver (GG) and ground screw to
secure the wires.
□ Insert the white wire from the junction box
into the terminal marked “N (White)”.
□ Insert the black wire from the junction box
into the terminal marked “L (Black)”.
□ Connect the bare or green ground wire
from the junction box to the ground screw
(marked with “GND”).
N (White/
Blanc/Blanco)
GND
Terre
Tierra
UP/Haut/Arriba
L (Black/
Noir/Negro)
3/8"
FF
HH
D
HH
1