
Instructions / Assembly


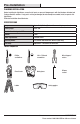


8
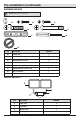
Operation
1
Adjusting the lamp heads
WARNING: Risk of re. Keep the lamp heads at least
2in. (51mm) from combustible materials.
CAUTION: Keep lamp heads 30° below horizontal to
avoid water damage and electrical shock.
□ Turn the power on at the circuit breaker or fuse
and turn on the wall switch.
□ If needed, gently grasp the lamp heads (A) and
tilt them up or down or side to side to adjust
the light coverage area.
2
Setting the sensor for testing
NOTE: When the “Test / Timer” control is set to the “Test”
position, the light xture will operate during the day or
night. The light will stay on for 8 seconds after all motion
is stopped.
□ Turn the “Test / Timer” control fully
counterclockwise to the “Test” position.
□ Turn the “SENS” control fully clockwise to the
minimum position.
NOTE: The motion sensor will need to completely warm
up (60 seconds) before beginning the setup process.
Te st 10Min
SENS
+–
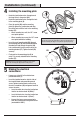
3
Adjusting the motion sensor
detection zone
□ Perform a “walk test”: walk in an arc across
the front of the motion sensor (C).
□ Watch the light. The light will come on and the
red LED will ash indicating motion has been
detected.
□ Stop, wait for the light to turn off, and then
begin walking again.
□ Continue this process until the detection zone
has been established.
□ If needed, gently grasp the motion sensor (C)
and move it from side to side or up and down
to adjust the detection zone.
C
C
A