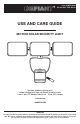
Item #1005414989 Model #DFI-7004-WH-G USE AND CARE GUIDE MOTION SOLAR SECURITY LIGHT Questions, problems, missing parts? Before returning to the store, call Defiant Customer Service 8 a.m.-7 p.m., EST, Monday-Friday, 9 a.m. - 6 p.m., EST, Saturday 1-866-308-3976 HOMEDEPOT.COM THANK YOU We appreciate the trust and confidence you have placed in Defiant through the purchase of this motion solar security light. We strive to continually create quality products designed to enhance your home.
Table of Contents Solar Panel..............................................3 Specifications.........................................4 Tools Required........................................4 Hardware Included..................................5 Package Contents...................................5 Installation.................................................6 Operation...................................................8 Care and Cleaning.....................................9 Troubleshooting....................
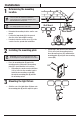
Pre-Installation PLANNING INSTALLATION Before installing the light fixture, ensure that all parts are present. Compare parts with the Hardware Included and Package Contents sections. If any part is missing or damaged, do not attempt to assemble, install, or operate this light fixture. Estimated installation time: 30 minutes INITIAL BATTERY CHARGE IMPORTANT: The solar panel requires full, direct sunlight to charge the battery.
Pre-Installation (continued) SPECIFICATIONS Range Up to 40 ft. (12 m) (Varies with surrounding temperature) Sensing angle Up to 180° Lumens Solar Power: 2100 LM LED color temperature 5000K (bright white) Power requirements 3600 mAh, 7.4V Li-Ion Rechargeable Battery (pre-installed, nonreplaceable) Operating modes Off, Test, Auto Time delay 5 seconds to 1 minute TOOLS REQUIRED Phillips screwdriver 1/8 in. Flathead screwdriver Drill Drill bits (3/32 in. and 7/32 in.
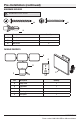
Pre-Installation (continued) HARDWARE INCLUDED NOTE: Hardware shown to actual size. AA BB CC Part Description AA Mounting screw Quantity 4 BB Mounting screw 2 CC Wall anchor 6 PACKAGE CONTENTS A D B UP E C Part Description Quantity A Lamp heads 3 B Light fixture 1 C Motion sensor 1 D Mounting plate 1 E Solar panel 1 5 HOMEDEPOT.COM Please contact 1-866-308-3976 for further assistance.
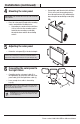
Installation the mounting 1 Determining location NOTE: The light fixture should be mounted approximately 8 ft. (2.4 m) above the ground. If the light fixture is mounted higher than recommended, aiming the sensor down will reduce the coverage area. Wall Mount NOTE: Ensure the fixture and the solar panel are located close enough together for the cord to reach.
Installation (continued) 4 Mounting the solar panel □ If mounting to wall board or brick, drill two 7/32 in. holes into the mounting surface. Insert the wall anchors (CC) and attach the base using the two mounting screws (AA). IMPORTANT: Caulk around the base and on top of the screw heads after installation. □ AA Place the solar panel (E) against the mounting surface and mark the mounting holes. □ If mounting to a wooden surface, drill two 3/32 in. holes into the mounting surface.
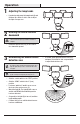
Operation 1 Adjusting the lamp heads □ If needed, gently grasp the lamp heads (A) and tilt them up or down or side to side to adjust the light coverage area. A THIS SIDE UP the sensor controls 2 Rotating downward 1MIN □ OFF C the motion sensor 3 Determining detection zone SENS UP H SIDE L THIS M Rotate the motion sensor (C) so the controls face toward the ground.
Operation (continued) 4 Adjusting the SENS switch 1MIN OFF M SENS TEST AUTO H 5S L L SENS 5S OFF H SENS TEST AUTO L M H SENS 5S M TEST AUTO L M H OFF SENS TEST AUTO L 5S C 1MIN 1MIN 5S Slide the control switch to the “OFF” position to turn the light (B) off and to conserve the battery life. H TEST AUTO C OFF M 5S 5S SENS Slide the control switch to the “AUTO” position. To increase the time, turn the dial toward the “1 MIN” position.
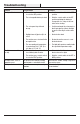
Troubleshooting Problem Possible Cause Solution The light will not come on. □ The motion sensor control switch is set to the OFF position. □ Slide the control switch to the AUTO position. □ The rechargeable battery is dead. □ Slide the control switch to the OFF position and allow the battery to charge with 3 to 7 days of full sunshine before testing. □ The solar panel is positioned wrong.
This device complies with Part 15 of the FCC Rules. Operation is subject to the following two conditions: (1) this device may not cause harmful interference, and (2) this device must accept any interference received, including interference that may cause undesired operation. Warning: Changes or modifications to this unit not expressly approved by the party responsible for compliance could void the user’s authority to operate the equipment.
Questions, problems, missing parts? Before returning to the store, call Defiant Customer Service 8 a.m.-7 p.m., EST, Monday-Friday, 9 a.m. - 6 p.m., EST, Saturday 1-866-308-3976 HOMEDEPOT.COM Retain this manual for future use.
Articulo #1005414989 Modelo #DFI-7004-WH-G GUÍA PARA EL USO Y CUIDADO LUZ SOLAR DE SEGURIDAD CON DETECTOR DE MOVIMIENTO ¿Tiene preguntas, problemas o piezas faltantes? Antes de devolverlo a la tienda, llame a Servicio al Cliente de Defiant de 08 a.m.-7 p.m., EST, Lunes - Viernes, 09 a.m.-6 p.m., EST, sábado. 1-866-308-3976 HOMEDEPOT.COM GRACIAS Agradecemos la confianza que han depositado en Defiant al comprar esta luz solar de seguridad con detector de movimiento.
Contenido Panel Solar............................................15 Especificaciones...................................16 Herramientas Requeridas.....................16 Ferretería Incluida.................................17 Contenido del Paquete..........................17 Instalación...............................................18 Operación.................................................20 Cuidado y limpieza..................................21 Análisis de averías..................................
Antes de la instalación PLANIFICACIÓN DE LA INSTALACIÓN Antes de instalar el aparato de luz, esté seguro que estén todas las piezas. Compare las piezas con la Ferretería incluida y las secciones de Contenidos del paquete. Si cualquier pieza falta o está dañada, no intente ensamblar, instalar ni operar este aparato de luz. Tiempo estimado para la instalación: 30 minutos CARGA INICIAL DE LA BATERÍA IMPORTANTE: El panel solar requiere luz de sol directa y total para cargar la batería.
Antes de la instalación (continuación) ESPECIFICACIONES Alcance Hasta 40 pies (12 m) (Varía con la temperatura circundante) Ángulo de detección Hasta 180° Lúmenes Energía solar: 2100 LM LED de temperatura de color 5000K (blanco brillante) Requisitos de la energía eléctrica Pila de ión-litio de 3600 mAh, 7,4 Voltios (preinstalada, no reemplazable) Fases de operación Apagado, prueba, automático Retardo de tiempo De 5 segundos a 1 minuto HERRAMIENTAS REQUERIDAS Destornillador phillips Destornil
Antes de la instalación (continuación) FERRETERÍA INCLUIDA NOTA: La ferretería se muestra en su tamaño real AA BB CC Pieza Descripción Cantidad AA Tornillo de montaje 4 BB Tornillo de montaje 2 CC Ancla de pared 6 CONTENIDO DEL PAQUETE A D B UP E C Pieza Descripción Cantidad A Cabezas de la lámpara 3 B Artefacto de luz 1 C Detector de movimiento 1 D Placa de montaje 1 E Panel solar 1 17 HOMEDEPOT.
Instalación del sitio de 1 Determinación montaje NOTA: Esta lámpara debe ser instalada aproximadamente a 8 pies (2,4 m) por encima del suelo. Si se la instala a una altura más alta de la recomendada, se reducirá la zona de cobertura si apunta el detector hacia abajo. Montaje en pared THIS de la placa de 2 Instalación montaje □ NOTA: Esté seguro que haya suficiente espacio vertical por encima de la placa de montaje que permita montar la lámpara.
Instalación (continuación) 4 Montaje del panel solar □ Si se monta sobre tabla de fibra prensada o sobre ladrillo, taladre dos orificios de 7/32 pulgadas en la superficie de montaje. Inserte anclas de pared (CC) y sujete la base con dos tornillos de montaje (AA). IMPORTANTE: Calafatee alrededor de la base y en la parte superior de las cabezas de los tornillos luego de la instalación. □ AA Coloque el panel solar (E) contra la superficie de montaje y marque los orificios de montaje.
Operación de los cabezales de la 1 Ajuste lámpara □ Si es necesario, sujete suavemente los cabezales de la lámpara (A) e inclínelos hacia arriba o hacia abajo o de lado a lado para ajustar el área de cobertura de la luz. A THIS SIDE UP hacia abajo de los 2 Giro controles del detector □ NOTA: Cuando el interruptor de control del detector de movimiento está en la posición “PRUEBA” (“TEST”), la luz funcionará durante el día o la noche.
Operación (continuación) 4 Ajuste del interruptor SENS L M 1MIN TEST AUTO □ OFF M TEST AUTO H 5S L L 5S SENS OFF H SENS TEST AUTO L M H SENS 5S M Deslice el interruptor de control a la posición “AUTO”. Para aumentar el tiempo, gire el dial hacia la posición de “1 MIN” (segundos). Para disminuir el tiempo, gire el dial hacia la posición de “5 S” (segundos).
Análisis de averías Problema Causa Probable Solución La luz no se enciende. □ El interruptor de control del detector de movimiento está en la posición OFF. □ Deslice el interruptor de control a la posición AUTO. □ La batería recargable está agotada. □ Deslice el interruptor de control a la posición OFF y deje que la batería se cargue con 3 a 7 días de pleno sol antes de probarla. □ El panel solar está mal ubicado.
Este aparato cumple con la Parte 15 de las Reglas de la FCC. La operación está sujeta a las dos siguientes condiciones: (1) este aparato no puede causar interferencias perjudiciales y (2) este aparato debe aceptar cualquier interferencia recibida, incluyendo una interferencia que pueda causar un funcionamiento indeseado.
¿Tiene preguntas, problemas o piezas faltantes? Antes de devolverlo a la tienda, llame a Servicio al Cliente de Defiant de 08 a.m.-7 p.m., EST, Lunes - Viernes, 09 a.m.-6 p.m., EST, sábado. 1-866-308-3976 HOMEDEPOT.COM Guarde este manual para uso futuro.