
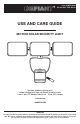
Full Product Manual


6
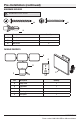
Installation
1
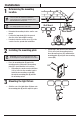
Determining the mounting
location
NOTE: The light xture should be mounted approximately
8 ft. (2.4 m) above the ground. If the light xture is
mounted higher than recommended, aiming the sensor
down will reduce the coverage area.
NOTE: Ensure the xture and the solar panel are located
close enough together for the cord to reach.
□ Determine the mounting location – wall or eave
mount.
□ Position the lamp heads (A) in the general
direction of the desired light coverage.
□ If needed, rotate the motion sensor (C) so the
controls face the ground after installation.
THIS SIDE UP
Wall Mount
THIS SIDE UP
Eave Mount
THIS SIDE UP
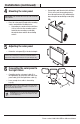
2
Installing the mounting plate
NOTE: Make sure there is enough vertical space above
the mounting plate to allow the light xture to be mounted.
□ Place the mounting plate (D) against the
mounting surface and ensure the mounting
plate (D) is level. Mark the hole locations.
□ If mounting to a wooden surface, drill two
3/32 in. holes into the mounting surface.
Install the two mounting screws (BB)
through the mounting plate (D) and into
the mounting surface.
□ If mounting to wall board or brick, drill two
7/32 in. holes into the mounting surface.
Insert the wall anchors (CC) and attach the
mounting plate (D) using the two mounting
screws (BB).
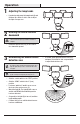
3
Mounting the light fixture
□ Slide the rear of the light xture (B) down onto
the mounting plate (D) until it snaps into place.
UP
A
D
BB
B
D