
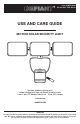
Full Product Manual


7 HOMEDEPOT.COM
Please contact 1-866-308-3976 for further assistance.
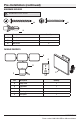
Installation (continued)
4
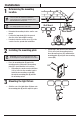
Mounting the solar panel
IMPORTANT: Caulk around the base and on top of the screw heads
after installation.
□ Place the solar panel (E) against the mounting
surface and mark the mounting holes.
□ If mounting to a wooden surface, drill two
3/32 in. holes into the mounting surface.
Install the two mounting screws (AA)
through the base and into the mounting
surface.
□ If mounting to wall board or brick, drill two
7/32 in. holes into the mounting surface.
Insert the wall anchors (CC) and attach the
base using the two mounting screws(AA).
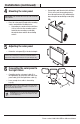
5
Adjusting the solar panel
□ Rotate the solar panel (E) to the desired angle.
IMPORTANT: The solar panel must receive as much direct sunlight
over the course of the day as possible. Keep in mind that shadows
may block the sunlight from reaching the solar panel during the day.
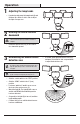
6
Connecting the solar panel to
the light fixture
□ Carefully route the solar panel cable (1) to
the light xture (B). Insert the end of the solar
panel cable (1) into the light xture cable(2).
□ Leave enough loose cable to form a drip
loop(3).
IMPORTANT: Slide the switch located on the bottom of the motion
sensor to the OFF position and allow the battery to charge with 3 to 7
days of full sunshine before testing.
NOTE: Wrap any excess solar panel cable around the arm
located behind the solar panel. Leave enough loose cable
to form a drip loop (3).
THIS SIDE UP
CC
AA
1
C
2
3
B
E
1
E
E