
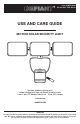
Full Product Manual


8
Operation
1
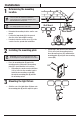
Adjusting the lamp heads
□ If needed, gently grasp the lamp heads (A) and
tilt them up or down or side to side to adjust
the light coverage area.
THIS SIDE UP
2
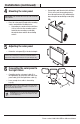
Rotating the sensor controls
downward
CAUTION: To avoid water damage, the motion sensor
controls must be facing the ground when installation is
complete.
□ Rotate the motion sensor (C) so the controls
face toward the ground.
THIS SIDE UP
SENS
5S 1MIN
OFF TEST AUTO
L M H
3
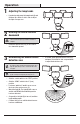
Determining the motion sensor
detection zone
NOTE: When the motion sensor control switch is set to
the “TEST” position, the light will operate during the day or
night. The light will stay on for 5 seconds after all motion
is stopped.
NOTE: The motion sensor will need to completely warm
up (50 seconds) before beginning the setup process.
□ Slide the control switch to the “TEST” position.
□ Slide the “SENS” switch to the “L” (low)
position.
□ Perform a “walk test”: walk in an arc across
the front of the motion sensor (C).
□ Watch the light (B). The light (B) will come on
and the red LED will ash indicating motion
has been detected.
□ Stop, wait for the light (B) to turn off, and then
begin walking again.
□ Continue this process until the detection zone
has been established.
□ If needed, gently grasp the motion sensor (C)
and move it from side to side or up and down
to adjust the detection zone.
THIS SIDE UP
SENS
5S 1MIN
OFF TEST AUTO
L M H
C
A
C
B