
Instructions / Assembly


6
Installation (continued)
4
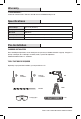
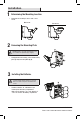
Installing the Mounting Plate
A. Wall Mount
C
2
C
AA
BB
2
□ Remove the two rubber gaskets (2) from
mounting plate (C).
□ Place the mounting plate (C) against the wall with
the word “UP” facing you (see illustration). Ensure
the mounting plate (C) is level. Mark the hole
locations.
□ If mounting to a wooden surface like a deck, you
can install the mounting screws (AA) through
the mounting plate (C) and into the wood with a
screwdriver, or with a drill and bit driver.
You can also drill two pilot holes into the wood
mounting surface with a 1/8 inch drill bit and then
install the screws. Reinstall the rubber gaskets
(2) over the screws to keep the unit weatherproof.
□ If mounting to wall board or brick, drill two pilot
holes into the mounting surface, using a 7/32 inch
drill bit.
Insert the wall pegs (BB) and attach the mounting
plate (C) using the two mounting screws (AA) and
install the rubber gaskets (2) over the screws to
keep the unit weatherproof.
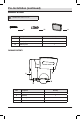
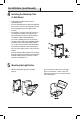
5
Mounting the Light Fixture
□ Attach the light fixture (B) to the mounting
plate (C).
□ Press the unit on the bottom to the mounting
plate. You should hear a “Click” sound. This
indicates that the device is securely attached to
the mounting plate.