
Installation Guide


5 HOMEDEPOT.COM
Please contact 1-866-308-3976 for further assistance.
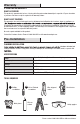
Installation
1
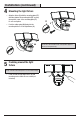
Determining the mounting
location
NOTE:
mounted higher than recommended, aiming the sensor
down will reduce the coverage area.
□ Determine the mounting location – wall or eave
mount.
□ Position the lamp heads (A) in the general
direction of the desired light coverage.
Wall Mount
Eave Mount
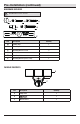
3
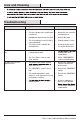
Making the electrical
connections
□ Connect the white wire of the xture to the white
wire from the junction box with wire nut(DD).
□ Connect the black wire of the xture to the black
wire from the junction box with wire nut(DD).
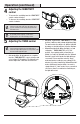
2
Installing the mounting bracket
WARNING: Turn the power off at the circuit breaker or
fuse. Place tape over the circuit breaker switch and verify
NOTE: Four mounting bracket screws of various sizes are
included. The installation will only require two. Discard the
unused mounting bracket screws after installation.
□
□ Install the mounting bracket (FF) with the
stamped word “FRONT” facing away from
the junction box. Use the mounting bracket
box. If necessary, use the screws that were
□ Firmly pull on the mounting bracket (FF) to
verify it is securely mounted to the junction
box.
A
BB or CC
FF
DD