
Use and Care Manual


6
1
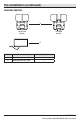
Mounting the fixture
□ Locate area in which you would like to install
your light fixture.
□ Using the fixture mounting screws (AA)
provided, mount fixture (A) to a solid surface
8–12 feet above the ground by placing the
screws through the holes on either side of
the fixture. Adjust sensor head so that control
switches are facing the ground.
NOTE: For fixture to operate properly, the solar panel (B)
must be located in an area that will receive the maximum
amount of sunlight and is free from obstructions.
2
Mounting the solar panel
□ Using the solar panel mounting screws (BB)
provided, mount solar panel (B) to a solid
surface (Fig. 3). Adjust the angle of the
solar panel (B) so that it will receive the
maximum amount of direct sunlight during
the daylight hours.
NOTE: For best results, locate panel to receive at least
3-4 hours of direct sunlight daily.
3
Connecting the fixture to the
solar panel
□ Carefully route the wire from the solar panel
(B) to the fixture (A) and plug it into the
connector extending from the side of the
fixture housing (A). Make sure to push the
connector plugs tightly together until you hear
two clicks to ensure they are fully engaged.
BB
B
Installation
AA
A
AA
BB
BB
BB
A
B