OWNER’S MANUAL FOR MODELS DMO 297—WHITE DMO 298 METALLIC 34 LITRE CONVECTION MULTIFUNCTION MICROWAVE OVEN YOU CAN RELY ON DEFY INDEX 2 Introduction. Microwaves and how they work. Precautions. Electrical installation. 3 Installation. Safety tips and instructions. 4 The control panel. 5 Accessories and their use. 6 Selecting language. Setting the time of day. Child lock. 7 Power save mode. Operational notes to remember. 8 Microwave cooking. 9 Grilling. 10 Convection cooking with pre heat.
Introduction You are now the owner of one of the finest and most modern microwave ovens that today’s technology can produce. You are going to make a great team together, but first you must familiarise yourself with the product. Please take some time and read through this manual carefully. It will tell you all you need to know about your new microwave oven, what it will do and how to do it. We wish you many happy years of cooking.
Installation 1. 2. 3. 4. Remove all packaging, including the protective film on the cabinet exterior. Do not remove the clear film on the inside of the door viewing screen. Examine the oven for any damage. ( A misaligned door, a dent in the cabinet) If damaged, do not operate the oven and notify your dealer or the nearest Defy Service Centre immediately. The oven must be placed on a suitable flat, level and stable surface capable of supporting the weight of the product. 5. 6. 7. 8. 9.
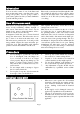
The control panel THE DISPLAY WINDOW The display will prompt you as to which action to take next. The indicator lights show the selected cooking mode, options and power level which have been selected. 1. Microwave. 2. Defrost. 3. Upper grill. 4. Lower grill. 5. Convection. 6. Child lock. 7. % microwave power. THE BUTTONS 8. Language: Press to select the desired language. 9. Clock: Press to set the clock. 10. Less: Press to deduct cooking time. 11. More: Press to add cooking time. 12.
Accessories and their use The rotating base. The rotating base should be securely fitted over the shaft at the centre of the oven floor. The rotating base must remain in the oven at all times during cooking and should only be removed for cleaning purposes. The turntable tray. Position the tray on top of the rotating base so the groove in the tray locates snugly over the base rollers. During operation, the tray must always be in place and will rotate clockwise or anti-clockwise. The metal stand.
Selecting the language The microwave features a six language prompt menu. When the oven is plugged in for the first time or after a power failure, the display will read :“SELECT LANGUAGE” in English, German, Dutch, French, Italian and Spanish. By pressing the language button repeatedly, it is possible to select the preferred language. Once for English, Twice for German , three times for Dutch and so on. Thereafter press the start button once to set and store the language into memory.
To set power save mode Power save mode switches the display off until required. Then the display will function normally but if no buttons are pressed within a 10 second period, the display will clear. To activate power save, proceed as follows: 1. 2. Press and hold the less button for 3 seconds. The oven beeps and the display will clear. To cancel power save , press the clock button and thereafter hold the less button for 3 seconds. The display will re-appears and the oven beeps.
Microwave cooking Microwave cooking allows you to set the desired power level and the duration of the cooking period. The oven will automatically cook at 100% power unless a lower power level is selected. To activate microwave cooking , proceed as follows: 1. 2. 3. 4. 5. 6. 7. 8. Power level Press the m/w button. The microwave indicator lights up. 100% and SET TIME are displayed. Select the power level by pressing the m/w button repeatedly until the appropriate level is displayed ( from 100% to 10%).
Grilling Grilling enables you to heat and brown food quickly without using microwaves. The oven has both an upper and a lower grill which may be operated in unison or independently. When used for the first time, the grill elements will generate smoke and release an odour. We therefore recommend that you heat both the upper and lower grill elements for 10 minutes before placing food in the oven. To activate grilling, proceed as follows: 1. 2. 3. 4. 5. 6. 7. Press the grill button.
Convection cooking with pre-heat Pre-heating of the oven is recommended ( except for 40°C convection mode). The maximum preheating time allowed is 30 minutes. The convection indicator will blink and the pre-heated temperature will be displayed. If the cooking is not started immediately thereafter, the oven will maintain the selected temperature for another 15 minutes and then switch off automatically. To activate convection cooking with pre-heat, proceed as follows: 1. 2. 3. 4. 5. 6. 7. 8. 9. 10. 11.
Convection cooking - Traditional cooking The convection oven may be used in the same way as a traditional oven. Microwaves are not used. Always use oven gloves when handling food in the oven as dishes will be hot. 1. 2. 3. 4. 5. 6. 7. 8. Press the convection button. The convection indicator lights up. 100°C, and PRESS START TO PREHEAT OR SET TIME are displayed. Select the convection cooking temperature by pressing the convection button again until the appropriate temperature is displayed.
Combination cooking MODE ELEMENTS COMBI 1 MICROWAVE CONVECTION COMBI 2 MICROWAVE CONVECTION LOWER GRILL COMBI 3 CONVECTION UPPER GRILL LOWER GRILL COMBI 4 MICROWAVE UPPER GRILL COMBI 5 MICROWAVE UPPER GRILL LOWER GRILL ( choose any of 5 different combination cooking modes.) Suggested use Cookware This is a very versatile combination and may be used for roasting meat, baking some cakes, meringues, cooking frozen and crumbed foods and for re-heating pastries and pies.
Combi 2 ( microwave, convection and lower grill cooking ) This function combines any of three microwave power levels (50%, 40%, 30%) with convection cooking to give traditional baking or roasting results in less time. Always use microwave compatible and oven proof cookware. Glass or ceramic dishes are ideal as they allow even microwave penetration to the food. Always use oven gloves when handling food in the oven as the oven and dishes get hot. 1. 2. 3. 4. 5. 6. 7. Press the combi button twice.
Combi 4 ( microwave, and upper grill cooking ) This function combines any of three microwave power levels (60%, 50%, 40%) with grilling to give traditional browning or grilling in less time. Always use microwave compatible and oven proof cookware. Glass or ceramic dishes are ideal as they allow even microwave penetration to the food. Always use oven gloves when handling food in the oven as the oven and dishes get hot. 1. 2. 3. 4. 5. 6. 7. Press the combi button four times.
Auto defrost This function allows accurate defrosting of meat, poultry fish and bread. Simply enter the weight of the food and the oven will select the correct defrosting time. During defrosting, the oven will beep to remind you to check the food. TURN OVER will appear in the display as a reminder to attend to the food. Always use microwave compatible cookware. 1. 2. 3. 4. 5. 6. 7. Press the auto defrost button. The defrost, indicator light up. 1 MEAT and SET WEIGHT are displayed.
Defrosting tips 1. 2. 3. 4. 5. Remove all packaging. Place the food on the low wire stand and place a paper towel on the tray below. Turn the food over when prompted to do so. Defrosted food should be cool but soft in all areas. Poultry and fish may be held under running cold water to complete the defrost process if necessary. 6. 7. Protect thin areas on poultry and meat with strips of aluminium foil to prevent them drying out. Standing time is important for bulky foods which cannot be stirred.
Cake recipes Ingredients Fruity Cream Cheese cake 150g butter 10ml grated lemon rind 125g cream cheese 225g castor sugar 3 eggs—beaten 100g plain flour 150g sultanas 150g cherries Chocolate cake 50g cocoa 350g castor sugar 10ml water 90g butter 2 eggs 15ml golden syrup 5ml vanilla essence 15ml raspberry jam 275g plain flour Pinch of salt 10ml baking powder 150ml milk Apple pie 30g castor sugar 5ml cinnamon 30g sultanas 2 cooking apples-peeled cored and sliced 15ml lemon juice 350g puff pastry Carrot cake 2
Cake recipes Ingredients Party size sausage rolls 425g frozen flaky pastry (defrosted) 300g sausage meat 10ml dried mixed herbs 1 beaten egg Baked jam roly poly pudding 1 quantity of suet pastry 75ml seedless raspberry jam Milk to glaze Standard bread 450g plain flour 1 sachet dried yeast 5ml salt 15g fat 300ml warm water Fruit scones 225g self raising flour Pinch of salt 5ml baking powder 50g butter 25g castor sugar 50g sultanas 150ml milk Beaten egg to glaze Method Cookware 1.
Crusty ( crispy ) Selecting the crusty function allows you to simply and automatically cook a range of crusty foods. Remember to use oven gloves when handling food in the oven as the dishes and the oven get hot. 1. 2. 3. 4. 5. 6. 7. Press the crusty button once. The microwave and convection indicators light up. 1 FRESH PIZZA and SET WEIGHT are displayed. Select a menu by pressing the crusty button until the appropriate menu is displayed. Refer to the Crusty menu chart below.
Auto cook Selecting the auto cook function allows you automatically cook a range of popular foods. Remember to use oven gloves when handling food in the oven as the dishes and the oven get hot. 1. 2. 3. 4. 5. 6. 7. Press the auto cook button once. The microwave, convection and grill indicators light up. 1 ROAST BEEF and SET WEIGHT are displayed. Select a menu by pressing the auto cook button until the appropriate menu is displayed. Refer to the auto cook menu chart below.
Auto cook menu ROAST CHICKEN Start temp. = Chilled 1. 2. 3. 4. 5. 6. Wash and dry the chicken. Tie the legs loosely together with string. Pierce the skin a few times just under the legs. Brush the butter mixture all over the chicken. Place the chicken directly onto the metal tray. Cook on AUTO ROAST CHICKEN. Remove from the oven. Drain off any excess juices. Season with salt if required. Allow to stand for 10 minutes before carving. 7. Serve with bacon rolls, chipolatas, bread sauce and gravy.
Memory cook If you often cook the same dish, you may store the cooking time and function in the oven’s memory. This saves re-setting every time the dish is cooked. To set the memory, proceed as follows: 1. 2. 3. Set your favourite cooking programme as previously described.( Auto defrost, cake, crusty and auto cook programmes cannot be stored in memory) Press the memory button. The oven will beep and 0 or the clock are displayed. Your setting is now stored in memory.
Less and More buttons To alter the cooking or defrosting time while the oven is operating, press the less or more buttons. Times will be increased or decreased in increments of 1 minute every time respective button is pressed 1. 2. During cooking, press the less button to decrease the cooking time by 1 minute. Repeated pressing will reduce the time by 1 minute every time the button is pressed. During cooking, press the more button to increase the cooking time by 1 minute.
To stop the oven when it is operating 1 Open the door. • The oven stops operating • The oven may be re-started by closing the door and pressing the start/speedy cook button. 2 Press the stop/ clear button. • The oven stops operating. • If you wish to cancel the setting, press the stop /clear button once more. • If not, pressing the start /speedy cook button will resume operation.
General guide lines ( continued ) Starting temperatures. The lower the temperature of the food placed in the oven, the longer the time required to cook it. Food at room temperature will cook quicker than refrigerated food. Composition of the food. Food with a high fat or sugar content will heat up faster than food containing a lot of water. Fat and sugar will also achieve a higher temperature during the cooking process than water. The more dense the food, the longer it takes to cook.
Cleaning and maintenance Note: Do not use any other turntable tray in the oven. Do not operate the oven without the rotating base or turntable tray in position. Interior Floor. A grill element is located under the floor and there are holes in the floor above the element. The tray prevents serious soiling of the floor below it but if the floor needs to be cleaned, great care should be taken not to drop any water or detergent into these holes. Do not use a damp cloth but clean with a soft dry cloth.
Problem solving If you experience a problem, , please check the chart below. If the problem cannot be rectified in this manner, please consult your nearest Defy Service Centre for assistance.
Questions and answers I accidentally operated my microwave without any food in it. Is it damaged? We do not recommend operating the oven without any food in it. However running it for a SHORT period should not damage the oven. Can I open the door while the oven is operating? The door may be opened at any time during the cooking process. Microwave energy will instantly be switched off and the time setting will be remembered until the door is closed again.
Service Centres If you have followed the instructions and still have a problem, contact the nearest Defy Service Centre for advice or help. BLOEMFONTEIN P.O.Box 1691 Bloemfontein. 9300. 160 Long Street, Hilton, Bloemfontein 9301. Tel. 051 400 3900. DURBAN P.O.Box 12004 Jacobs 4026. 174 Teakwood Rd. Jacobs 4052. Tel. 031 460 9712. CAPE TOWN P.O.Box 953 Milnerton. 7435 5A Marconi Rd. Montague Gardens, Milnerton 7441. Tel. 021 551 8314. POLOKWANE P.O.Box 1719 Polokwane 0700. 87 Nelson Mandela Drive.
Warranty This certificate is issued by DEFY APPLIANCES LIMITED manufacturers of Defy and Ocean products, hereinafter the Company, to the original purchaser only, of the appliance described on the certificate and shall constitute the only warranty given in respect of this appliance.