OWNER’S MANUAL You can rely on Defy.
You and your Defy oven You’re going to make a great team together. But first, it will pay if you really get to know each other. This manual will provide you with information on how to operate and care for your oven in order that you gain the maximum benefit from it. There is even a Do and Don’t guide. So have a cup of tea or coffee, sit down and read all about it.
Electrical installation. This appliance must be earthed and the manufacturer and the seller do not accept responsibility for any damage due to incorrect installation or electrical connection. • • This appliance should not be connected through an earth leakage system. Refer to S.A.B.S. 0142. Support the oven in front of the aperture and make the electrical connection before installing. This will ensure enough cable length for subsequent servicing.
Reversing the oven door to open from the other side ( optional) This task will require an assistant to hold and support the door during the changeover 1 2 3 4 Open the oven door and using a suitable Allen key, remove the two hinge mounting cover plates (A) located at the top and bottom of the right hand oven flange. While holding and supporting the door weighing 7.4kg, remove the hinges (B) at the left hand oven flange.
Automatic oven clock / timer When the power is first connected (or after a power failure), the clock display will flash 00.00. • • The display will again show the time of day. After 5 minutes the timer will emit an electronic tone which lasts for about one minute (2 beeps every 2 seconds). To cancel the tone, press any of the buttons.
Auto Bake. Automatically switching the oven on and off. Auto bake is intended for dishes such as roasts and casseroles. These are not affected by a waiting period in a cold oven. • • • • • • Prepare your meal and place it in the oven. Set the cooking period required by pressing buttons 2 and 6 until the desired period is displayed. Set the stop time by pushing buttons 3 and 6 until the desired stop time is displayed. Release the buttons and the clock will again display the time of day.
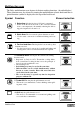
Safety -Key lock De-activating the Key lock To Activate the key lock: 2. 2. 3. When activated, the ‘Key Lock” prevents unauthorised persons or children operating the oven. 1. 3. 4. 5. 1. Ensure that the timer is in manual mode. ( Cancel any active programmes) Press buttons 1 and 2 simultaneously and hold them down for approximately 8 seconds. The display will then read “ON” Press button 6 and the display will read “OFF” and a key symbol will appear.
Multifunction oven The Defy multifunction oven features 6 distinct cooking functions. (described below) These functions may be selected by turning the multifunction selector knob until the required function symbol is displayed at the top of the knob bezel. Symbol Function 1 Defrosting Only the fan is used. No heat is generated. • In this mode the fan at the back of the oven will circulate air at room temperature, substantially reducing the defrosting period required for frozen food.
Multifunction oven– Operation 1 Fan only Used for defrosting Set the multifunction knob to fan only. In this mode the fan at the back of the oven will circulate air at room temperature, substantially reducing the defrosting period required for frozen food. WARNING: Under no circumstances should the bottom bake element be covered with aluminium foil. Nor should a pan or tray be positioned directly above the bake element. • Doing so would reflect the heat from the bake element downwards.
3 Fan assisted oven For traditional baking & even heat distribution • • • • • Use the wire shelves only. Remove the baking trays during fan assisted mode as they are to be used for Thermofan baking only. Set the multifunction selector to fan assisted oven and the oven thermostat to the required temperature. The indicator light will glow and remain on until the oven has reached the selected temperature. No preheating is necessary and the food can be placed in the oven immediately.
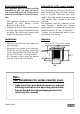
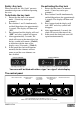
Thermofan Baking guide 5 Turbo grilling. For meat and fish • • • • • • Thermofan baking may be done on one or two baking trays depending on volume. Large items: One or two cake tins may be placed as shown below and as close to the door as possible. If one tin is used , it should be placed centrally left to right . Small items: The entire area of each tray may be utilised. Avoid any time delays between positioning the two trays.
A guide to Thermofan cooking Thermofan ovens require a slightly different technique from conventional ovens. These notes enable the first time Thermofan user to get the best results. Oven temperatures The airflow in a Thermofan oven allows lowered temperatures to be used. This results in roasts being more succulent and baking having a better texture. At the same time a small saving in electricity consumption is made. Baking times Baking times in a Thermofan oven are the same as for a Conventional oven.
Biscuits Excellent results may be obtained by using both trays and reducing recipe temperatures. Baking time could be slightly prolonged. The door may be opened for inspection purposes, after half the baking time has elapsed. “Rotisserie” Chicken Two or more chickens, depending on size, may be done simultaneously in the Thermofan oven. The chickens should be placed directly on a chrome wire shelf and a drip tray should be placed on a second wire shelf directly below each chicken.
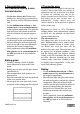
SUGESTED TEMPERATURES FOR THERMOFAN AND CONVENTIONAL OVENS CHEESECAKE Temperatures and times may vary depending on the type of cheesecake being made Others require slower baking NOTE: The size and depth of the cheese filling will determine the baking time. CHEESE CAKECRUST/PASTRY The crust of the cheesecake will be better if pre baked at..
SUGESTED TEMPERATURES FOR THERMOFAN AND CONVENTIONAL OVENS THERMOFAN OVEN CONVENTIONAL OVEN TEMP ºC MINUTE TEMP ºC MINUTE 175ºC – 180Cº 20 – 25 190ºC 20 – 25 BUTTER CAKE Margarine / butter and sugar creaming method 165ºC 20 – 25 180ºC 20 – 25 LOAF CAKE Date, Ginger and Banana Loaf 165ºC 45 180ºC 45 PASTRIES 200ºC - 210ºC 20 220ºC 20 SCONES 200ºC - 210ºC 12 – 15 220ºC 12 – 15 PIES AND SAUSAGE ROLLS 200ºC - 210ºC 25 220ºC 25 BISCUITS Golden brown Sensitive biscuits 160ºC 1
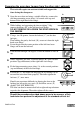
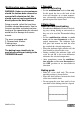
Solid plate hob Red dot plates • • Plates featuring a red dot in the centre are high speed, high wattage plates for increased performance. For your safety these plates are fitted with thermal limiters. Should a plate be accidentally switched on and left unattended, the limiter will reduce the power output of the plate and minimise the risk of overheating and the possibility of fire. Plate controls • • • Recommendations • • • • Use only pots with a solid level base.
Solid plate - care guide DO BEFORE USING THE PLATES FOR THE FIRST TIME SWITCH THEM ON FOR FOUR MINUTES AT THE HIGHEST SETTING THIS ALLOWS THE PROTECTIVE COATING TO BURN IN DON”T DO NOT USE ONE POT ON TWO PLATES DO NOT USE A POT ON AN UNMATCHED PLATE USE POTS THAT ARE SLIGHTLY BIGGER THAN THE PLATE AND THAT HAVE A SMOOTH FLAT BASE DO NOT USE A POT WITH AN UNEVEN BASE TO CLEAN THE PLATE - WIPE IT WITH A DAMP CLOTH OR NYLON SCOURING PAD DO NOT USE A POT WITH A DIRTY OR WET BASE SWITCH THE PLATE ON FOR
® Ceran smooth top hob Warning In the unlikely event of sustaining accidental damage and cracking, switch off the appliance at the mains to avoid electric shock and have the panel replaced before further use. • • Recommendations (see the enclosed ‘CERAN’ leaflet) • Plate controls • • • Select the heat level by turning the relevant plate control knob to the required setting. The higher the number selected, the hotter the temperature of the plate will be. The plate indicator light will glow.
Do OVER THE YEARS, DEFY'S SERVICE CENTRES HAVE IDENTIFIED THIS LIST OF DO'S AND DON'TS AS BEING IMPORTANT FOR CUSTOMER SATISFACTION AND SAFETY. PLEASE READ IT AND FAMILIARISE YOURSELF WITH ITS CONTENTS. • Clean your appliance regularly This will prolong it's good looks and enhance hygiene levels. • Use flat bottomed pots and pans when cooking on the hotplates. This will maximise efficiency and reduce electricity costs. • Keep children well away from the cooking appliance. Explain the dangers to them.
Maintenance Cleaning the oven • Switch off the power at the wall switch, open the oven door and allow the oven to cool down. • Remove the oven shelves, side racks, grill rack, roast pan and element guard. • Wash in soapy water, rinse , dry and replace. • Clean the oven with a hot soapy cloth only. Do not use a steam cleaner. • It may be necessary to soak burnt soils with a liquid cleaner to soften them before scrubbing them with a nylon brush or scouring sponge.
Defy Service Centres If you have followed the instructions and still have a problem, contact the nearest Defy Technical Support Centre. They will be able to advise you on any aspect of the product or send a qualified technician to repair it. BLOEMFONTEIN CAPE TOWN DURBAN EAST LONDON JOHANNESBURG Commercial Head Office, Administration, Distribution, National Groups, Tel. Sales, Contracts and Credit. POLOKWANE PORT ELIZABETH PRETORIA. 160 Long Street, Hilton, Bloemfontein 9301. Tel.
Warranty This certificate is issued by DEFY APPLIANCES (PTY) LIMITED manufacturers of Defy and Ocean products, hereinafter the Company, to the original purchaser only, of the appliance described on the certificate and shall constitute the only warranty given in respect of this appliance.
Notes PAGE 23 OF 24
Feature Benefit Multifunction oven Choice of 6 cooking options 93 litre oven capacity A real family sized oven 2 Bake trays Ideal for bulk baking Digital oven timer Automatic on/off and minute minder Full temperature range 70°C to 230°C 70°C setting Oven may be used as a warmer Enamel interior Hard wearing and easy to clean Reversible full glass door Designed to suit any installation Roast pan and Broiler Convenient accessories Under-counter level installation Space saving Hob controls