Owner’s Manual GEMINI PETIT CHEF EYE LEVEL OVEN CONTENTS 2 2 2 2 3 3 4 4 7 8 9 9 9 9 www.defy.co.
INTRODUCTION Congratulations on the purchase of this quality appliance. We, the manufacturer, trust that you will enjoy many years of trouble free use. Please read these instructions carefully before using the oven. This book will provide you with information on how to operate and care for your appliance in order that you gain the maximum benefit from it. UNPACKING • • • Please ensure that packaging material is disposed of in a responsible manner.
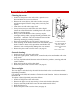
INSTALLATION _3 60 + 0 32 MIN Aperture 665 H x 700 W x 580 D _3 665 + 0 Aperture _3 700 + 0 Aperture 32 MIN _3 900 + 0 Typical section showing ventilation requirements Above floor level Floor • • • • Support the oven in front of the aperture and make the electrical connection before installing. This will ensure enough cable length for subsequent servicing. Lift off the top trim and unscrew the bottom trim. This will expose the fixing holes. Secure the oven to the cabinet using suitable screws.
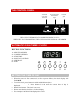
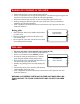
THE CONTROL PANEL Oven thermostat and indicator light Automatic oven timer and clock Variable grill S 0 1 2 :4 5 STOP 1 0 8 1 8 - + GEMINI PETIT CHEF THE OVEN THERMOSTAT IS MARKED DOWN TO 70°C.
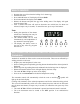
MINUTE MINDER • • • • • • Suppose that you wish to time the boiling of a 5 minute egg. First boil the water Press and hold button 1. The display will show 00.00 Press button 6 until the display shows 00.05 Release the buttons and place the egg in the boiling water. The display will again show the time of day. After 5 minutes the timer will emit an electronic tone which lasts for about one minute (2 beeps every 2 seconds). To cancel the tone, press any of the buttons.
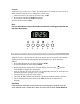
Example: Suppose the time of day is now 13h00. The food needs to be cooked for 2 hours at 180 C and it should be ready to serve at 18h00. Here’s what to do. • Ensure the clock is set to the correct time of day, 13.00. • Press buttons 2 and 6 until 02.00 is displayed • Press buttons 3 and 6 until 18.00 is displayed. Set the oven thermostat to 180 C Hint: It is not advisable to use the Autobake function for cooking periods that are less than 60 minutes.
BAKING OR COOKING IN THE OVEN • • • • • Ensure that the timer is set to manual. Press button 4. Set the oven thermostat to the required temperature. The indicator light will glow and remain on until the oven has reached the selected temperature. When the indicator light switches off, the food should be placed in the oven.
MAINTENANCE Cleaning the ovens • • • • • • • • Switch off the power at the wall switch, open the oven door and allow the oven to cool down. Remove the oven shelves, side racks, broiler, roast pan and element guard. Wash in soapy water, rinse dry and replace. Clean the oven with a hot soapy cloth. It may be necessary to soak burnt soils with a liquid cleaner to soften them before scrubbing them with a nylon brush or scouring sponge.
PROBLEM CHECK Before calling a service technician to assist with a problem, PLEASE CHECK THE FOLLOWING THE MAINS DISTRIBUTION BOARD THE WALL SWITCH SET THE TIMER TO MANUAL Remember that you may be charged for a service call even during the warranty period if the fault is due to or caused by any of the above. OWNER’S RESPONSIBILITY Since the following are not factory faults, they are the owner’s responsibility. • Damage to exterior finish. • Breakage of glass and other components.