
Owner's Manual


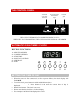


INSTALLATION
665
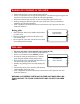
Aperture
Typical section showing
ventilation requirements
Aperture
665 H x 700 W x 580 D
700
900
Above floor
level
Floor
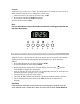
60
+
_
3
0
+
_
3
0
+
_
3
0
+
_
3
0
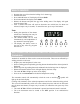
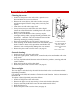
Aperture
32
32
MIN
MIN
• Support the oven in front of the aperture and make the electrical connection before
installing. This will ensure enough cable length for subsequent servicing.
• Lift off the top trim and unscrew the bottom trim. This will expose the fixing holes.
• Secure the oven to the cabinet using suitable screws. (Fasteners are not provided.)
• Replace the top and bottom trims.
ELECTRICAL INSTALLATION
“This appliance must be earthed and the manufacturer and the seller do
not accept responsibility for any damage due to incorrect installation or
electrical connection.”
Earth leakage
This appliance should not be connected through an earth leakage system.
Refer to S.A.B.S. 0147.
Connection to the power supply must be carried out by a licensed electrician, who will
ensure that the oven is correctly connected and safely earthed. The rated current is printed
on the serial number label attached to the oven bottom trim.
The appliance must be connected to the mains through a double pole isolating switch
which has a minimum clearance between the contacts of 3 mm. in both poles.
A means for disconnection must be provided in the fixed wiring.