OWNER’S MANUAL Models 731 MF and 735 MF 831 MF and 835 MF 2 2 2 2 2 3 4 5 5 7 8 9 9 10 10 11 12 12 13 14 15 15 15 15 16 16 17 18 19 20 20 CONTENTS Introduction Unpacking Installation Electrical installation Anti-tilt mechanism Anti-tilt mechanism assembly Safety advice Control panel and symbols Automatic oven timer / clock Warming drawer Multifunction oven Defrost—fan only Static oven Fan assisted oven Thermofan oven Turbo grilling Grilling Solid plate care guide Solid plates Ceran smooth top Maintenance C
Introduction Congratulations on the purchase of this quality product. We trust that you will enjoy many years of trouble free use. Please read these instructions carefully before using the stove. This manual will provide you with information on how to operate and care for your product in order that you gain the maximum benefit from it. Unpacking • • • • Please ensure that packaging material is disposed of in a responsible manner.
Anti-Tilt mechanism • • • • • • • • • • “A” 1 x Stability chain “B” 1 x Stability hook with anchor sleeve “A” is factory fitted at the rear of the stove in the centre. (See overleaf for instructions if the removable splashback is to be fitted) Position the stove and move “A” to touch the wall behind the stove. Mark the hole where “A” touches the wall behind the stove. Move the stove away from the wall to allow for an area to work in. Using a 8.0 mm concrete bit, drill a hole at the marked position.
Safety advice This section contains safety instructions that will help you avoid risk of injury and damage. All warranties will become void if you do not follow these instructions. General safety • This appliance is not intended for use by persons (including children) with reduced physical, sensory or mental capabilities, or lack of experience and knowledge, unless they have been given supervision or instruction concerning the use of the appliance by a person responsible for their safety.
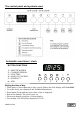
The control panel and symbols used. Automatic oven timer / clock BUTTON FUNCTIONS 1 = MINUTE MINDER 2 = COOKING PERIOD 3 = STOP TIME 4 = MANUAL CONTROL 5 = SUBTRACT 6 = ADD - + 1 2 3 4 5 6 Setting the time of day • When power is first connected or after a power failure, the clock display will flash 00.00. • To set the clock, press buttons 1 and 2 and hold them down. • Press button 5 or 6 until the correct time of day is displayed. • Release the buttons. The clock is now set.
Automatic oven timer / clock continued Minute minder • Suppose that you wish to time the boiling of a 5 minute egg. • First boil the water • Press and hold button 1. The display will show 00.00 • Press button 6 until the display shows 00.05 • Release the buttons and place the egg in the boiling water. The display will again show the time of day. • After 5 minutes the timer will emit an electronic tone which lasts for about one minute (2 beeps every 2 seconds). To cancel the tone, press any of the buttons.
Automatic oven timer / clock continued Example: Suppose the time of day is now 13h00. The food needs to be cooked for 2 hours at 180°C and it should be ready to serve at 18h00. Here’s what to do. Ensure the clock is set to the correct time of day, 13.00. Press buttons 2 and 6 until 02.00 is displayed Press buttons 3 and 6 until 18.00 is displayed. Set the oven thermostat to 180°C and the multi function selector to the desired cooking mode.
Multifunction oven The Defy multifunction oven features 6 distinct cooking functions. (described below) These functions may be selected by turning the multifunction selector knob until the required function symbol is displayed at the top of the knob bezel. Symbol Function 1 Defrosting Only the fan is used. No heat is generated. • In this mode the fan at the back of the oven will circulate air at room temperature, substantially reducing the defrosting period required for frozen food.
Multifunction oven– Operation WARNING: Under no circumstances should the bottom bake element be covered with aluminium foil. Nor should a pan or tray be positioned directly above the bake element. Doing so would reflect the heat from the bake element downwards. Heat to the oven would be restricted and overheating of the space below the element would result in damage to the oven enamel. 1 Fan only Used for defrosting • Set the multifunction knob to fan only.
3 Fan assisted oven For traditional baking & even heat distribution • Use the wire shelves only. Remove the baking trays during fan assisted mode as they are to be used for Thermofan baking only. • Set the multifunction selector to fan assisted oven and the oven thermostat to the required temperature. The indicator light will glow and remain on until the oven has reached the selected temperature. • No preheating is necessary and the food can be placed in the oven immediately.
Recommended shelf positions. baking trays. T/F BAKING T/F BAKING T/F ROASTING TURBO & NORMAL GRILLING Note 831 and 835 models are supplied with a wire support shelf for the baking trays Baking guide • Large items: One or two cake tins may be placed as shown and as close to the door as possible. If one tin is used , it should be placed centrally left to right . • Small items: The entire area of each tray may be utilised. Avoid any time delays between positioning the two trays.
6 Grilling. • • • • • The oven door must remain partially open (the hinges allow for the door to be held in this position) when using the conventional Grill. Use only a wire shelf when grilling as the intense heat could warp the baking tray. Set the multifunction knob to grill. Set the oven thermostat to the grill position. Operating instructions are otherwise the same as those for turbo grilling mentioned previously.
Solid plates (Models 731MF and 831MF) Plate controls • Select the heat level by turning the relevant plate control knob to the required setting. • The higher the number selected, the hotter the temperature of the plate will be. • The plate indicator light will glow when a plate is switched on. Red dot plates • Plates featuring a red dot in the centre are high speed, high wattage plates for increased performance. • For your safety these plates are fitted with thermal limiters.
R Ceran smooth top (Models 735MF and 835MF) WARNING In the unlikely event of sustaining accidental damage and cracking, switch off the appliance at the mains to avoid electric shock and have the panel replaced before further use. Plate controls—variable • Select the heat level by turning the plate control knob to the required setting. • 1= low , 3 = medium and 6 = high. • The relevant pilot light will glow and shortly thereafter the hot surface indicator light on the hob will glow.
Maintenance Cleaning the oven • Switch off the electrical power supply before cleaning any part of the appliance. • Open the oven door and allow the oven to cool down. • For improved access, the shelves, trays and oven door may be removed. (see details below) • Clean the oven with a damp, hot soapy cloth. Do NOT use steam cleaners. • It may be necessary to soak burnt soils with a liquid cleaner to soften them before scrubbing them with a nylon brush or scouring sponge.
Owner’s responsibility. Since the following are not factory faults, they are the owner’s responsibility. • Damage to exterior finish. • Breakage of glass and other components. • Replacement of the light bulb. • Damage through improper installation or use of the appliance. • Damage caused by moving the appliance. WARNING: Under no circumstances should the bake element be covered with aluminium foil. Nor should a pan or tray be positioned directly above the bake element.
OVER THE YEARS, DEFY'S SERVICE CENTRES HAVE IDENTIFIED THIS LIST OF DO'S AND DON'TS AS BEING IMPORTANT FOR CUSTOMER SATISFACTION AND SAFETY. PLEASE READ IT AND FAMILIARISE YOURSELF WITH ITS CONTENTS. Do • Clean your appliance regularly. This will prolong it's good looks and enhance hygiene levels. • Do close the oven door when using Turbo grill. • • • • • • • Don’t • Use pots which are smaller than the hotplate diameter. This wastes electricity and allows the pot handles to overheat.
Service Centres If you have followed the instructions and still have a problem, contact the nearest Defy Service Centre. They will be able to advise you on any aspect of the product or send a qualified technician to repair it. BLOEMFONTEIN CAPE TOWN DURBAN EAST LONDON JOHANNESBURG Commercial Head Office, Administration, Distribution, National Groups, Tel. Sales, Contracts and Credit. POLOKWANE PORT ELIZABETH PRETORIA. 160 Long Street, Hilton, Bloemfontein 9301. Tel. 051 400 3900 Bloemfontein.
Warranty This certificate is issued by DEFY APPLIANCES LIMITED manufacturers of Defy and Ocean products, hereinafter the Company, to the original purchaser only, of the appliance described on the certificate and shall constitute the only warranty given in respect of this appliance.
731 MF 735 MF 831 MF 835 MF HEIGHT 1190 1190 1190 1190 WIDTH 665 665 755 755 DEPTH EXCL HANDLE 640 640 640 640 FLOOR TO COOKTOP 900 900 900 900 MASS (kg) 72 72 95 92 OVEN CAPACITY (L) 93 93 116 116 MULTIFUNCTION SELECTOR SWITCH 1 1 1 1 OVEN THERMOSTAT WITH INDICATOR LIGHT 1 1 1 1 ELECTRONIC CLOCK / OVEN TIMER 1 1 1 1 VARIABLE WARMER DRAWER WITH INDICATOR LIGHT 1 1 1 1 PLATE CONTROL WITH INDICATOR LIGHT 4 4 4 4 6 6 6 6 SOLID 4 - 4 - CERAN -