DCH299 600T PREMIUM EXTRACTOR HOOD DCH303 900T PREMIUM EXTRACTOR HOOD YOU CAN RELY ON DEFY DCH304 900T PREMIUM EXTRACTOR GLASS HOOD PREMIUM EXTRACTOR HOOD Users Manual Record in the space below the listed information for future reference. SERIAL NUMBER%%%%%%%%%%%%%%%%%%%%%%%%%%%%%%%.. DATE OF PURCHASE%%%%%%%%%%%%%%%%%%%%%%%%%%%%%... PURCHASED FROM%%%%%%%%%%%%%%%%%%%%%%%%%%%%%%.. %%%%%%%%%%%%%%%%%%%%%%%%%%%%%%%%%%%%%%%%.
Introduction Dear customer, Your new Defy Extractor Hood was manufactured in a state of the art facility and has passed the strictest quality control procedures. Please read this manual carefully before using your Extractor Hood for the first time and then store it within easy reach for future reference. This manual will provide you with information on how to operate and care for your Extractor Hood to gain the maximum benefit from it. We trust you will enjoy years of trouble free use.
Important safety instructions This section contains safety instructions that will help you avoid risk of injury and damage. All warranties will be void if you do not follow these instructions.
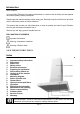
Description • • The extractor hood fan extracts the kitchen vapours and passes them through the grease filter. The grease filter absorbs the solid particles in the cooking vapours, keeping the kitchen almost free of grease. • • • • Before use Before using your new extractor hood for the first time, please read this manual carefully. It contains important information concerning your personal safety as well as on the use and care of the extractor hood.
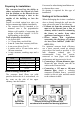
Preparing for installation The extractor hood has the ability to either recirculate the filtered air back into the kitchen, or the filtered air can be circulated through a duct to the outside of the building or into the ceiling. Decide on which option best suits you before commencing with the installation. • The extractor hood is intended to be mounted onto a flat perpendicular kitchen wall capable of supporting the weight of the hood. (approx. 16 to 26 kg depending on the model).
Installation • Installation sequence; 1. Extractor unit / chimney brackets. 2. Top chimney duct. 3. Bottom chimney duct. • Carefully remove the extractor hood and the components from the packaging. • Carefully remove the protective film. • Remove the grease filters (see page 8). • Draw a fine vertical line on the wall from the rear-centre of the hob to the ceiling. • Draw another line, horizontal this time, where the bottom edge of the hood should be.
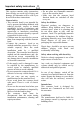
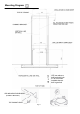
650 or 700* Mounting Diagram CEILING MOUNTING BRACKET (CHIMNEY BRACKET) TOP CHIMNEY DUCT Page 7 *650 mm above a built in electric hob or 700 mm when installed above a built in gas hob
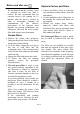
Before and after use Optional Carbon pad filters We recommend that the extractor hood is switched on before any food is cooked. We also recommend that the extractor hood is left running for 15 minutes after the food is cooked, in order to thoroughly eliminate all contaminated air. The effective performance of the extractor hood depends on constant maintenance; the anti-grease filter and the active carbon filter both require special attention.
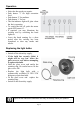
Operation • • • • • • • • Select the fan speed you require. Push button ‘3’ for high extraction level. Push button ‘2’ for medium. Push button ‘1’ for low. The fan indicator light will glow when the fan is operating. To switch the fan off, push the motor speed OFF button ‘0’. If required, you may illuminate the cooking area by switching the hood lights on. Leave the hood running for a short period after the cooking has been completed to clear any smoke and odours.
Maintenance and cleaning Important: Before cleaning any part of the hood, switch the power off at the mains. Cleaning the metal grease filters. • In normal operation (1 to 2 hours daily), the metal grease filters must be cleaned every 8 to 10 weeks. • The filters may washed in a dishwasher, however they may discolour slightly. • When hand cleaning the filters, soak them in hot, soapy water to loosen the grease. • Brush with a stiff nylon brush. • Rinse clean and allow to air dry before re-fitting.
Owner’s responsibility NOTE: Since the following are not factory faults, they are the owner’s responsibility. • Damage to exterior finish. • Breakage of glass and other components. • Replacement of the light bulbs. • Damage through improper use or installation. Problem check Before calling a service technician to assist with a problem please check: • The main distribution board. See if a circuit breaker has tripped or a fuse has blown. • The wall socket.
Warranty This certificate is issued by DEFY APPLIANCES LIMITED manufacturers of Defy and Ocean products, hereinafter the Company, to the original purchaser only, of the appliance described on the certificate and shall constitute the only warranty given in respect of this appliance.