User Guide September 2021 D-UG143-001
www.dejero.com Dejero Labs Inc. 410 Albert Street, Suite 200 Waterloo, Ontario, N2L 3V3 +1 519 772 4824 Copyright, Trademarks, and Patents Copyright © 2021 Dejero Labs Inc. Dejero is a trademark of Dejero Labs Inc. QuickTime is a trademark of Apple Inc. Wi-Fi is a trademark of the Wi-Fi Alliance. Windows is either a registered trademark or trademark of Microsoft Corporation in the United States and/or other countries. All other trademarks are the property of their respective owners.
www.dejero.com Contents Safety Warnings and Hazards............................................................................. 5 Handling and Operating Conditions..................................................................... 7 About the Dejero EnGo 263 ................................................................................ 8 What’s included................................................................................................... 9 About Dejero Control.............................
www.dejero.com Warning and error messages ............................................................................ 56 Technical specifications .................................................................................... 62 Additional help ..................................................................................................
www.dejero.com Warranty and Liability Reasonable care has been taken in preparing the information in this document. However, this document may contain omissions, technical inaccuracies, or typographical errors. Dejero Labs Inc. does not accept responsibility of any losses due to the use of this document. Product specifications are subject to change without notice. Due to the nature of wireless communication, transmission and reception of data can never be guaranteed.
www.dejero.com RF Exposure Notice THIS DEVICE MEETS THE GOVERNMENT REQUIREMENTS FOR EXPOSURE TO RADIO WAVES. EnGo is a radio transmitter and receiver. It is designed and manufactured not to exceed the emission limits for exposure to radio frequency (RF) energy set by the Federal Communications Commission of the U.S. Government and Industry Canada.
www.dejero.com use of its products in a vehicle or any other application. In order to safely install and use Dejero products full consideration of vehicle occupants, vehicle systems (i.e., the location of fuel lines, brakes lines, electrical, drive train or other systems), airbags and other safety equipment is recommended. Dejero specifically disclaims any responsibility for the improper use or installation of its products not consistent with the original vehicle manufacturer’s specifications.
www.dejero.com Do Not Open the Case The EnGo case should remain sealed at all times to protect the sensitive electronics inside and ensure the safety of the operator. Opening the case renders the warranty null and void. Do Not Disassemble the Product Only authorized Dejero personnel can open, modify, or repair the EnGo unit. Unless authorized by Dejero personnel, any attempt by the user to open, disassemble, or repair the device renders the warranty null and void.
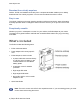
www.dejero.com Broadcast from virtually anywhere Cellular, Wi-Fi®, and satellite connectivity from a compact transmitter enables you to reliably broadcast live from virtually anywhere. You can even broadcast live while in motion. Easy to use The simple, intuitive touch screen interface provides confidence monitoring, status information, and easy operation. Built-in intelligence does most of the work for you so you can focus on the shot.
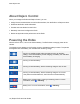
www.dejero.com About Dejero Control When you manage the EnGo with Dejero Control, you can: • Assign live and recorded video, as well as file transfers, from the EnGo to a Dejero receiver. • Geolocate the EnGo mobile transmitter. • Preview and route feeds from the EnGo. • Remotely control and configure the EnGo. • Review analytics about the performance of the EnGo. Powering the EnGo When the EnGo is on, it runs on its internal battery. The EnGo does not supply power to the camera.
www.dejero.com Note: When the EnGo 263 is off, it uses power from an attached power source (such as a power outlet or an auxiliary battery) to charge the internal battery. It continues to draw a small amount of that power even after the internal battery is charged fully. If the EnGo is attached to an auxiliary battery, keeping it connected can drain the auxiliary battery. The EnGo’s internal battery does not lose charge if you disconnect from a power source.
www.dejero.com Blue light flashing approximately once a second If the EnGo is off, the internal battery is charging but is not yet fully charged. Blue light flashing approximately twice a second The EnGo is off, connected to an external power source, and the internal battery is fully charged. If the device is on, the internal battery is below 50% but above 30%. This setting also indicates that the EnGo is not being charged. Blue light flashing The EnGo is on and the internal battery is below 30%.
www.dejero.com • Live: Transmit live video over network blending of cellular, Wi-Fi, Ethernet, or satellite connections to the Dejero receivers. • Recording: Record video for later transmission. Use this mode when a live feed is not required, or when bandwidth is limited or not available. • Live and Recording: Transmit live while also recording high-quality video to use later. Use this mode when network bandwidth is limited but you still need to broadcast live.
www.dejero.com The EnGo selects the correct video input automatically. If you do not see video on the screen, make sure that the cables are connected properly and that you are using a supported video format. If the video format is not detected automatically, you may need to configure the video settings. For more information, see "Configuring the EnGo" on page 26. Note: You can use the mini DP output on the EnGo to connect directly to an external DP display.
www.dejero.com • I = Idle • R = Receiving • .1-.9 = IFB is active and the delay is less than 1 second • 1-9 = IFB is active and delay is less than 10 seconds • X = IFB is active and the delay is 10 seconds or more The indicator starts at I and, when IFB is active, it shows the volume and the delay interval. As the EnGo receives voice packets from the receiver, the sound level varies (when a device is connected to the mini-XLR port).
www.dejero.com 2. Connect the Logitech H390 USB headset to a USB port on the EnGo. 3. Use Control to assign the EnGo to an output on the WayPoint receiver. 4. Ensure that Intercom is enabled on the EnGo. For more information, see "Enable Intercom" on page 43. Identifying your EnGo backpack edition There are two editions of the backpack.
www.dejero.com About the EnGo Backpack Edition One Use the top zipper to access the EnGo from the EnGo Backpack Edition One. Inserting the EnGo into the EnGo Backpack Edition One When the EnGo is inside the backpack, ensure that the cables are not bent and the connections are not under stress. Tip: Use the strap on the right side of the backpack to secure audio and video cables when they are disconnected. 1.
www.dejero.com 5. To secure the EnGo, wrap the zip cords around the antenna endcaps at either end of the EnGo. 6. Connect the cable to the DC IN port on the EnGo. 7. If you want to power the EnGo using an auxiliary battery, perform the following actions: a. In the battery compartment, ensure that the D-Tap connector is connected to the battery plate. b. Ensure that the battery plate is held in place with the hook-and-loop fasteners. c. Slide the auxiliary battery onto the battery plate. 8.
www.dejero.com Inserting the EnGo into the EnGo Backpack Edition Two When the EnGo is inside the backpack, ensure that the cables are not bent and the connections are not under stress. Note: When you receive your Edition Two backpack, the IFB and SDI cables are already inserted. 1. Use the two zippers at the top of the backpack to open the top compartment fully. 2. Connect the SDI cable to the correct input port on the side of the EnGo.
www.dejero.com a. In the battery compartment, ensure that the D-Tap connector is connected to the battery plate. b. Ensure that the battery plate is held in place with the hook-and-loop fasteners. c. Slide the auxiliary battery onto the battery plate. d. Connect the power cable to the DC IN port on the EnGo. 7. Close the top of the backpack. Note: You must secure the EnGo in the backpack with the zip cords. If you do not, the EnGo can move around or fall out.
www.dejero.com 2. Use the magnet at the top of the backpack to hold open the top compartment. Use an HDMI cable with the EnGo Backpack Edition Two By default, the backpack comes with the SDI cable already inserted. You can remove this cable if you want to use an HDMI cable instead. Note: If you only need to use an HDMI cable temporarily, feed the HDMI cable through the hookand-loop fastener opening on the side of the backpack. Remove the zip cords from around the EnGo.
www.dejero.com 7. Pull the SDI cable through the channel in the foam spacer and remove it from the backpack. 8. Route the HDMI cable behind the foam spacer, ensuring that the end of the cable that connects to the EnGo fits under the notch at the bottom of the foam spacer. 9. Ensure that the HDMI cable, as well as the IFB and power cables, fit inside the channel in the foam spacer. 10.
www.dejero.com messages, and connection details. For a list of possible error messages, see "Warning and error messages" on page 56. You can use the menus and buttons to access the features of the EnGo: • Go Live button: Use this button to start a live transmission. The current live stream profile appears below the Go Live button. When you select the button, the Preview screen shows the live stream run time below the button, and the stream connection health and the latency above the button.
www.dejero.com Set the quality of recorded clips 1. On the Preview screen, select the Record Menu button. 2. Select 2.5 Mb/s, 4.0 Mb/s, 6.0 Mb/s, 12.0 Mb/s or 15.0 Mb/s. About network connection icons The following icons appear on the Preview screen to show the status of the EnGo connections. The icons also appear on the screen when using Remote Control with EnGo.
www.dejero.com Swap the SIM module 1. Power off the EnGo. 2. Remove the SIM module from the EnGo by loosening the thumbscrews and pulling out the module. 3. Insert the replacement SIM module with the end marked TOP oriented toward the Preview screen. 4. Line up and tighten the thumbscrews. Ensure that the module is aligned correctly and tightly connected. After changing the SIM module, select which SIMs to use. For more information, see "Define the SIM set" on page 33.
www.dejero.com 9. Line up and tighten the thumbscrews. Ensure that the module is aligned correctly and tightly connected. Note: After changing the SIM cards, select which SIMs to use. For more information, see "Define the SIM set" on page 33 Configuring the EnGo Use the Settings screen to configure the transmitter settings. Note: When you are streaming live content, you cannot configure the settings for the EnGo. Adjust the display brightness The preferred brightness can be manually or automatically set.
www.dejero.com Note: Before configuring the video input to IP, connect an Ethernet cable from your video source to the EnGo. You can connect the cable to either port 1 or port 2. 1. On the Preview screen, select . 2. Select Settings. 3. Select Input. 4. Select Video Input. 5. Set the video input to HDMI, SDI, IP, or AUTO. 6. Select Back. 7. If you selected SDI, set the Input Resolution and Input Frame Rate. Input Resolution Input Frame Rates 480i 29.97 576i 25 720p 50, 59.94, 60 1080i 25, 29.
www.dejero.com 1. On the Preview screen, select . 2. Select Settings. 3. Select Input. 4. Select Video Input. 5. Select IP. 6. Select IP Input Settings. 7. In the Source URL field, type the IP address and port for the source IP video stream. 8. Select the network interface of the EnGo that the source IP video is connected to. Configure the audio input By default, EnGo uses two audio channels. To add more audio channels and maintain video quality, you will require additional data.
www.dejero.com resolution is stepped down automatically to the maximum allowable resolution when the connection type is set to Modems or All. If the connection type is set to Ethernet, the maximum live resolution setting in Control is ignored. The administrator can also use Control to set the maximum connection bitrate. 1. On the Preview screen, select . 2. Select Settings. 3. Select Live. 4. Select Resolution. 5.
www.dejero.com Audio-only mode In situations of limited bandwidth, when the available bandwidth falls below the threshold required for usable video quality, EnGo automatically sends only audio to the receiver and the last good frame of the video remains on the screen. When the bandwidth increases above the required threshold, EnGo resumes sending video. Note: The thresholds change depending on the number of audio channels selected; more audio channels result in higher thresholds.
www.dejero.com Fixed Latency mode In Fixed Latency mode, the system attempts to give the glass-to-glass latency requested (either 1.5s, 3s, 8s, or preset). If the current network conditions cannot support the configured latency, a warning appears on the screen. This setting is ideal when a known latency is preferred.
www.dejero.com 2. Select Settings. 3. Select Connections. 4. Select Connection Types. 5. Select a connection type: All, Ethernet, or Modems. Connection type settings Setting Description All The transmitter sends data through all available connections, including cellular, Ethernet, and Wi-Fi. The transmitter uses only the connections that are available. If multiple connections are available, the transmitter uses all connection types simultaneously.
www.dejero.com Cellular Use Cellular if your Ethernet connection is a satellite connection and you prefer to use cellular connections instead. EnGo puts a higher priority on the cellular connection and, if necessary, adjusts the weighting depending on the network conditions to provide the requested bitrate. Ethernet Use Ethernet to put a higher priority on the Ethernet connection over the cellular connection.
www.dejero.com Note: When a hotspot is active, the selected connection is not used for live streams. Rename the hotspot By default, the hotspot name is the name that appears for laptops or mobile devices in the available Wi-Fi networks list. You can change this name to make it easier to identify. 1. On the Preview screen, select . 2. Select Settings. 3. Select Connections. 4. Select Hotspot. 5. Select Actions. 6. Select SSID. 7. Type the new hotspot name. 8. Select .
www.dejero.com 4. Select Hotspot. 5. Select Actions. 6. Select Info. Managing Wi-Fi connections You can connect the EnGo to a Wi-Fi network to blend other network connections with a WAN connection. Configure a Wi-Fi connection 1. On the Preview screen, select . 2. Select Settings. 3. Select Connections. 4. Select Wi-Fi. 5. From the list of available connections, select a Wi-Fi connection. 6. Select Actions. 7. Select Connect. 8. If prompted, use the keyboard on the screen to type the password. 9.
www.dejero.com Delete a saved Wi-Fi profile 1. On the Preview screen, select . 2. Select Settings. 3. Select Connections. 4. Select Wi-Fi. The current Wi-Fi network is highlighted in green. 5. Select Actions. 6. Select Forget. Check the details of a Wi-Fi connection 1. On the Preview screen, select . 2. Select Settings. 3. Select Connections. 4. Select Wi-Fi. The current Wi-Fi network is highlighted in green. 5. Select Actions. 6. Select Info.
www.dejero.com 2. Select the Device Status message. Turn off return video feeds 1. On the Preview screen, select . 2. Select Return Video. 3. Select Off. Managing SIM cards When traveling, you might need to set up any secondary SIM cards that you use from local carriers. Change the Access Point Name When you add new SIM cards, you might need to change the Access Point Name (APN). The APN is needed by the source transmitter to set up the connection to the wireless network.
www.dejero.com Note:If a SIM card is locked, Cellular might appear instead of a carrier name. To determine if you selected the correct connection, scroll to the SIM card ICCID and compare it to the packaging for the SIM card. 1. On the Preview screen, select . 2. Select Connections. 3. Select the connection for the SIM card carrier. SIM cards in the secondary SIM set will have a list of available actions. 4. Select Actions. 5. Select Unlock SIM. 6. Select a field to access the keyboard. 7.
www.dejero.com 2. Select Connections. 3. Select the connection for the SIM card carrier. SIM cards in the secondary SIM set will have a list of available actions. 4. Select Actions. 5. Select Disable PIN. 6. Type the current PIN. 7. Select . Enable the PIN for a SIM 1. On the Preview screen, select . 2. Select Connections. 3. Select the connection for the SIM card carrier. SIM cards in the secondary SIM set will have a list of available actions. 4. Select Actions. 5. Select Enable PIN. 6.
www.dejero.com Turn off roaming for a connection In some regions, you might be able to manage roaming settings for each cellular connection that the EnGo has. By default, roaming is turned on, so connections roam on to any available cellular network. If this option is configured for your EnGo, you can turn roaming off for individual connections. 1. On the Preview screen, select . 2. Select Settings. 3. Select Connections. 4. Select a connection. 5. Select Actions. 6. Set the Roaming field to No.
www.dejero.com • To check your connections first, select No. Note:If you want to use the CellSat connection after checking your connections, on the Preview screen, select Start CellSat. Select Yes. Stop a transmission 1. On the Preview screen, select Stop. 2. Select Yes. The Preview screen continues to show the input from the camera. The device remains ready to resume broadcasting. To resume the transmission, select Go Live.
www.dejero.com During data transmission, if the data is encrypted and sent successfully, upper-right corner of the video on the Preview screen. appears in the Stream encryption modes Setting Description Always Audio and video data transmitted (including IFB and Intercom) is encrypted. The successfully. icon appears when the data is encrypted and sent If EnGo is assigned to a receiver that does not support stream encryption, an error appears.
www.dejero.com The green meter shows the audio data received from the WayPoint receiver. It is heard in the connected Logitech H390 headset. The blue meter shows the microphone input audio data from the connected Logitech H390 headset. By default, Intercom is enabled on the EnGo. Enable Prompt Audio You can enable Prompt Audio to send a low-latency audio feed from your audio input device to your WayPoint receiver. You can still use IFB when Prompt Audio is enabled.
www.dejero.com 3. Select Intercom. Turn off Intercom and Prompt Audio If you do not want to use the Intercom or Prompt Audio features, you can turn them off. 1. On the Preview screen, select . 2. Select Audio Comms. 3. Select Off. Using Record mode With Record mode, you can record up to 40 hours of HD video clips directly onto the transmitter.With Record mode, you can record up to 30 hours of HD video clips directly onto the transmitter. You can preview, transfer, and delete the clips.
www.dejero.com 6. Select Back. 7. Select Clip File Format. 8. Set the clip file format: MP4, MOV, or M2TS. 9. Select Back. 10. Select Auto transfer. 11. To transfer clips while they are recording, set the Auto transfer field to On. 12. Select Back. 13. Select Prefix. 14. Type the prefix that you want to add to the names of clips. 15. Select . Clip file format settings Setting Description MP4 The standard MP4 clip contains H.264 video and AAC audio.
www.dejero.com 2. Select Record. The Preview screen shows the video that you are transmitting and recording. Note: When transferring a clip, you can switch to a CellSat connection, if one is available. In the Start CellSat dialog box, select Yes. If a CellSat connection becomes available after starting a clip transfer, on the Preview screen, select Start CellSat. Select Yes. Record a clip Prerequisite: Confirm that the clip quality that appears on the Record button is appropriate for the clip.
www.dejero.com 4. Scroll through the clips to find the correct clip. 5. Perform one of the following actions: • To select a clip, select the check box. • To select all clips, select All. • To cancel selecting all clips, select All again. 6. Select Actions. 7. Select Transfer. To stop transferring the clip, select Stop. Note: When transferring a clip, you can switch to a CellSat connection, if one is available. In the Start CellSat dialog box, select Yes.
www.dejero.com 8. To start the backup and save it in the currently selected destination folder, select Backup. Transfer a file 1. On the side of the EnGo, insert a USB drive. 2. On the Preview screen, select . 3. Select Transfer. 4. Select Files. 5. Using the arrows on the right side of the screen, navigate to the file that you want to import. 6. Select the file to transfer it. You can select and transfer multiple files from the same folder. 7. Select Actions. 8. Select Transfer.
www.dejero.com 2. Select Transfer. 3. Select Clips. 4. Scroll through the clips to find the correct clip. 5. Select the clip. 6. Select Actions. 7. Select Change Prefix. 8. Type a new name for the clip. 9. Select . Delete a clip 1. On the Preview screen, select . 2. Select Transfer. 3. Select Clips. 4. Select a clip. 5. Select Actions. 6. Select Delete. 7. To delete the clip from the transmitter permanently, select Yes.
www.dejero.com The file transfer progress appears on the screen. Note: When transferring a file, you can switch to a CellSat connection, if one is available. In the Start CellSat dialog box, select Yes. If a CellSat connection becomes available after starting a file transfer, on the Preview screen, select Start CellSat. Select Yes. About warning and error states Live If EnGo encounters an issue during a live transmission, the background color of the Preview screen changes.
www.dejero.com View the Remote Control user 1. On the Preview screen, select . 2. Select Settings. 3. Select Info. When using Remote Control, the Preview screen and the transmission activity continue to appear and the buttons work. Setting the display orientation By default, the EnGo appears in landscape mode. When you rotate the EnGo, the display orientation changes automatically, but you can set it manually.
www.dejero.com Viewing connection information The EnGo communicates data through modems, Ethernet, CellSat, and Wi-Fi connections. Individual connections show the active data transmission rate and, if enabled, the roaming status. Note: On the Connections screen, the modem number for the connection appears before the network name. 1. On the Preview screen, select . 2. Select Connections. 3.
www.dejero.com Glass-to-glass latency Latency measures time delay.Glass-to-glass refers to the delay from the time that EnGo detects an image to the time that it appears on a video monitor connected to the receiver output, or is output from the Cloud Server. When transmitting live, the glass-to-glass latency appears on the Preview screen, above the Go Live button. Stream Health indicator When transmitting live, the Stream Health indicator appears on the Preview screen above the Live menu.
www.dejero.com EnGo does not turn Make sure that the internal battery has enough charge to power the on EnGo. Connect the EnGo to a power outlet or attach a charged auxiliary battery. After you connect to a power source, the EnGo starts immediately. If the EnGo still does not turn on, contact Dejero Support. EnGo does not turn Confirm that the DC cable connection is secure and firmly inserted into on when power place.
www.dejero.com Video, audio, or transmission problems Problem Possible solution Preview screen is black A source is not connected to EnGo. Make sure that the cable from the source is securely connected to the correct input port on EnGo. The video input might not be specified correctly. For more information, see "Configure the video input" on page 26. There is sound, but The video input might not be specified correctly. For more information, no picture see "Configure the video input" on page 26.
www.dejero.com Troubleshooting Intercom If no sound is received by the Logitech headset connected to the EnGo, verify that the MOTU 4pre unit is connected to the CuePoint return feed server. Verify that an audio input is connected to the input port on the MOTU 4pre unit that corresponds to the WayPoint output assigned to the EnGo device. Use resilient mode If there is an issue with the Dejero infrastructure, Resilient Mode appears on the Preview screen.
www.dejero.com Problem Error / warning number Description Solution Poor network Warning 04 There is insufficient connection Try repositioning the EnGo for bett bandwidth to support the bitrate. wireless coverage, or change to a latency setting. For more informatio "Configure the latency" on page 30 One or more modems have malfunctioned. Restarting this device may resolve the problem. Error 05 Unable to establish a network connection. Reinitialize the modems: 1. Power off the EnGo. 2.
www.dejero.com Problem Error / warning number Description Poor network Warning 17 Network conditions are too poor Try repositioning the EnGo for bett to transmit reliably at the current wireless coverage, or change the la latency setting. setting to Adaptive or set a longer value. See "Configure the latency" page 30. No disk space Warning 18 There is not enough space on EnGo to store an additional clip. Delete existing clips to free up stor space.
www.dejero.com Error / warning number Description Solution CellSat is not ready. Please make sure the satellite connection is correctly set up or completely disconnected. Warning 25 The satellite connection is not ready. Give the satellite more time to conn has not connected within a suitable check that the satellite connection configured correctly or disconnect problem persists, contact Dejero S CellSat is not allowed in Ethernet-only mode. Please change the Connection Types setting to ‘All’.
www.dejero.com Problem Error / warning number Description Solution Unable to create or maintain a secure connection Error 33 The connection between EnGo Contact Dejero Support. 263 and the receiver couldn’t be authenticated so a secure connection is not available. Decryption error Error 34 The data is not encrypted properly or is corrupted. It could not be decrypted. Contact Dejero Support.
www.dejero.com Problem Error / warning number Description Solution File transfer failed Warning 111 This error message appears if there was an error creating a new file transfer session. Contact your system administrator Control to assign a different destina Capacity reached Warning 112 The assigned output has Wait for an output to become availa reached its live stream capacity. try again. Or, use Control to assign different output.
www.dejero.com Problem Error / warning number Description Solution SSL Handshake failed Warning 121 The SSL handshake failed due to poor network conditions. Wait for network conditions to impr try again. Hardware failure Error 200 The input device has malfunctioned. Contact Dejero Support. Software failure Error 201 The software stopped unexpectedly and was restarted automatically. Contact Dejero Support. Technical specifications Video Resolutions 480i 29.97, 576i 25, 720p 50/59.
www.dejero.com Network connections Cellular Up to 6 x 3G/4G/LTE/LTE-A Ethernet Dual 1 Gb/s port for LAN, WAN, and portable satellite (including BGAN, Ku-band, Ka-band) Wi-Fi Dual-band wireless-AC (802.11 a/b/g/n/ac) Open WEP, WPA-PSK, and WPA2-PSK Power DC IN 100-240 VAC adapter, 90W (included) Physical Dimensions 21.8 x 14.2 x 8.4 cm (8.5 x 5.6 x 3.3 inches) (H x W x D) Weight 1.8 kg (4.
www.dejero.com Key functions Live Transmit broadcast-quality live video over IP networks. Record mode Record video for later transfer. Live and Record mode Transmit live while also recording video for later at a higher quality. File transfer Transfer edited video or other files to Dejero receivers. Hotspot Connect laptop, phone, or other devices to the Internet leveraging the EnGo connectivity.
www.dejero.com Additional help If you still require assistance operating your Dejero EnGo 263: • Visit the Dejero SupportHub online knowledge base at support.dejero.com • Email the Dejero technical support team at support@dejero.com • Call the 24-hour technical support number for your region. • US & Canada: 1 866 808 3665, ext. 2 • International: +1 519 772 4824, ext. 2 Document revision history Version Date Changes 001 October 2021 Initial Version. Technical Support: support@dejero.