May 2019 User D-UG114-015 Guide November 2019
www.dejero.com Dejero Labs Inc. 412 Albert Street, Suite 100 Waterloo, Ontario, N2L 3V3 +1 519 772 4824 Copyright, Trademarks, and Patents Copyright © 2019 Dejero Labs Inc. Dejero is a trademark of Dejero Labs Inc. All other trademarks are the property of their respective owners. Dejero products or portions thereof are protected by patents granted and pending.
www.dejero.com Contents Warranty and Liability ................................................................................................................... 4 Safety Warnings and Hazards ...................................................................................................... 4 Handling and Operating Conditions .............................................................................................. 6 About the Dejero EnGo 260 ........................................................
www.dejero.com Warranty and Liability Reasonable care has been taken in preparing the information in this document. However, this document may contain omissions, technical inaccuracies, or typographical errors. Dejero Labs Inc. does not accept responsibility of any losses due to the use of this document. Product specifications are subject to change without notice. Due to the nature of wireless communication, transmission and reception of data can never be guaranteed.
www.dejero.com Explosive Atmosphere The EnGo should be powered off in an area with a potentially explosive atmosphere such as fuelling areas, fuel or chemical transfer or storage areas, below deck on boats, or in areas where the air contains chemicals or particles such as grain, dust or metal powders. It is rare, but there is potential for PC-like devices, such as the EnGo, to generate sparks, which could trigger an explosion.
www.dejero.com Personal Health and Safety For personal health and safety, the operator should maintain a minimum distance of 10 mm from the EnGo while it is powered on, except when using the touch screen. Medical Implant Devices It is possible that the radio modems in the EnGo may interfere with some types of medical devices (such as cardiac pacemakers or implant defibrillators), when operated close to the device. You should seek advice from your doctor before operating the EnGo.
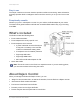
www.dejero.com Do Not Disassemble the Product Only authorized Dejero personnel can open, modify, or repair the EnGo unit. Unless authorized by Dejero personnel, any attempt by the user to open, disassemble, or repair the device renders the warranty null and void. Keep Air Vents Clear If the air vents are blocked, the EnGo may overheat and shut down. These vents are located on the top and bottom of the device. (The intake is protected by the black plastic antenna module end caps on the top and bottom.
www.dejero.com Easy to use The simple, intuitive touch screen interface provides confidence monitoring, status information, and easy operation. Built-in intelligence does most of the work for you so you can focus on the shot. Exceptionally versatile Whether you put it in a backpack or mount it in your vehicle, the EnGo adapts to your needs. The latest LTE-A global modems and field-user accessible SIMs make it easy to go live using local SIMs.
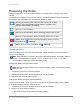
www.dejero.com Powering the EnGo When the EnGo is on, it runs on its internal battery. The EnGo does not supply power to the camera. The following icons appear on the Preview screen to indicate the battery’s status. The percent that appears with each battery icon indicates the remaining charge. Running on auxiliary power (either a power source or an auxiliary battery). If the internal battery needs charging, the battery icon indicates that the battery is charging. Running on internal battery.
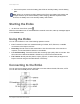
www.dejero.com • Connect the power cord to the battery plate. Slide an auxiliary battery onto the battery plate. Note: When you connect an auxiliary battery to the EnGo, the battery both powers and charges the EnGo (if the internal battery needs charging). Because it performs both functions, the battery level in the auxiliary battery drains faster. Starting the EnGo 1. On the front of the EnGo, press .
www.dejero.com Connect video and audio The EnGo supports HDMI or SDI video input with embedded audio. 1. Plug the included SDI or HDMI cable into the video camera’s output port. 2. Plug the SDI or HDMI cable into the video input port on the EnGo. 3. Make sure that all cables are firmly connected. The EnGo selects the correct video input automatically. If you do not see video on the screen, make sure that the cables are connected properly and that you are using a supported video format.
www.dejero.com • .1-.9 = IFB is active and the delay is less than 1 second • 1-9 = IFB is active and delay is less than 10 seconds • X = IFB is active and the delay is 10 seconds or more The indicator starts at I and, when IFB is active, it shows the volume and the delay interval. As the EnGo receives voice packets from the receiver, the sound level varies. Note: If you are using a Dejero Broadcast Server or a Dejero Transceiver, the audio is unbalanced.
www.dejero.com Tip: Use the strap on the right side of the backpack to secure disconnected audio and video cables. Use the EnGo inside the backpack When the EnGo is inside the backpack, you do not need to remove it to view the screen or interact with it. 1. Open the top compartment of the backpack halfway. 2. Use the magnet at the top of the backpack to hold open the top compartment. About the Preview screen When the EnGo is on, the Preview screen appears.
www.dejero.com • Live Menu: Use this menu to select the settings for your live transmission. • Record Menu: Use this menu to set the quality of your Store & Forward clips. Note: Your Control administrator must assign the transmitter to a receiver output destination before you can use it to go live. If your administrator has not assigned the transmitter, an error appears.
www.dejero.com Icon Description Wi-Fi connection Cellular connection Note: If an icon appears in grey or if no bars appear, no connection is available. If a red X appears with the icon, there is an error with the connection. For Wi-Fi and cellular connections, the number of bars indicates the strength of the connection. For cellular connections, an R indicates that you are roaming. Specifying the camera input type The EnGo is configured to detect the camera input automatically.
www.dejero.com Swap the SIM module 1. Power off the EnGo. 2. Remove the SIM module from the EnGo by loosening the thumbscrews. 3. Replace the SIM module by lining up and tightening the thumbscrews. Ensure that the module is aligned correctly and tightly connected. Change the SIM cards in the accessible SIM module Note: When inserting the SIM cards, use the diagram on SIM module to determine the correct orientation. 1. Power off the EnGo. 2. Remove the SIM module from the EnGo by loosening the thumbscrews.
www.dejero.com Adjust the brightness display The preferred brightness can be manually set or auto-adjust can be turned on to change the brightness automatically, based on the light sensor. Auto-adjust brightens the display in bright light and dims it in low light. 1. On the Preview screen, tap . 2. Tap Brightness. 3. Use the slider to adjust the brightness. 4. Tap the check box to turn the Auto-adjust feature on or off.
www.dejero.com Configure the audio input By default, EnGo uses two audio channels. To add more audio channels and maintain video quality, you will require additional data. Any additional data that you use for additional audio channels is deducted from your data plan allotment. 1. On the Preview screen, tap . 2. Tap Settings. 3. Tap Input. 4. Tap Audio Input. 5. Select the number of audio channels. 6. Tap Back.
www.dejero.com • Set the maximum connection bitrate. 7. Tap Back. 8. Tap Back as needed. 9. Tap to close the menu. The EnGo monitors the available bandwidth and adjusts the transport resolution automatically to give you the best possible video quality under the current network conditions. The receiver output resolution does not change, so the video routed to your internal systems remains constant.
www.dejero.com 3. Tap Live. 4. Tap Latency. 5. Tap a preset value: 1.5 seconds, 3 seconds, 8 seconds, or Preset, where Preset is between 0.8 to 20 seconds, as defined for the assigned receiver output in Control. 6. Tap Back. 7. Tap Latency Mode. 8. Tap a latency mode: Fixed, Adaptive, or Up to. 9. Tap Back. Note: If you engage a satellite connection as part of the CellSat service, the EnGo must use a latency of greater than 1.5 seconds. If the latency is set to less than 1.
www.dejero.com 4. Tap Auto Start. 5. Tap your delay selection: No delay, 1 minute, 2 minutes, 3 minutes, 4 minutes, or 5 minutes. Note: If you turn on Auto Start, the live stream starts when the transmitter detects video. If the live stream is stopped manually, Auto Start does not start again until you turn off and turn on the EnGo again. Configure the connection type You can set the type of connection to use when transmitting data. 1. On the Preview screen, tap . 2. Tap Settings. 3. Tap Connections. 4.
www.dejero.com Connection Preference settings Setting Description Automatic Use Automatic to provide an even weighting of connections across cellular and Ethernet connections. The EnGo adjusts the overall weighting according to network conditions to provide the requested bitrate. Cellular Use Cellular if your Ethernet connection is a satellite connection and you prefer to use cellular connections instead.
www.dejero.com 6. Tap Actions. 7. Tap Activate. Note: When a hotspot is active, the selected connection is not used for live streams. Rename the hotspot By default, the hotspot name is the name that appears for laptops or mobile devices in the available Wi-Fi networks list. You can change this name to make it easier to identify. 1. On the Preview screen, tap . 2. Tap Settings. 3. Tap Connections. 4. Tap Hotspot. 5. Tap Actions. 6. Tap SSID. 7. Type the new hotspot name. 8. Tap .
www.dejero.com 6. Tap Info. Managing Wi-Fi connections You can connect the EnGo to a Wi-Fi network to blend other network connections with a WAN connection. Configure a Wi-Fi connection 1. On the Preview screen, tap . 2. Tap Settings. 3. Tap Connections. 4. Tap Wi-Fi. 5. Scroll through the list of available Wi-Fi connections and tap your selection. 6. Tap Actions. 7. Tap Connect. 8. If prompted, use the keyboard on the screen to type the password. 9. Tap .
www.dejero.com Check the details of a Wi-Fi connection 1. On the Preview screen, tap . 2. Tap Settings. 3. Tap Connections. 4. Tap Wi-Fi. The current Wi-Fi network is highlighted in green. 5. Tap Actions. 6. Tap Info. Managing return feeds You can subscribe to return feeds sent from the studio using a Dejero CuePoint server. Turn on return video feeds 1. On the Preview screen, tap . 2. Tap Return Video. 3. Tap Return Video. 4. To add sound, tap Audio.
www.dejero.com Usually, the APN is available from the SIM card, but, in some cases, you might need to change it manually. 1. On the Preview screen, tap . 2. Tap Connections. 3. Tap a connection. 4. Tap Actions. 5. Tap Edit APN. 6. Tap a field to access the keyboard. 7. Type the new APN, network name, and PDP type. 8. Tap Apply. Note: If you need to reset the SIM to the default values, tap the Delete button. The Delete button is only available after you apply changes.
www.dejero.com 2. Tap Connections. 3. Tap the connection for the SIM card carrier. SIM cards in the secondary SIM set will have a list of available actions. 4. Tap Actions. 5. Tap Change PIN. 6. Type the current PIN. 7. Type the new PIN. 8. Tap . Disable the PIN for a SIM If you do not want to type the PIN every time you make changes to the SIM card, you can disable the PIN. Disabling the PIN simplifies your future actions. 1. On the Preview screen, tap . 2. Tap Connections. 3.
www.dejero.com 2. Tap Connections. 3. Tap the connection for the SIM card carrier. SIM cards in the secondary SIM set will have a list of available actions. 4. Tap Actions. 5. Tap Unblock SIM. 6. Type the PUK code. 7. Tap . Note: There is a limit on the number of PUK attempts. If you exceed this limit, the SIM is no longer usable. Turn off roaming for a connection In some regions, you might be able to manage roaming for each cellular connection that the EnGo has.
www.dejero.com 1. Tap Go Live. You can monitor the video feed as it transmits. Switch to a CellSat connection During a live transmission, you can switch to a CellSat connection, if one is available. 1. In the Start CellSat dialog box, perform one of the following actions: • To start using the CellSat connection, tap Yes. • To check your connections first, tap No. Note: If you want to use the CellSat connection after checking your connections, on the Preview screen, tap Start CellSat. Tap Yes.
www.dejero.com Note: Your administrator configures the available quality settings for Store & Forward clips using Control. Certain quality settings might not be available. For more information, contact your administrator. 1. On the Preview screen, tap . 2. Tap Settings. 3. Tap Record. 4. Tap Quality. 5. Set the recording rate to 2.5 Mb/s, 4.0 Mb/s, 6.0 Mb/s, 12.0 Mb/s, or 15.0 Mb/s. 6. Tap Back. 7. Tap Clip File Format. 8. Tap the preferred file format: MP4, MOV, or M2TS. 9. Tap Back. 10.
www.dejero.com Transfer a clip The receiver that receives the transferred clip is defined in Control. Clips are recorded Store & Forward files. Note: You cannot transfer a file or transfer a clip while recording if you are streaming live content. 1. On the Preview screen, tap . 2. Tap Transfer. 3. Tap Clips. 4. Scroll through the clips to find the correct clip. 5. Perform one of the following actions: • To select a clip, tap the checkbox. • To select all clips, tap All.
www.dejero.com Note: When you change the prefix for a clip, you are not changing the default prefix. For more information on changing the default prefix, see page 29. 1. On the Preview screen, tap . 2. Tap Transfer. 3. Tap Clips. 4. Tap a clip. 5. Tap Actions. 6. Tap Change Prefix. 7. Type a new name for the clip. 8. Tap . Delete a clip 1. On the Preview screen, tap . 2. Tap Transfer. 3. Tap Clips. 4. Tap a clip. 5. Tap Actions. 6. Tap Delete. 7.
www.dejero.com 2. On the Preview screen, tap . 3. Tap Transfer. 4. Tap Clips or Files. 5. Tap Actions. 6. On the S&F Clip Selection screen, select clips. 7. Tap Actions. 8. Tap Backup. 9. Select the drive. 10. To start the backup and save it in the currently selected destination folder, tap Backup. Record a Store & Forward clip Prerequisite: Confirm that the Store & Forward clip quality that appears on the Record button is appropriate for the clip.
www.dejero.com Note: When transferring a clip, you can switch to a CellSat connection, if one is available. In the Start CellSat dialog box. Tap Yes. If a CellSat connection becomes available after starting a clip transfer, on the Preview screen, tap Start CellSat. Tap Yes. Transferring files You can insert a USB drive into either of the USB ports on the EnGo. After you insert a USB drive, you can transfer files to the EnGo and then send the files to a receiver. Transfer a file 1.
www.dejero.com Record If an error occurs during recording (such as the EnGo is out of disk space), the error appears in the status area under the Record button. Transfer If an error occurs during a Store & Forward clip transfer or file transfer, a red X appears on the row. Using the Remote Control You can use the Remote Control feature in Control to control the EnGo from a remote location. For more information, visit support.dejero.com to read the Dejero Control User Guide.
www.dejero.com Viewing connection information The EnGo communicates data through modems, Ethernet, CellSat, and Wi-Fi connections. Individual connections show the active data transmission rate and, if enabled, the roaming status. Note: On the Connections screen, the modem number for the connection appears before the network name. 1. On the Preview screen, tap . 2. Tap Connections. 3.
www.dejero.com 3. Tap Connections. 4. Tap Carrier Data. Any connection that you changed the APN for appears on this screen along with the connection’s ICCID, network, and APN. If you did not change the APN for any connections, No Carrier Data appears. Note: You can also change the SIM settings from this screen. On the Carrier Data screen, tap Edit. Change the APN, network name, or PDP type. Tap Apply. Restart the EnGo for the changes to take effect.
www.dejero.com • Make sure that all cables are connected correctly. • Verify that your video source is on and sending video. • If necessary, select the specific video input type (HDMI or SDI), input resolution, and input frame rate for your camera. • Verify that the supplied video is in a compatible format. Start-up or power problems Problem Possible solution EnGo does not turn on Make sure that the battery is charged. Connect the EnGo to a power outlet or attach a charged auxiliary battery.
www.dejero.com Problem Possible solution Back-up battery in use If the Power button flashes quickly, or a warning appears in Control, connect the EnGo to a power outlet or connect a fully charged external battery. If the battery power is low, a warning appears on the screen. The battery icon also changes to a red battery with white text. If this warning appears, connect the EnGo to a power source or a fully charged external battery. If the battery temperature is approaching its limit, a warning appears.
www.dejero.com • Verify that the correct capture device is set as the default on the receiver. If you still encounter errors, the transmitter might have an internal hardware problem. For more information, contact Dejero Support. Resilient mode If there is an issue with the Dejero infrastructure, Resilient Mode appears on the Preview screen. In Resilient mode, you can still start a transmission or transfer clips or files.
www.dejero.com Message Error/warning number Description Possible solution Poor network Warning 04 There is insufficient connection bandwidth to support the bitrate. Try repositioning the EnGo for better wireless coverage, or change to a longer latency setting. For more information, see Configure the latency on page 19. One or more modems have malfunctioned. Restarting this device may resolve the problem. Error 05 Unable to establish a network connection. To reinitialize the modems: 1.
www.dejero.com Message Error/warning number Description Possible solution Device is inactive. Please contact your system administrator. Error 14 Unable to establish connection with assigned receiver. If this occurs, contact your system administrator. No Ethernet Warning 16 The Ethernet connection type has been selected but there are no Ethernet connections present. Connect an Ethernet cable to the EnGo or establish a WiFi connection.
www.dejero.com Message Error/warning number Description Possible solution Device not licensed Error 21 This device is not licensed. Contact Dejero Support. Device needs to be assigned to a clip receiver. Please contact your system administrator. Warning 22 The device needs to be assigned to a clip receiver. Use Control to assign a clip receiver to your EnGo. Device needs to be assigned to a file receiver. Please contact your system administrator.
www.dejero.com Message Error/warning number Description Possible solution Satellite capacity is not available at the moment. This message will automatically clear when satellite capacity is available again. Warning 27 The device cannot establish a satellite connection. Wait for the satellite connection to become available. CellSat is not allowed. Please contact Dejero at 1-519-772-4824. Error 28 The EnGo does not have modems or there are no SIM cards in the modems. Contact Dejero Support.
www.dejero.com Message Error/warning number Description Possible solution Clip transfer failed Warning 110 This error message appears if there was an error creating a new Store & Forward clip transfer session. Attempt to transmit the clip again. If the problem persists, contact your system administrator. Consider managing the clips on the Dejero receiver to reduce the total number of clips to less than 1000. File transfer failed.
www.dejero.com Message Error/warning number Description Possible solution Receiver incompatible Error 119 Could not broadcast. The receiver is incompatible and requires a software update. Contact Dejero Support. Latency is being adjusted to optimize requested operation. This message will automatically clear when the latency adjustment has completed. Warning 120 The CellSat service requires a minimum latency of 1.5 seconds. The device is adjusting the latency from a lower level.
www.dejero.com Audio Encoding Live: Opus 48 kHz, 2,4 or 8-channel, 16-128 kb/s adaptive bitrate, 16-bit audio depth Recording: AAC 48 kHz, stereo or 4-channel Inputs Embedded (SDI, HDMI) Network connections Cellular Up to 6 x 3G/4G/LTE/LTE-A Ethernet Dual 1 Gb/s port for LAN, WAN, and portable satellite (including BGAN, Ku-band, Ka-band) Wi-Fi Dual-band wireless-AC (802.11 a/b/g/n/ac) Open, WEP, WPA-PSK, and WPA2-PSK Power DC IN 100-240 VAC adapter, 90W (included) Physical Dimensions 21.
www.dejero.com Store & Forward Record video for later transfer. Live and Store & Forward Transmit live while also recording video for later at a higher quality. File Transfer Transfer edited video or other files to Dejero receivers. Hotspot Connect laptop, phone, or other devices to the Internet leveraging the EnGo connectivity. Multiple Output Formats Reliably transmit to a wide range of outputs including CDN, SDI, MPEG-TS, or SMPTE ST 2110.
www.dejero.com Technical Support: support@dejero.com US & Canada (Toll Free): 1 866 808 3665, ext. 2 International: +1 519 772 4824, ext.