User Guide June 2022 D-UG145-DRAFT
www.dejero.com Dejero Labs Inc. 410 Albert Street, Suite 200 Waterloo, Ontario, N2L 3V3 +1 519 772 4824 Copyright, Trademarks, and Patents Copyright © 2022 Dejero Labs Inc. Dejero is a trademark of Dejero Labs Inc. QuickTime is a trademark of Apple Inc. Wi-Fi is a trademark of the Wi-Fi Alliance. Linux is the registered trademark of Linus Torvalds in the U.S. and other countries. All other trademarks are the property of their respective owners.
www.dejero.
www.dejero.
www.dejero.com Warranty and Liability Reasonable care has been taken in preparing the information in this document. However, this document may contain omissions, technical inaccuracies, or typographical errors. Dejero Labs Inc. does not accept responsibility of any losses due to the use of this document. Product specifications are subject to change without notice. Due to the nature of wireless communication, transmission and reception of data can never be guaranteed.
www.dejero.com The PMN is EM12-G. RF Exposure Notice THIS DEVICE MEETS THE GOVERNMENT REQUIREMENTS FOR EXPOSURE TO RADIO WAVES. EnGo is a radio transmitter and receiver. It is designed and manufactured not to exceed the emission limits for exposure to radio frequency (RF) energy set by the Federal Communications Commission of the U.S. Government and Industry Canada.
www.dejero.com In-vehicle use Dejero Labs Inc. (Dejero) is not liable for any liabilities, obligations, loss, damage, personal injury, special, incidental or consequential damages for personal injury or other damage of any nature arising, including but not limited to those arising under any contract, warranty, negligence or in theory of contract or tort law, directly or indirectly as a result of the improper installation or use of its products in a vehicle or any other application.
www.dejero.com Handle Device with Care While the EnGo is durable, it is possible to damage the device if it is dropped or thrown. Please handle with care. Damage sustained as the result of mishandling the EnGo renders the warranty null and void. Do Not Open the Case The EnGo case should remain sealed at all times to protect the sensitive electronics inside and ensure the safety of the operator. Opening the case renders the warranty null and void.
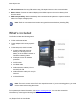
www.dejero.com EnGo 3x efficiently encodes and securely transmits high-quality live video from the field while also empowering mobile teams to work more efficiently with resilient, high-bandwidth, wireless internet access. Featuring Dejero's renowned Smart Blending Technology, the dependable EnGo 3x reliably performs in the most challenging network conditions.
www.dejero.com ● IFB and Intercom: One-way IFB and two-way, full-duplex Intercom voice communication. ● Return video: Connect an external display to the HDMI output to view a low-latency feed from the studio. ● UAS interoperability: Works seamlessly with unmanned aerial systems to capture real-time video from unique vantage points. Note: EnGo 3x can transmit and receive encrypted live transmissions (including IFB).
www.dejero.com About Dejero Control When you manage the EnGo with Dejero Control, you can: ● Assign live and recorded video, as well as file transfers, from the EnGo to a Dejero receiver. ● Geolocate the EnGo mobile transmitter. ● Preview and route feeds from the EnGo. ● Remotely control and configure the EnGo. ● Review analytics about the performance of the EnGo. ● Add metadata that is associated with uploaded clips. Powering the EnGo When the EnGo is on, it runs on its internal battery.
www.dejero.com Battery error, but the EnGo is running on auxiliary power. For more information, select > Warning. Battery error. For more information, select > Warning. Charge the EnGo When the battery is low, you must charge the EnGo. Charge the battery in EnGo fully prior to using it for the first time. Note: The battery might not charge if the temperature is below 10° C / 50° F or above +45° C / 113° F, or if it has encountered a problem that caused the battery to fail.
www.dejero.com Blue light flashing once every 2 seconds for approximately 30 seconds The EnGo is off and connected to an external power source but the battery is fully charged. After approximately 30 seconds, the blue light stops flashing. Blue light flashing approximately twice a second The EnGo is on and the internal battery is below 20%. The EnGo is not connected to an external power source so the battery is not charging.
www.dejero.com ● Live and Recording: Transmit live while also recording high-quality video to use later. Use this mode when network bandwidth is limited but you still need to broadcast live. ● Clip or File Transfer: Quickly transfer photos, scripts, graphics, or edited video packages to the Dejero receivers using the blended network connectivity. ● Record and Auto Transfer: Record a clip and transfer it to the receiver simultaneously.
www.dejero.com Connect video and audio The EnGo supports SDI video input with embedded audio. 1. Plug the included SDI cable into the video camera’s output port. 2. Plug the SDI cable into the video input port on the EnGo. 3. Make sure that all cables are firmly connected. The EnGo selects the correct video input automatically. If you do not see video on the screen, make sure that the cables are connected properly and that you are using a supported video format.
www.dejero.com You can use IFB at any time – regardless of whether the EnGo is transmitting a live stream. To use IFB when the EnGo is not live, both the EnGo and the receiver that you are using must be using software version 5.3 or later. For more information on Dejero receivers, visit support.dejero.com to read the receiver user guides. IFB audio output can be balanced or unbalanced. For more information on switching between them, see "Switch between balanced and unbalanced IFB audio output" on page .
www.dejero.com If you are using a WayPoint 104 receiver, you can also use the MOTU-4PRE, the Behringer UMC404HD, or the Dante Virtual audio card. Note: IFB works independently of the Intercom feature. 1. Ensure that the WayPoint receiver and the audio interface device are configured properly. For more information, visit support.dejero.com to read the appropriate Dejero WayPoint User Guide and the Dejero Intercom Reference Guide. 2. Connect a headset with a 3.5 mm connection to the EnGo. 3.
www.dejero.com Inserting the EnGo into the backpack When the EnGo is inside the backpack, ensure that the cables are not bent and the connections are not under stress. 1. Use the four zippers at the top of the backpack to open the top compartment fully. 2. Connect the SDI cable to the correct input port on the side of the EnGo. For more information on using an HDMI cable with the EnGo instead, see "Insert an HDMI cable into the EnGo backpack" on page . 3. If necessary, use either the 3.
www.dejero.com d. Connect the power cable to the DC IN port on the EnGo. 10. Close the top of the backpack. As you close the top, ensure that the Wired Remote and power cables lay inside the foam channels at the top of the backpack. The foam should rest on the EnGo 3x, not the cables. Note: You must secure the EnGo in the backpack with the zip cords. If you do not, the EnGo can move around or fall out.
www.dejero.com 5. Close the top of the backpack. 6. To view the EnGo with the sun shade, perform the following actions: a. Lift the front access panel from the bottom. b. Unfold the triangle flaps from behind the panel. c. Press the edges of the triangle flaps down on to the hook-and-loop fasteners on the sides of the front access panel. 7. To view the EnGo screen without the sun shade, perform the following actions: a. Lift the front access panel from the bottom. b.
www.dejero.com d. Secure the sun shade to the hook-and-loop fastener strip on top of the cable storage compartment. Ensure that the triangle flaps are captured underneath. Note: To disassemble the sun shade, lift the hook-and-loop fasteners from the triangle flaps. Fold the flaps up and close the front access panel. Insert an HDMI cable into the EnGo backpack By default, the backpack comes with the SDI cable already inserted. You can remove this cable if you want to use an HDMI cable instead.
www.dejero.com 4. Use the hook-and-loop fasteners to open the slot in the bottom of the cable storage compartment. 5. Pull the SDI cable into the backpack through the slot in the cable storage compartment. 6. Gently separate the foam spacer from the back of the backpack and pull it forward. 7. Pull the SDI cable through the channel in the foam spacer and remove it from the backpack. 8.
www.dejero.com About the Preview screen When the EnGo is on, the Preview screen appears. You can use the Preview screen in portrait or landscape mode. By default, the screen appears in landscape mode. For more information on changing the display orientation, "Setting the display orientation" on page . The Preview screen is the hub of the EnGo transmitter. The top half of the screen shows the live camera feed, as well information about the power level, network connections, stream health, and any errors.
www.dejero.com Your Control administrator must assign the transmitter to a receiver output destination before you can use it to go live. If your administrator has not assigned the transmitter, an error appears. Your administrator can also change the Store and Forward Clip upload or File upload receiver destination using Control and the available quality settings for clips. If any settings are not available, a message appears with the quality setting in the Record Menu.
www.dejero.com Wi-Fi connection Cellular connection Note: If an icon appears in grey or if no bars appear, no connection is available. If a red X appears with the icon, there is an error with the connection. For Wi-Fi and cellular connections, the number of bars indicates the strength of the connection. For cellular connections, an R indicates that you are roaming. Changing SIM modules The EnGo has a user-changeable SIM module for regional cellular network access.
www.dejero.com After changing the SIM module, select which SIMs to use. For more information, see "Define the SIM set" on page . Warning: Do not force the module into the EnGo. If it does not insert easily, remove it and check that you inserted the replacement module in the correct way. Forcing the module can result in damage to the SIM module or the EnGo. Change the SIM cards in the accessible SIM module Note: The SIM cards only fully insert and remain locked if they are oriented correctly. 1.
www.dejero.com Adjust the display brightness The preferred brightness can be manually or automatically set. If you use auto adjust, the EnGo’s light sensor brightens the display in bright light and dims it in low light. 1. On the Preview screen, select . 2. Select More. 3. Select Brightness. 4. Perform one of the following actions: ● To adjust the brightness manually, use the slider. ● To have the EnGo adjust the brightness automatically, select the Auto-adjust check box.
www.dejero.com Input Resolution Input Frame Rates 480i 29.97 576i 25 720p 50, 59.94, 60 1080i 25, 29.97, 30 1080p 23.98, 24, 25, 29.97, 30 1080p 50, 59.94, 60 (3G-SDI Level-A) UHD (3840x2160) 23.98, 24, 25, 29.97, 30, 50, 59.94, 60 Change the IP video input settings If you want to receive video over the Ethernet connection for the EnGo, you can change the IP video input settings. Note: The EnGo supports MPEG-TS (UDP/RTP), RTSP, and RTMP IP inputs. 1. On the Preview screen, select . 2.
www.dejero.com Configure the audio input By default, EnGo uses two audio channels. To add more audio channels and maintain video quality, you will require additional data. Any additional data that you use for additional audio channels is deducted from your data plan allotment. EnGo supports 2-, 4- or 8--channel audio. To add more audio channels and maintain video quality, you will require additional data. Note: 4- or 8-channel audio is only available with the SDI input. 1. On the Preview screen, select .
www.dejero.com Note: To prevent using higher resolutions over a cellular connection, an administrator might set the maximum live resolution allowed for an EnGo in Control. When a restriction is added, the resolution is stepped down automatically to the maximum allowable resolution when the connection type is set to Modems or All. If the connection type is set to Ethernet, the maximum live resolution setting in Control is ignored. The administrator can also use Control to set the maximum connection bitrate.
www.dejero.com Auto: UHD 60.0 Mb/s Audio-only mode In situations of limited bandwidth, when the available bandwidth falls below the threshold required for usable video quality, EnGo automatically sends only audio to the receiver and the last good frame of the video remains on the screen. When the bandwidth increases above the required threshold, EnGo resumes sending video. Note: The thresholds change depending on the number of audio channels selected; more audio channels result in higher thresholds.
www.dejero.com Note: If you engage a satellite connection as part of the CellSat service, the EnGo must use a latency of greater than 1.5 seconds. If the latency is set to less than 1.5 seconds, the EnGo changes the latency to a short latency (1.5 s). Latency settings Setting Description Fixed Latency mode In Fixed Latency mode, the system attempts to give the glass-to-glass latency requested. If the current network conditions cannot support the configured latency, a warning appears on the screen.
www.dejero.com Note: If you turn on Auto Start, the live stream starts when the transmitter detects video. If the live stream is stopped manually, Auto Start does not start again until you turn off and turn on EnGo again. Configure the connection type You can set the type of connection to use when transmitting data. 1. On the Preview screen, select . 2. Select More. 3. Select Settings. 4. Select Connections. 5. Select Connection Types. 6. Select a connection type: All, Ethernet, or Modems.
www.dejero.com 5. Select Preferred Connection. 6. Select a connection setting: Automatic, Ethernet, or Cellular. Connection Preference settings Setting Description Automatic Use Automatic to provide an even weighting of connections across cellular and Ethernet connections. The EnGo adjusts the overall weighting according to network conditions to provide the requested bitrate.
www.dejero.com Activate the hotspot You can activate the hotspot so smartphones, laptops, and other devices can use the EnGo to connect to the internet. You can select whether you want to activate the hotspot for a single connection or all connections. 1. On the Preview screen, select . 2. Select More. 3. Select Settings. 4. Select Connections. 5. Select Hotspot. 6. Perform one of the following actions: ● To activate the hotspot for a single connection, select Single Modem.
www.dejero.com Change the hotspot password The password prevents unauthorized users from accessing the EnGo hotspot. Note: When you change the hotspot password, it changes whether you are using a single modem hotspot or you are using GateWay Mode. 1. On the Preview screen, select . 2. Select More. 3. Select Settings. 4. Select Connections. 5. Select Hotspot. 6. Select Actions. 7. Select Password. 8. Delete the old password. 9. Type the new hotspot password. 10. Select .
www.dejero.com Mode uses all available connections which provides enhanced reliability to transfer large files quickly or to access station systems from the field. GateWay Mode is meant for fast file transfers, internet access, or for increased capacity when used as a mobile access point. Note: GateWay Mode is a licensed feature and additional charges might apply. If you do not see the GateWay Mode option on your EnGo, contact your system administrator. Turn on GateWay Mode 1.
www.dejero.com 2. Select Connections. 3. Select Hotspot. 4. Select GateWay Mode. 5. Select Actions. 6. Select Deactivate. Managing Wi-Fi connections You can connect the EnGo to a Wi-Fi network to blend other network connections with a WAN connection. Note: If you enable GateWay Mode, you cannot connect the EnGo to a Wi-Fi network as described in this section. In GateWay Mode, devices must connect to the hotspot. For more information, see "Activate the hotspot" on page . Configure a Wi-Fi connection 1.
www.dejero.com 4. Select Actions. 5. Select Disconnect. Delete a saved Wi-Fi profile 1. On the Preview screen, select . 2. Select Connections. 3. Select Wi-Fi. The current Wi-Fi network is highlighted in green. 4. Select Actions. 5. Select Forget. Check the details of a Wi-Fi connection 1. On the Preview screen, select . 2. Select Connections. 3. Select Wi-Fi. The current Wi-Fi network is highlighted in green. 4. Select Actions. 5. Select Info.
www.dejero.com Turn off return video feeds 1. On the Preview screen, select . 2. Select Return Video. 3. Select Off. Managing SIM cards When traveling, SIMs from local carriers can be used in the user-accessible SIM module. Additional setup tasks, such as customizing the Access Point Name and managing PINs for the SIM cards, might be required. Change the Access Point Name When you add new SIM cards, you might need to change the Access Point Name (APN).
www.dejero.com Note: If a SIM card is locked, Cellular might appear instead of a carrier name. To determine if you selected the correct connection, scroll to the SIM card ICCID and compare it to the packaging for the SIM card. 1. On the Preview screen, select . 2. Select More. 3. Select Connections. 4. Select the connection for the SIM card carrier. SIM cards in the secondary SIM set will have a list of available actions. 5. Select Actions. 6. Select Unlock SIM. 7. Select a field to access the keyboard.
www.dejero.com 1. On the Preview screen, select . 2. Select More. 3. Select Connections. 4. Select the connection for the SIM card carrier. SIM cards in the secondary SIM set will have a list of available actions. 5. Select Actions. 6. Select Disable PIN. 7. Type the current PIN. 8. Select . Enable the PIN for a SIM 1. On the Preview screen, select . 2. Select More. 3. Select Connections. 4. Select the connection for the SIM card carrier.
www.dejero.com 8. Select . Note: There is a limit on the number of PUK attempts. If you exceed this limit, the SIM is no longer usable. Turn off roaming for a connection In some regions, you might be able to manage roaming settings for each cellular connection that the EnGo has. By default, roaming is turned on, so connections roam on to any available cellular network. If this option is configured for your EnGo, you can turn roaming off for individual connections. 1. On the Preview screen, select . 2.
www.dejero.com Switch to a CellSat connection During a live transmission, you can switch to a CellSat connection, if one is available. 1. In the Start CellSat dialog box, perform one of the following actions: ● To start using the CellSat connection, select Yes. ● To check your connections first, select No. Note: If you want to use the CellSat connection after checking your connections, on the Preview screen, select Start CellSat. Select Yes. Stop a transmission 1. On the Preview screen, select Stop. 2.
www.dejero.com 6. Click . 7. In the Configuration section, in the Stream Encryption Mode drop-down list, set the stream encryption mode. 8. Click . During data transmission, if the data is encrypted and sent successfully, upper-right corner of the video on the Preview screen. appears in the Stream encryption modes Setting Description Always Audio and video data transmitted (including IFB and Intercom) is encrypted. The successfully.
www.dejero.com The green meter shows the audio data received from the WayPoint receiver. It is heard in the connected headset. The blue meter shows the microphone input audio data from the connected headset. By default, Intercom is enabled on the EnGo. Enable Prompt Audio You can enable Prompt Audio to send a low-latency audio feed from your audio input device to your WayPoint receiver. You can still use IFB when Prompt Audio is enabled.
www.dejero.com 2. Select Audio Comms. 3. Select Intercom. Turn off Intercom and Prompt Audio If you do not want to use the Intercom or Prompt Audio features, you can turn them off. 1. On the Preview screen, select . 2. Select Audio Comms. 3. Select Off. Using Record mode With Record mode, you can record up to 70 hours of HD video clips directly onto the transmitter. You can preview, transfer, and delete the clips.
www.dejero.com 6. Set the recording rate to 2.5 Mb/s, 4.0 Mb/s, 6.0 Mb/s, 12.0 Mb/s, 15.0 Mb/s, or 30.0 Mb/s. 7. Select Back. 8. Select Clip File Format. 9. Set the clip file format: MP4, MOV, or M2TS. 10. Select Back. 11. Select Auto transfer. 12. To transfer clips while they are recording, set the Auto transfer field to On. 13. Select Back. 14. Select Prefix. 15. Type the prefix that you want to add to the names of clips. 16. Select .
www.dejero.com 1. On the Preview screen, select Go Live. 2. Select Record. The Preview screen shows the video that you are transmitting and recording. Note: When transferring a clip, you can switch to a CellSat connection, if one is available. In the Start CellSat dialog box, select Yes. If a CellSat connection becomes available after starting a clip transfer, on the Preview screen, select Start CellSat. Select Yes.
www.dejero.com 3. Select Clips. 4. Scroll through the clips to find the correct clip. 5. Perform one of the following actions: ● To select a clip, select the check box. ● To select all clips, select All. ● To cancel selecting all clips, select All again. 6. Select Actions. 7. Select Transfer. To stop transferring the clip, select Stop. Note: When transferring a clip, you can switch to a CellSat connection, if one is available. In the Start CellSat dialog box, select Yes.
www.dejero.com 7. Select the drive. 8. To start the backup and save it in the currently selected destination folder, select Backup. View a clip's information The clip information includes the transfer receiver, the transfer complete percentage, as well as the timestamp. 1. On the Preview screen, select . 2. Select Transfer. 3. Select Clips. 4. Select a clip. 5. Select Actions. 6. Select Info. Change the prefix for a clip You can change the prefix for a single clip before you transfer it to a receiver.
www.dejero.com 4. Select a clip. 5. Select Actions. 6. Select Delete. 7. To delete the clip from the transmitter permanently, select Yes. Transferring files In addition to using the transmitter to transfer recorded video clips, you can use the file transfer feature to transfer non-executable files, such as documents or other videos. You can insert a USB drive into either of the USB ports on the EnGo. After you insert a USB drive, you can transfer files to the EnGo and then send the files to a receiver.
www.dejero.com ● If an error appears, the background color changes to red. EnGo requires more advanced troubleshooting and might require support from your system administrator. View error or warning information 1. On the Preview screen, select . 2. Select Error or Warning. Record If an error occurs during recording (such as EnGo is out of disk space), the error appears in the status area under the Record button. Transfer If an error occurs during a clip or file transfer, a red X appears on the row.
www.dejero.com 1. On the Preview screen, select . 2. Select More. 3. Select Settings. 4. Select Operation. 5. Select Display. 6. Select a display orientation. If you changed the display orientation from landscape to portrait, the EnGo appears in portrait mode. Viewing connection information The EnGo communicates data through modems, Ethernet, CellSat, and Wi-Fi connections. Individual connections show the active data transmission rate and, if enabled, the roaming status.
www.dejero.com 3. To view detailed connection information, including the latency, MB/s transferred, roaming status, the network that you are roaming on to, and the connection’s MAC address, select a connection. Note: If roaming is not on for a connection, on the Connections screen, an X appears over the signal strength indicator for that connection. View SIM connection information You can view SIM-specific details for any cellular connection that you changed the APN for.
www.dejero.com Stream Health indicator When transmitting live, the Stream Health indicator appears on the Preview screen above the Live menu. It appears as either Good, Marginal, or Poor. A colored dot appears along with the value to show the stream health. The Stream Health indicator measures the quality of the live video stream received, decoded, and displayed by the output receiver.
www.dejero.com Start a transmission with the Wired Remote After you connect the Wired Remote to the EnGo, you can use the remote to start a live transmission. Note: If a red light appears beside Ready on the Wired Remote, the EnGo is not ready to transmit live. Use the Preview screen to review the network connection status and verify that the EnGo is connected to a video source. Resolve any other warnings that appear on the Preview screen. For more information, see "Troubleshooting" on page . 1.
www.dejero.com Troubleshooting No display on Preview screen If you do not see a video on the Preview screen, perform the following actions: ● Make sure that all cables are connected correctly. ● Verify that your video source is on and sending video. ● If necessary, select the specific video input type (HDMI or SDI), input resolution, and input frame rate for your camera. ● Verify that the supplied video is in a compatible format.
www.dejero.com EnGo needs to be assigned to a receiver output Contact your system administrator to assign a receiver output. When assigned, the output destination for EnGo appears on the Preview screen. EnGo is disabled Contact Dejero Support. You will need to restart EnGo after it is reenabled. Low power If battery power in the EnGo is low, the Power button flashes quickly (approximately two times a second), and a warning appears on the screen and in Control.
www.dejero.com An error message appears on the screen For a full list of EnGo error messages and possible solutions, see "Warning and error messages" on page . Troubleshooting IFB IFB might not be working if you encounter one or more of the following problems: ● No sound is coming through the earpiece. ● On the Preview screen, the IFB indicator stays at I. ● On the Preview screen, the IFB indicator shows X.
www.dejero.com Note: If you transfer clips or files in Resilient mode, EnGo uses the last receiver that you assigned for a clip or file transfer. Restart EnGo Occasionally, you might need to restart EnGo to assist with support sessions or during troubleshooting. 1. On the Preview screen, select . 2. Select More. 3. Select Settings. 4. Select Operation. 5. Select Restart. Note: If you use Control for remote management of the EnGo, when EnGo restarts, you lose access.
www.dejero.com Problem Error / warning number Description Solution 3. Wait 30 seconds, reconnect the power source, and restart. If this does not resolve the problem, contact Dejero Support. Output not assigned Warning 09 EnGo might not be assigned to a receiver output in Control. The assigned receiver output is either turned off or inactive. Device is disabled. Please contact Dejero. Use Control to assign an output. For more information, visit support.dejero.
www.dejero.com Problem Error / warning number Description Solution No disk space Warning 18 There is not enough space on EnGo to store an additional clip. Delete existing clips to free up storage space. All outputs in use Warning 19 This error message appears if EnGo is assigned to an output pool (in Control), but all the outputs in the pool are currently in use or unavailable. Wait for another user to finish using a receiver output and try again.
www.dejero.com Problem Error / warning number Description Solution CellSat is not Warning 25 ready. Please make sure the satellite connection is correctly set up or completely disconnected. The satellite connection is not ready. Give the satellite more time to connect. If it has not connected within a suitable time, check that the satellite connection is configured correctly or disconnect it. If the problem persists, contact Dejero Support. CellSat is not Error 26 allowed in Ethernetonly mode.
www.dejero.com Problem Error / warning number Description Solution Live receiver does not support encryption Warning 31 EnGo is assigned to a receiver that does not support encryption. Assign EnGo to a different receiver that does support encryption or contact Dejero Support. Unable to create or maintain a secure connection Error 33 The connection between Contact Dejero Support. EnGo 3x and the receiver couldn’t be authenticated so a secure connection is not available.
www.dejero.com Problem Error / warning number Description Solution Clip transfer failed Warning 110 This error message appears if there was an error creating a new clip transfer session. Attempt to transmit the clip again. If the problem persists, contact your system administrator. Consider managing the clips on the Dejero receiver to reduce the total number of clips to less than 1000.
www.dejero.com Problem Error / warning number Description Solution Latency is being adjusted to optimize the requested operation. This message will automatically clear when the latency adjustment has completed. Warning 120 The CellSat service Wait for the device to adjust the latency. requires a minimum latency of 1.5 seconds. The device is adjusting the latency from a lower level. SSL Handshake failed Warning 121 The SSL handshake failed due to poor network conditions.
www.dejero.
www.dejero.com Physical Dimensions 21.8 x 14.2 x 8.4 cm (8.5 x 5.6 x 3.3 inches) (H x W x D) Weight 1.9 kg (4.2 lbs) Operating conditions 0°C to 45°C (32°F to 113°F)* 0°C to 40°C (32°F to 104°F) in backpack, up to 95% RH (noncondensing) Storage conditions -20°C to 70°C (-4°F to 158°F) < 95% RH (non-condensing) Connectors SDI in (BNC), HDMI in, HDMI out, 2 x RJ45 Ethernet, 2 x USB 3.0, IFB out (3.5 mm), Intercom headset (3.
www.dejero.com Multiple output formats Reliably transmit to a wide range of outputs including SDI, SMPTE ST 2110, MPEG-TS, Content Delivery Networks (CDNs), social networks, and MultiPoint. Regulatory compliance Product EnGo 3x Model EG3x Compliance This product is compliant with international EMC and safety standards.
www.dejero.com Additional help If you still require assistance operating your Dejero EnGo 3x: ● Visit the Dejero SupportHub online knowledge base at support.dejero.com ● Email the Dejero technical support team at support@dejero.com ● Call the 24-hour technical support number for your region. ● US & Canada: 1 866 808 3665, ext. 2 ● International: +1 519 772 4824, ext. 2 Document revision history Version Date Changes 001 TBD Initial release. Technical Support: support@dejero.