
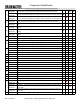
Warranty Guide


Rev: 5 06/2016 Brush Master™ Chipper/Shredder with 2-Way Feed
14
T
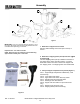
Rapid retraction of the recoil starter cord can pull the
starter cord back faster than you can let go. When
starting the engine, pull the cord slowly until resistance
is felt then pull rapidly to avoid kickback.
NOTE: A noise will be heard when finding the start of the
compression cycle. This noise is caused by the flails and
fingers, which are part of the shredding mechanism, and it
should be expected until the impeller reaches full speed.
Step 7: When engine starts, move choke control
gradually to the RUN position.
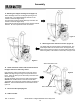
Using the Chipper Shredder
Yard waste such as leaves and pine needles can be raked up
and placed in the chipper funnel for shredding. DO NOT PUT
BRANCHES INTO THE LEAF FUNNEL. BRANCHES SHOULD BE FED
INTO THE LIMB CHUTE.
Do not aempt to use the side chute while using the
funnel at the same me.
When using the limb chute to chip branches, it is important to
let the chipper feed the branches through automatically. DO
NOT attempt to force the branches through. If the branches
do not automatically feed through, gently push the branch
and then allow the chipper to automatically feed the branch
through.
Once material is shredded by the hammers on the impeller
assembly, it is discharged through the open discharge chute.
Do not attempt to shred or chip any material other than
normal yard vegetation found (i.e., branches, leaves, twigs,
etc.) Avoid fibrous, wet vegetation such as tomato vines until
they are thoroughly dried. Twigs and small branches can be
fed into the limb chute. (See model specifications for
maximum cutting thickness.)
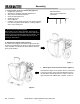
IMPORTANT: The hammer screen is located inside the
housing in the discharge area. If the screen becomes
clogged, remove and clean as instructed. For best
performance, it is also important to keep the chipper blades
sharp.
If the discharge area becomes clogged:
Stop the engine. Disconnect spark plug wire from spark
plug and ground against the engine.
Remove leaf funnel
Reach in and clear the debris causing the blockage.
Reinstall the funnel and the clean out access hatch.
Connect the spark plug wire and restart.
NOTE: If the blockage is severe, the hammer screen within
the discharge chute can be removed as well, providing
greater access. To accomplish this, remove the discharge
chute and the flail screen out of the discharge chute.
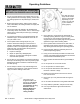
Operating Instructions
This machine was built to be operated according to the
rules for safe operation in this manual. As with any type of
power equipment, carelessness or error on the part of the
operator can result in serious injury.
Always wear hearing and eye protection while
operating this machine or if you are within 75 feet of
this machine.
Add Gasoline and Oil
Step 1: Add gasoline
Step 2: Add 10W-30 oil until the oil is about to overflow
from the oil fill spout. (see page 2 for capacity) A low oil
sensor will prevent the engine from running unless the oil
is COMPLETELY FULL. Ensure both oil fill plugs are
secure after filling.
Never fill fuel tank indoors with engine running or
until the engine has been allowed to cool for at least
two minutes after running.
Starting the Engine
Step 3: Attach spark plug wire to spark plug. Make
certain the plug wire on the end of the spark plug is
fastened securely over the metal tip on the spark plug.
Step 4: Move choke lever on engine to CHOKE
position. (A warm engine may not require choking).
Step 5: Turn the fuel valve to the ON position.
Step 6: Grasp starter handle and pull rope out slowly
until engine reaches start of compression cycle (rope will
pull slightly harder at this point). Pull rope with a rapid,
continuous, full arm stroke. Keep a firm grip on starter
handle. Let the rope rewind slowly. Repeat the previous
steps until engine fires.
WARNING
DANGER
WARNING
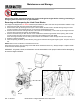
IMPORTANT: This unit is shipped
without gasoline or oil in the engine.
Be certain to fill the engine with
gasoline and oil as instructed before
operating your machine.