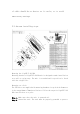
23dBi antenna professional installation instructions 1 Technical Parameters 23dbi antenna mainly apply to outdoor application scenarios, connect to outdoor AP 5GHz RF port by using a MCX type connector. Fig.
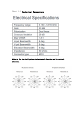
Chart 1-1 Technical Parameters Below is the far-field pattern in horizontal direction and in vertical direction.
2 Safety Precautions Warning! Antenna installation is dangerous to some extent, please read over the below safety precautions before installation, so to avoid unnecessary injuries and deaths. Please set the antenna location far away from electricity such as power supply wire, street lamp or power supply box. Installer must pay attention not to touch the power supply wire, otherwise it may cause severe casualty. To choose a safe location where get far away from the power line or other cable.
Proper location to install 23dbi antenna. 23dbi antenna mainly used in outdoor such as top of building or top of the mountain. Generally speaking, the higher it be, the more area it will cover, so the more effective it will be. 5 Antenna Installation 23dbi antenna is packed with all kinds of spare parts, while other tools such as monkey wrench, cross screw driver and “-”type screw driver need to be prepared by yourself. 5.
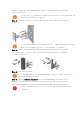
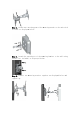
of cable should be as shorter as it can be, so to avoid unnecessary wastage. 5.3 Antenna installing steps. Mounting the LigoPTP 5-23 PRO Mounting bracket of LigoPTP 5-23 PRO unit is designed to make installation on a wall or a pipe easy. The unit is attached and its position is fixed with the single bolt. Mounting on a Pole The PTP units are supplied with mounting hardware for pole with diameters in the range 10mm to 70mm installations. Follow the steps for LigoPTP 5-23 PRO installation on a pole: Step 1.
against lightning. The grounding wire must be attached to the grounding stud on the unit. If the unit is attached to a metal pole which is earth-grounded, no further grounding is required. Step 3. Connect the unit to the bracket together and tighten up with the screws: It is recommended not to tighten the unit’s mounting bracket details until the alignment process of the antenna is complete. Step 4. Attach the mounting bracket and the pole clamp with the bolts and nuts.
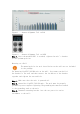
Figure 1 – Antenna Alignment Tool on Web Figure 2 – Antenna Alignment Tool on OLED Step 7. After the maximal RSSI is reached, tighten the unit’s bracket in the optimum position. Mounting on a Wall The mounting bolts for unit installation on the wall are not included in the package. For mounting LigoPTP 5-23 PRO unit on the wall, first mount one half of the bracket to the wall and then connect the two halves of the bracket together and tighten the nut and bolt. Step 1.
Step 4. Attaach the folllowing parrt of the mounting m b bracket to the unit with w 4 screws as displayedd below: Step 5. Attaach the seccond part of the mou unting braacket to the wall us sing scrrews (not included) as displlayed belo ow: Step 6.
It is recommended not to tighten the units to its mounting brackets until the alignment process of the antenna is complete. Step 7. Power-up the LigoPTP 5-23 PRO unit. It is recommended to use shielded Ethernet cable to reduce exposure of the electromagnetic noise. Step 8.
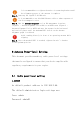
2 Radio Power Tx Power(dBm):23dBi
3 Different Frequency of the power setting 5150-5250MHZ:11dBi 5725-5850MHZ:22dBi
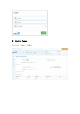
4 Select save and apply Click on the Save changes and apply.