XPS 11 Service Manual Computer model: XPS 9P33 Regulatory model: P16T Regulatory type: P16T001
Notes, Cautions, and Warnings NOTE: A NOTE indicates important information that helps you make better use of your computer. CAUTION: A CAUTION indicates potential damage to hardware or loss of data if instructions are not followed. WARNING: A WARNING indicates a potential for property damage, personal injury, or death. ____________________ © 2013 Dell Inc. Trademarks used in this text: Dell™, the DELL logo, and XPS™ are trademarks of Dell Inc. 2013 - 10 Rev.
Contents Before Working Inside Your Computer Before You Begin Recommended Tools Safety Instructions 5 5 5 6 After Working Inside Your Computer 7 Removing the Base Cover 8 Procedure Replacing the Base Cover Procedure Removing the Battery Prerequisites Procedure Replacing the Battery Procedure Postrequisites Removing the Wireless Card Prerequisites Procedure Replacing the Wireless Card Procedure Postrequisites Removing the mSATA Card Prerequisites Procedure Replacing the mSATA Card Procedure Post
Removing the Fan 17 Prerequisites Procedure 17 17 Replacing the Fan 18 Procedure Postrequisites Removing the Display Assembly Prerequisites Procedure Replacing the Display Assembly Procedure Postrequisites Removing the System Board Prerequisites Procedure Replacing the System Board Procedure Postrequisites Entering the Service Tag in the BIOS Removing the Palm-Rest Assembly Prerequisites Procedure Replacing the Palm-Rest Assembly Procedure Postrequisites Flashing the BIOS 4 | Contents 18 18
Before Working Inside Your Computer Before You Begin CAUTION: To avoid data loss, save and close all open files and exit all open programs before turning off your computer. 1 Save and close all open files, exit all open programs, and turn off your computer. Point to the lower or upper-right corner of the screen to open the charms sidebar and click Settings→ Power→ Shut down. NOTE: If you are using a different operating system, see the documentation of your operating system for shut-down instructions.
Safety Instructions Use the following safety guidelines to protect your computer from potential damage and ensure your personal safety. WARNING: Before working inside your computer, read the safety information that shipped with your computer. For more safety best practices, see the Regulatory Compliance home page at dell.com/regulatory_compliance. WARNING: Disconnect all power sources before opening the computer cover or panels.
After Working Inside Your Computer CAUTION: Leaving stray or loose screws inside your computer may severely damage your computer. 1 Replace all screws and make sure that no stray screws remain inside your computer. 2 Connect any cables, peripherals, and other parts you removed before working on your computer. 3 Connect your computer to the electrical outlet. 4 Turn on your computer.
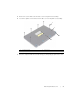
Removing the Base Cover WARNING: Before working inside your computer, read the safety information that shipped with your computer and follow the steps in "Before Working Inside Your Computer" on page 5. After working inside your computer, follow the instructions in "After Working Inside Your Computer" on page 7. For more safety best practices, see the Regulatory Compliance home page at dell.com/regulatory_compliance. Procedure 1 Close the display, and turn the computer over.
3 Remove the screws that secure the base cover to the palm-rest assembly. 4 Loosen the captive screws that secure the base cover to the palm-rest assembly. 1 2 3 4 5 1 screws (Torx) (6) 2 base cover 3 captive screws (4) 4 screw (Phillips) Place the computer with the rear side facing you, and gently pry up the base cover.
Replacing the Base Cover WARNING: Before working inside your computer, read the safety information that shipped with your computer and follow the steps in "Before Working Inside Your Computer" on page 5. After working inside your computer, follow the instructions in "After Working Inside Your Computer" on page 7. For more safety best practices, see the Regulatory Compliance home page at dell.com/regulatory_compliance.
Removing the Battery WARNING: Before working inside your computer, read the safety information that shipped with your computer and follow the steps in "Before Working Inside Your Computer" on page 5. After working inside your computer, follow the instructions in "After Working Inside Your Computer" on page 7. For more safety best practices, see the Regulatory Compliance home page at dell.com/regulatory_compliance. Prerequisites Remove the base cover. See "Removing the Base Cover" on page 8.
Replacing the Battery WARNING: Before working inside your computer, read the safety information that shipped with your computer and follow the steps in "Before Working Inside Your Computer" on page 5. After working inside your computer, follow the instructions in "After Working Inside Your Computer" on page 7. For more safety best practices, see the Regulatory Compliance home page at dell.com/regulatory_compliance. Procedure 1 Close the display and turn the computer over.
Removing the Wireless Card WARNING: Before working inside your computer, read the safety information that shipped with your computer and follow the steps in "Before Working Inside Your Computer" on page 5. After working inside your computer, follow the instructions in "After Working Inside Your Computer" on page 7. For more safety best practices, see the Regulatory Compliance home page at dell.com/regulatory_compliance. Prerequisites 1 Remove the base cover. See "Removing the Base Cover" on page 8.
Replacing the Wireless Card WARNING: Before working inside your computer, read the safety information that shipped with your computer and follow the steps in "Before Working Inside Your Computer" on page 5. After working inside your computer, follow the instructions in "After Working Inside Your Computer" on page 7. For more safety best practices, see the Regulatory Compliance home page at dell.com/regulatory_compliance.
Removing the mSATA Card WARNING: Before working inside your computer, read the safety information that shipped with your computer and follow the steps in "Before Working Inside Your Computer" on page 5. After working inside your computer, follow the instructions in "After Working Inside Your Computer" on page 7. For more safety best practices, see the Regulatory Compliance home page at dell.com/regulatory_compliance. Prerequisites 1 Remove the base cover. See "Removing the Base Cover" on page 8.
Replacing the mSATA Card WARNING: Before working inside your computer, read the safety information that shipped with your computer and follow the steps in "Before Working Inside Your Computer" on page 5. After working inside your computer, follow the instructions in "After Working Inside Your Computer" on page 7. For more safety best practices, see the Regulatory Compliance home page at dell.com/regulatory_compliance. Procedure 1 Align the notch on the mSATA card with the tab on the mSATA-card connector.
Removing the Fan WARNING: Before working inside your computer, read the safety information that shipped with your computer and follow the steps in "Before Working Inside Your Computer" on page 5. After working inside your computer, follow the instructions in "After Working Inside Your Computer" on page 7. For more safety best practices, see the Regulatory Compliance home page at dell.com/regulatory_compliance. Prerequisites 1 Remove the base cover. See "Removing the Base Cover" on page 8.
Replacing the Fan WARNING: Before working inside your computer, read the safety information that shipped with your computer and follow the steps in "Before Working Inside Your Computer" on page 5. After working inside your computer, follow the instructions in "After Working Inside Your Computer" on page 7. For more safety best practices, see the Regulatory Compliance home page at dell.com/regulatory_compliance. Procedure 1 Align the screw holes on the fan with the screw holes on the palm-rest assembly.
Removing the Display Assembly WARNING: Before working inside your computer, read the safety information that shipped with your computer and follow the steps in "Before Working Inside Your Computer" on page 5. After working inside your computer, follow the instructions in "After Working Inside Your Computer" on page 7. For more safety best practices, see the Regulatory Compliance home page at dell.com/regulatory_compliance. Prerequisites 1 Remove the base cover. See "Removing the Base Cover" on page 8.
2 Turn the computer over.
3 Peel off the conductive and Mylar tapes that cover the antenna cables and disconnect the antenna cables from the wireless card. 4 Disconnect the display cable from the system board. 5 Lift the connector latch, and using the pull tab, disconnect the webcam cable from the system board.
6 Remove the screws that secure the display hinges to the palm-rest assembly. 7 Lift the display assembly off the palm-rest assembly.
Replacing the Display Assembly WARNING: Before working inside your computer, read the safety information that shipped with your computer and follow the steps in "Before Working Inside Your Computer" on page 5. After working inside your computer, follow the instructions in "After Working Inside Your Computer" on page 7. For more safety best practices, see the Regulatory Compliance home page at dell.com/regulatory_compliance.
Removing the System Board WARNING: Before working inside your computer, read the safety information that shipped with your computer and follow the steps in "Before Working Inside Your Computer" on page 5. After working inside your computer, follow the instructions in "After Working Inside Your Computer" on page 7. For more safety best practices, see the Regulatory Compliance home page at dell.com/regulatory_compliance. Prerequisites 1 Remove the base cover. See "Removing the Base Cover" on page 8.
Procedure NOTE: Replacing the system board removes any changes you made to the BIOS using System Setup. Enter the Service Tag of your computer in the BIOS and make the desired changes again after you replace the system board. For more information on entering the Service Tag in the BIOS, see "Replacing the System Board" on page 30. NOTE: Before disconnecting the cables from the system board, note the location of the connectors so that you can reconnect them correctly after you replace the system board.
2 Remove the screws that secure the display hinge to the palm-rest assembly. 2 1 3 3 1 display hinge 3 palm-rest assembly 2 screws (3) Open the palm-rest assembly to release the display hinge and close the palm-rest assembly.
4 Disconnect the power-adapter port cable from the system board.
5 Lift the connector latches, and using the pull tabs disconnect the power-button cable, NFC cable, touchpad cable, keyboard and keyboard-backlight cable, volume-control buttons cable, fan cable, webcam cable, and display-lid switch cable. 6 Disconnect the speaker cable and display cable.
7 Remove the screws that secure the system board to the palm-rest assembly. 8 Lift the system board off the palm-rest assembly.
Replacing the System Board WARNING: Before working inside your computer, read the safety information that shipped with your computer and follow the steps in "Before Working Inside Your Computer" on page 5. After working inside your computer, follow the instructions in "After Working Inside Your Computer" on page 7. For more safety best practices, see the Regulatory Compliance home page at dell.com/regulatory_compliance. Procedure CAUTION: Make sure that no cables are placed under the system board.
Removing the Palm-Rest Assembly WARNING: Before working inside your computer, read the safety information that shipped with your computer and follow the steps in "Before Working Inside Your Computer" on page 5. After working inside your computer, follow the instructions in "After Working Inside Your Computer" on page 7. For more safety best practices, see the Regulatory Compliance home page at dell.com/regulatory_compliance. Prerequisites 1 Remove the base cover. See "Removing the Base Cover" on page 8.
2 Turn the computer over. 1 2 1 palm-rest assembly 2 display assembly 3 Remove the screws that secure the display hinges to the palm-rest assembly. 4 Lift the display assembly away from the palm-rest assembly.
Replacing the Palm-Rest Assembly WARNING: Before working inside your computer, read the safety information that shipped with your computer and follow the steps in "Before Working Inside Your Computer" on page 5. After working inside your computer, follow the instructions in "After Working Inside Your Computer" on page 7. For more safety best practices, see the Regulatory Compliance home page at dell.com/regulatory_compliance.
Flashing the BIOS You may need to flash (update) the BIOS when an update is available or when you replace the system board. To flash the BIOS: 1 Turn on the computer. 2 Go to dell.com/support. 3 If you have your computer's Service Tag, type your computer's Service Tag and click Submit. If you do not have your computer's Service Tag, click Detect Service Tag to allow automatic detection of the Service Tag.