100-OM_EN.book Page i Friday, May 20, 2005 3:14 PM Dell™ Laser Printer 1100 Owner’s Manual Look Inside For: • Preparing Your Printer • Understanding Software • Loading Print Media • Printing • Maintenance • Troubleshooting w w w. d e l l . c o m | s u p p o r t . d e l l .
1100-OM_EN.book Page ii Friday, May 20, 2005 3:14 PM www.dell.com | support.dell.com Order Toner Cartridges Dell™ toner cartridges are available only through Dell. You can order toner cartridges online at www.dell.com/supplies or by phone. USA 877-INK-2-YOU Australia 1300 303 290 Austria 08 20 - 24 05 30 35 Belgium 02.
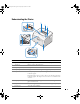
1100-OM_EN.book Page iii Friday, May 20, 2005 3:14 PM Understanding the Printer # Use the: When you want to: 1 Operator Panel Operate the printer and check the status of your printer. 2 Top Cover Open to remove the paper jams. 3 Paper Output Tray Stack printed document face down. 4 Paper Output Extension Keep print media from falling off the paper output tray. 5 Express Service Code Identify your printer when you use support.dell.com or contact technical support.
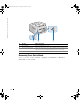
www.dell.com | support.dell.com 1100-OM_EN.book Page iv Friday, May 20, 2005 3:14 PM # Use the: When you want to: 9 Power Switch Power your printer on or off. 10 Power Cord Connector Plug your printer into a properly grounded electrical outlet with the power cord (after all peripherals have been connected). 11 USB Cable Connector Insert the USB cable. Accessing Your User’s Guide To access your User’s Guide, click Start → Programs → Dell Printers → Dell Laser Printer 1100 → User’s Guide.
1100-OM_EN.book Page v Friday, May 20, 2005 3:14 PM Notes, Notices, and Cautions NOTE: A NOTE indicates important information that helps you make better use of your printer. NOTICE: A NOTICE indicates either potential damage to hardware or loss of data and tells you how to avoid the problem. CAUTION: A CAUTION indicates a potential for property damage, personal injury, or death. ____________________ Information in this document is subject to change without notice. © 2005 Dell Inc.. All rights reserved.
1100-OM_EN.book Page vi Friday, May 20, 2005 3:14 PM Contents Understanding the Printer . . . . . . . . . . . . . . . . . . . . . . . . . . . . Accessing Your User’s Guide . . . . . . . . . . . . . . . . . . . . . . . . . . CAUTION: SAFETY INFORMATION. . . . . . . . . . . . . . . . . . . . . . . . . . . . . . . . . . . . . . . . . . . . . . . . . . 3 . . . . . . . . . . . . . . . . . . . . . . . . 5 . . . . . . . . . . . . . . . . . . . . . . . . . . . 6 . . . . . . 7 . . . . . . . . . . . .
1100-OM_EN.book Page vii Friday, May 20, 2005 3:14 PM 3 Loading Print Media Print Media Guidelines . . . . . . . . . . . . . . . . . . . . . . . . . . . . . . . . . . . . . . . . . . . . . . . . 17 . . . . . . . . . . . . . . . . . . . . . . . . 19 Pint Media Types, Sizes, and Support Loading Paper in the Paper Tray. Loading Paper Using Manual Feed Mode . . . . . . . . . . . . . . . . . . . . 21 . . . . . . . . . . . . . . . . . . . . . . . . . . . 22 . . . . . . . . . . . . . . . . . . . . . .
1100-OM_EN.book Page viii Friday, May 20, 2005 3:14 PM 7 Contacting Dell Technical Assistance . . . . . . . . . . . . . . . . . . . . . . . . . . . . . . Automated Order-Status Service Contacting Dell 8 . . . . . . . . . . . . . . . . . . . . . . . . 44 . . . . . . . . . . . . . . . . . . . . . . . . . . . . . . . . . 44 Appendix U.S Terms and Conditions of Sales . . . . . . . . . . . . . . . . . . . . . . . Limited Warranties and Return Policy . . . . . . . . . . . . . . . . . . . . .
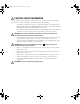
1100-OM_EN.book Page 1 Friday, May 20, 2005 3:14 PM CAUTION: SAFETY INFORMATION Use the following safety guidelines to help ensure your own personal safety and to help protect your system and working environment from potential damage. • This printer is certified as a "Class 1" laser product under the U.S. Department of Health and Human Services (DHHS) Radiation Performance Standard according to the Radiation control for Health and Safety Act of 1968.
1100-OM_EN.book Page 2 Friday, May 20, 2005 3:14 PM www.dell.com | support.dell.com WAARSCHUWING: VEILIGHEIDSINFORMATIE Volg de onderstaande veiligheidsrichtlijnen om uw persoonlijke veiligheid te garanderen en uw systeem en werkomgeving tegen mogelijke schade te beschermen.
00-OM_EN.book Page 3 Friday, May 20, 2005 3:14 PM FORSIGTIG: Sikkerhedsoplysninger Brug følgende sikkerhedsvejledning til at sikre din egen personlige sikkerhed og til t beskytte dit arbejdsområde mod eventuelle skader. • Printeren er certificeret som laserprodukt i klasse 1 under USA's Department of Health and Human Services (DHHS) Radiation Performance Standard i henhold til Radiation control for Health and Safety Act of 1968.
1100-OM_EN.book Page 4 Friday, May 20, 2005 3:14 PM www.dell.com | support.dell.com VAROITUS: TURVALLISUUSTIEDOT Toimi seuraavien turvaohjeiden mukaan oman turvallisuutesi varmistamiseksi ja välttääksesi järjestelmän ja työympäristön mahdollisen vahingoittumisen.
1100-OM_EN.book Page 5 Friday, May 20, 2005 3:14 PM FORSIKTIG: SIKKERHETSINFORMASJON Ved å følge retningslinjene for sikkerhet nedenfor trygger du din egen personlige sikkerhet i tillegg til at du bidrar til å beskytte systemet og arbeidsmiljøet mot mulig skade. • Skriveren er sertifisert som et laserprodukt i "Class 1" ifølge U.S. Department of Health and Human Services (DHHS) Radiation Performance Standard, basert på "Radiation control for Health and Safety Act" fra 1968.
1100-OM_EN.book Page 6 Friday, May 20, 2005 3:14 PM www.dell.com | support.dell.com VARNING: säkerhetsinformation Följ anvisningarna här nedan för att skydda dig själv, systemet och arbetsmiljön mot skador. • Skrivaren har certifierats vara en laserprodukt av klass 1 enligt den amerikanska standarden Department of Health and Human Services (DHHS) Radiation Performance Standard, i enlighet med statuten Radiation control for Health and Safety Act från 1968.
1100-OM_EN.book Page 7 Friday, May 20, 2005 3:14 PM ПРЕДУПРЕЖДЕНИЕ: ИНФОРМАЦИЯ О БЕЗОПАСНОСТИ Следуйте приведенным ниже указаниям по мерам безопасности, чтобы обеспечить Вашу личную безопасность и избежать возможных повреждений Вашего оборудования.
www.dell.com | support.dell.com 1100-OM_EN.book Page 8 Friday, May 20, 2005 3:14 PM ϥΎϣϷ ΕΎϣϮϠόϣ :ήϳάΤΗ .ϞϤΘΤϣ έήο ϱ Ϧϣ ϞϴϐθΘϟ ΔΌϴΑϭ ϡΎψϨϟ ΔϳΎϤΤϟϭ ΔϴμΨθϟ ϚΘϣϼγ ϰϠϋ ϥΎϨΌϤσϼϟ ΔϴϟΎΘϟ ϥΎϣϷ ΕΎϬϴΟϮΗ ϡΪΨΘγ ΔΤμϟ ΓέίϮϟ ϲϋΎόηϹ ˯ΩϷ έΎϴόϣ ϰϠϋ ˯˱ ΎϨΑ "1 ΔΌϔϟ" Ϧϣ έΰϴϟ ΞΘϨϣ ΎϫέΎΒΘϋΎΑ ΔόΑΎτϟ ϩάϫ κϴΧήΗ ϢΗ ΔΤμϟ ϞΟ Ϧϣ ΕΎϋΎόηϹ ϰϠϋ Γήτϴδϟ ϥϮϧΎϗ ΐΟϮϤΑ ΓΪΤΘϤϟ ΕΎϳϻϮϟ ϲϓ (DHHS) ΔϳήθΒϟ ΕΎϣΪΨϟϭ .
1100-OM_EN.book Page 9 Friday, May 20, 2005 3:14 PM DİKKAT: Güvenlik bilgileri Kişisel güvenliğinizi sağlamak ve aynı zamanda sisteminizi ve çalışma ortamınızı muhtemel arıza ve hasarlardan korumak için aşağıdaki emniyet kurallarına uyun. • A.B.D. Sağlık ve İnsan Hizmetleri Bakanlığının (DHHS) 1968 yılında yürürlüğe giren Sağlık ve Güvenlik için Radyasyon kontrolü kanununa göre, bu yazıcı bir "Class 1" lazer ürünü olarak onaylanmıştır.
1100-OM_EN.book Page 10 Friday, May 20, 2005 3:14 PM www.dell.com | support.dell.com CUIDADO: INFORMAÇÃO DE SEGURANÇA Siga as orientações de segurança abaixo para o ajudar a garantir a sua segurança pessoal e a proteger o sistema e ambiente de trabalho contra danos potenciais. • Esta impressora está certificada como produto laser de "Classe 1", segundo a norma Radiation Performance (Desempenho das radiações) do U.S.
1100-OM_EN.book Page 11 Friday, May 20, 2005 3:14 PM UPOZORNĚNÍ: BEZPEČNOSTNÍ INFORMACE Následující bezpečnostní pokyny vám pomohou zajistit vlastní osobní bezpečnost a chránit vaše zařízení a pracovní prostředí před možným poškozením. • Tato tiskárna je klasifikována jako laserové zařízení "třídy 1" podle normy pro vyzařování vydané Ministerstvem zdravotnictví a veřejných služeb USA v souladu s kontrolou záření pro Zákon o zdraví a bezpečnosti z r. 1968.
1100-OM_EN.book Page 12 Friday, May 20, 2005 3:14 PM www.dell.com | support.dell.com PRZESTROGA: INFORMACJE O BEZPIECZEŃSTWIE Aby zapewnić sobie bezpieczeństwo osobiste oraz uchronić system i środowisko pracy przed potencjalnymi uszkodzeniami, należy przestrzegać poniższych wskazań dotyczących bezpieczeństwa.
1100-OM_EN.book Page 13 Friday, May 20, 2005 3:14 PM Preparing Your Printer Setting Up the Printer If you have not already done so, follow the steps on the Setup Diagram (poster) to complete the hardware and software installation. Using the Operator Panel The operator panel on the top right side of your printer has two LEDs and one button. LEDs LED Description The operator panel LEDs signify different things, depending on their sequence.
1100-OM_EN.book Page 14 Friday, May 20, 2005 3:14 PM www.dell.com | support.dell.com Button Item Description To print a demo page In Ready mode, press and hold slowly, and release. Manual feeding Press each time you load a sheet of paper in the tray, when you select Manual Feed for Source from your software application. For detailed information, see “Loading Paper Using Manual Feed Mode” on page 21. To cancel a print job Press during printing.
1100-OM_EN.book Page 15 Friday, May 20, 2005 3:14 PM Understanding Software Software Overview After setting up your printer and connecting it to your computer, you must install the drivers and utilities from the Drivers and Utilities CD included with your printer. If you purchased a Dell™ computer and your printer at the same time, the drivers and utilities are automatically installed. You don’t need to install them.
1100-OM_EN.book Page 16 Friday, May 20, 2005 3:14 PM www.dell.com | support.dell.com Uninstalling Dell Software You should remove the printer driver if you are upgrading the software or if your driver installation fails. You can remove the software using the Drivers and Utilities CD or the Windows uninstall. NOTE: Close all programs before uninstalling software. 1 From the Start menu, select Programs → Dell Printers → Dell Laser Printer 1100 → Dell Printer Software uninstall.
1100-OM_EN.book Page 17 Friday, May 20, 2005 3:14 PM Loading Print Media Print Media Guidelines Printer media includes paper, card stock, transparencies, labels, and envelopes. Your printer provides high quality printing on a variety of print media. Selecting the appropriate print media for your printer helps you avoid printing problems. To get the best possible print quality, use only high-quality, copier-grade paper.
www.dell.com | support.dell.com 1100-OM_EN.book Page 18 Friday, May 20, 2005 3:14 PM Paper Dimensionsa Weight Capacityb 75 to 90 g/m2 bond (20 to 24 lb) for manual feed mode 1 sheet of paper for manual feed mode Envelopes No.10 4.12 x 9.5 in. (105 x 241mm) DL 4.33 x 8.66 in. (110 x 220 mm) C5 6.38 x 9.01 in. (162 x 229 mm) C6 4.5 x 6.4in. (114 x 162 mm) Monarch 3.875 x 7.5in. (98.4 x 190.5 mm) Labels Letter 8.5 x 11 in. (216 x 279 mm) A4 8.3 x 11.7 in.
1100-OM_EN.book Page 19 Friday, May 20, 2005 3:14 PM Loading Paper in the Paper Tray Load up to 150 sheets of plain paper in the paper tray. 1 Open the paper input tray. Pull on the length and width guides to extend the tray. 2 Flex the sheets back and forth to loosen them, and then fan them out. Do not fold or crease the print media. Align the edges on a level surface.
1100-OM_EN.book Page 20 Friday, May 20, 2005 3:14 PM www.dell.com | support.dell.com 3 Load paper in the paper tray with the side to be printed on facing up. Make sure that all four corners are flat in the tray. 4 Be careful not to overload the paper tray. Overloading may cause paper jams. 5 Squeeze the length guide and slide it until it lightly touches the end of the paper stack. Squeeze the width guide and move it toward the stack of paper until it lightly touches the side of the stack.
1100-OM_EN.book Page 21 Friday, May 20, 2005 3:14 PM Loading Paper Using Manual Feed Mode If you select Manual Feed in the Source option in your software application, you can manually load a sheet of print material in the tray. Manually loading paper can be helpful when you want to check the print quality after each page is printed. Use the manual feed mode to print transparencies, labels, envelopes, or postcards in addition to paper types or sizes that are not currently loaded in the paper tray.
1100-OM_EN.book Page 22 Friday, May 20, 2005 3:14 PM www.dell.com | support.dell.com Loading Special Materials 1 Open the paper input tray. 2 Load the print material in the paper input tray. Do not mix types. 3 Adjust the length and width guides against the print material without bending it. 4 To print on special material, you must select Manual Feed for Source from the software application, and then select the appropriate paper size and type. For details, see the HTML User’s Guide. 5 Press to start.
1100-OM_EN.book Page 23 Friday, May 20, 2005 3:14 PM • Load a sheet of labels in the tray with the side to be printed on facing up. NOTE: To prevent labels from sticking to each other, do not let the printed label sheets stack up as they are printed out. • Load a transparency in the tray with the side to be printed on facing up, and the top with the adhesive strip inserted first.
1100-OM_EN.book Page 24 Friday, May 20, 2005 3:14 PM www.dell.com | support.dell.com • Load a sheet of card stock with the side to be printed on facing up, short edge first, from the center of the tray. NOTE: Do not print on media smaller than 3.0 in. (76 mm) wide or 5.0 in. (127 mm) long. • Load a letterhead in the tray with the design face up, top edge toward the printer. NOTE: Before you load letterhead, verify that the ink on the paper is dry.
1100-OM_EN.book Page 25 Friday, May 20, 2005 3:14 PM Printing Basic Printing 1 Load paper. See page 19. 2 With your document open, click File → Print. Make sure that your printer is selected. 3 To change the printer settings, click Properties, Preferences, Options, or Setup, depending on the program or operating system. The printer properties window displays. 4 From the five tabs on the top of the printer properties window, confirm the selections. 5 Click OK until the Print window appears.
1100-OM_EN.book Page 26 Friday, May 20, 2005 3:14 PM www.dell.com | support.dell.com Sharing Your Printer Locally You can connect the printer directly to a selected computer, called the “host computer,” on a network using a USB cable. Your printer can be shared by other users on the network through a Windows 98, Me, 2000, or XP network printer connection. Before you can share your printer, you must first setup a Microsoft Windows network. In Windows 98/Me Setting Up the Host Computer 1 Start Windows.
1100-OM_EN.book Page 27 Friday, May 20, 2005 3:14 PM In Windows 2000/XP Setting Up the Host Computer 1 Start Windows. 2 For Windows 2000, click the Start button → Settings → Printers. For Windows XP, click the Start button and select Printers and Faxes. 3 Double-click your printer icon. 4 Click the Printer menu and select Sharing. 5 For Windows 2000, check the Shared As box. For Windows XP, check the Share this printer box. 6 Fill in the Share Name field and click OK.
www.dell.com | support.dell.com 1100-OM_EN.
1100-OM_EN.book Page 29 Friday, May 20, 2005 3:14 PM Maintenance Ordering Supplies You can order supplies using the Dell™ Toner Management System or by contacting Dell at www.dell.com/supplies. In addition to the toner level indicator that is displayed in the Printing Status window each time you send a job to print, the printer’s operator panel LED sequences tell you about the status of your supplies. When lights orange, your toner cartridge is low and you should order a new toner cartridge.
1100-OM_EN.book Page 30 Friday, May 20, 2005 3:14 PM www.dell.com | support.dell.com Replacing the Toner Cartridge CAUTION: Before performing any of the procedures listed in this section, read and follow the safety information on page 1. CAUTION: Do not touch the green underside of the toner cartridge. Use the handle on the cartridge to avoid touching this area. When the toner cartridge is near the end of its life, on the operator panel lights orange.
1100-OM_EN.book Page 31 Friday, May 20, 2005 3:14 PM 2 Pull the used toner cartridge out and lift it up and away from the printer. CAUTION: Avoid reaching too far into the printer. The fusing area may be hot. 3 Unpack a new toner cartridge. Hold the cartridge carefully and gently shake it from sideto-side 5 or 6 times to distribute the toner. NOTE: If toner comes into contact with your clothing, wipe the toner off with a dry cloth and wash your clothing in cold water. Hot water sets toner into fabric.
1100-OM_EN.book Page 32 Friday, May 20, 2005 3:14 PM www.dell.com | support.dell.com 4 Pull the tape to remove the protective paper. 5 Locate the cartridge slot inside the printer, one on each side. 6 Unfold the toner cartridge handle and grasp it. Insert the cartridge into the printer until it snaps into place. 7 Close the front cover. Make sure that the cover is securely closed. If it is not firmly closed, printing errors may occur.
1100-OM_EN.book Page 33 Friday, May 20, 2005 3:14 PM Cleaning Your Printer To maintain print quality, follow the cleaning procedures below, each time the toner cartridge is replaced or if print quality problems occur. NOTE: Do not touch the transfer roller located under the toner cartridge when cleaning inside the printer. Oil from your fingers may cause print quality problems. CAUTION: Cleaning solvents that contain alcohol or other strong substances may discolor or crack the printer cabinet.
1100-OM_EN.book Page 34 Friday, May 20, 2005 3:14 PM www.dell.com | support.dell.com 3 Gently pull the toner cartridge out, being careful not to scratch against the printer, and lift it up and away from the printer. Set it on a clean flat surface. CAUTION: To prevent damage to the toner cartridge, do not expose the toner cartridge to light for more than a few minutes. CAUTION: Do not touch the green underside of the toner cartridge. Use the handle on the cartridge to avoid touching this area.
1100-OM_EN.book Page 35 Friday, May 20, 2005 3:14 PM Troubleshooting Clearing Jams in the Paper Tray If a paper jam occurs, on the operator panel lights red. Find and remove the jammed paper. If you cannot see it, look inside the printer. To avoid tearing the paper, pull the jammed paper out gently and slowly. Follow the steps below to clear the jam. Paper Feed Jam 1 Remove any misfed paper by pulling it out by its visible edge. Make sure that all of the paper is properly aligned in the tray.
1100-OM_EN.book Page 36 Friday, May 20, 2005 3:14 PM www.dell.com | support.dell.com Paper Exit Jam NOTE: Paper jams in this area may result in loose toner on the page. If you get any toner on your clothes, wash them in cold water as hot water will set the toner into the fabric. 1 If the paper jams as it exits to the output tray and a long portion of the paper is visible, pull the paper straight out. Open and close the front or top cover to resume printing. NOTE: Failed pages will not reprint.
1100-OM_EN.book Page 37 Friday, May 20, 2005 3:14 PM 3 Loosen the paper if it is caught in the heat roller. Then remove the paper by gently pulling it out. CAUTION: When removing jammed paper, be careful not to touch the heat roller (located underneath the inner cover). It is hot and could cause burns! 4 Close the inner cover and the top cover. Printing resumes automatically. NOTE: Failed pages will not reprint. Reprint the failed pages.
1100-OM_EN.book Page 38 Friday, May 20, 2005 3:14 PM www.dell.com | support.dell.com Fuser Area Jam NOTICE: The fuser area is hot. Take care when removing paper from the printer. 1 Open the front cover. 2 Gently pull the toner cartridge out, being careful not to scratch against the printer, and lift it up and away from the printer.
1100-OM_EN.book Page 39 Friday, May 20, 2005 3:14 PM 3 Remove the paper by gently pulling it toward you. 4 Check that there is no other paper in the printer. 5 Reinstall the toner cartridge and close the front cover. Your printer resumes printing the document from failed pages. Tips for Avoiding Paper Jams By selecting the correct paper types, most paper jams can be avoided. When a paper jam occurs, follow the steps outlined in "Clearing Jams in the Paper Tray" on page 35.
1100-OM_EN.book Page 40 Friday, May 20, 2005 3:14 PM www.dell.com | support.dell.com Understanding the Operator Panel LEDs The operator panel LEDs signify different things, depending on their sequences. LEDs that are off, on, and/or blinking indicate printer conditions such as printer status, intervention (for example, out of paper and jammed paper), or service. The following table shows the most common LED sequences.
1100-OM_EN.book Page 41 Friday, May 20, 2005 3:14 PM LED Pattern Meaning and Suggested Solution (Red) • You pressed while the printer was receiving data. • In Manual Duplex mode, the first side of your job has printed. Load the paper back into the tray with the already-printed side down and the top of the page toward the front of the tray. Then press to start printing. For details, see the HTML User’s Guide.
www.dell.com | support.dell.com 1100-OM_EN.
1100-OM_EN.book Page 43 Friday, May 20, 2005 3:14 PM Contacting Dell Technical Assistance If you need help with a technical problem, Dell is ready to assist you. 1 Call technical support from a telephone near or at the printer so that technical support can assist you with any necessary procedures. When calling Dell, use your Express Service Code to help expedite the routing of your call to the proper support personnel.
1100-OM_EN.book Page 44 Friday, May 20, 2005 3:14 PM www.dell.com | support.dell.com Automated Order-Status Service To check on the status of any Dell™ products that you have ordered, you can go to support.dell.com, or you can call the automated order-status service. A recording prompts you for the information needed to locate and report on your order. See "Contacting Dell" for the telephone number to call for your region.
1100-OM_EN.book Page 45 Friday, May 20, 2005 3:14 PM Department Name or Service Area, Website and E-Mail Address Country (City) International Access Code Country Code City Code Area Codes, Local Numbers, and Toll-Free Numbers U.S.A.
www.dell.com | support.dell.com 1100-OM_EN.book Page 46 Friday, May 20, 2005 3:14 PM Department Name or Service Area, Website and E-Mail Address Country (City) International Access Code Country Code City Code Argentina (Buenos Aires) Website: www.dell.com.ar International Access Code: 00 E-mail: us_latin_services@dell.com Country Code: 54 E-mail for desktop and portable computers: latechsupport@dell.
1100-OM_EN.book Page 47 Friday, May 20, 2005 3:14 PM Department Name or Service Area, Website and E-Mail Address Country (City) International Access Code Country Code City Code Belgium (Brussels) Website: support.euro.dell.com International Access Code: 00 E-mail: tech_be@dell.com Country Code: 32 E-mail for French Speaking Customers: support.euro.dell.
www.dell.com | support.dell.com 1100-OM_EN.book Page 48 Friday, May 20, 2005 3:14 PM Country (City) International Access Code Country Code City Code Chile (Santiago) Department Name or Service Area, Website and E-Mail Address Sales, Customer Support, and Technical Support Area Codes, Local Numbers, and Toll-Free Numbers toll-free: 1230-020-4823 Country Code: 56 City Code: 2 China (Xiamen) Tech Support website: support.dell.com.cn Country Code: 86 Tech Support E-mail: cn_support@dell.
1100-OM_EN.book Page 49 Friday, May 20, 2005 3:14 PM Department Name or Service Area, Website and E-Mail Address Country (City) International Access Code Country Code City Code Area Codes, Local Numbers, and Toll-Free Numbers Colombia General Support 980-9-15-3978 Costa Rica General Support 0800-012-0435 Czech Republic (Prague) Website: support.euro.dell.com International Access Code: 00 E-mail: czech_dell@dell.
www.dell.com | support.dell.com 1100-OM_EN.book Page 50 Friday, May 20, 2005 3:14 PM Department Name or Service Area, Website and E-Mail Address Country (City) International Access Code Country Code City Code Area Codes, Local Numbers, and Toll-Free Numbers France (Paris) (Montpellier) Website: support.euro.dell.com International Access Code: 00 E-mail: support.euro.dell.
1100-OM_EN.book Page 51 Friday, May 20, 2005 3:14 PM Department Name or Service Area, Website and E-Mail Address Country (City) International Access Code Country Code City Code Greece Website: support.euro.dell.com International Access Code: 00 E-mail: support.euro.dell.
www.dell.com | support.dell.com 1100-OM_EN.book Page 52 Friday, May 20, 2005 3:14 PM Department Name or Service Area, Website and E-Mail Address Country (City) International Access Code Country Code City Code Ireland (Cherrywood) Website: support.euro.dell.com International Access Code: 16 E-mail: dell_direct_support@dell.com Country Code: 353 Technical Support City Code: 1 U.K. Technical Support (dial within U.K. only) Home User Customer Care Small Business Customer Care U.K.
1100-OM_EN.book Page 53 Friday, May 20, 2005 3:14 PM Department Name or Service Area, Website and E-Mail Address Country (City) International Access Code Country Code City Code Japan (Kawasaki) Website: support.jp.dell.
www.dell.com | support.dell.com 1100-OM_EN.book Page 54 Friday, May 20, 2005 3:14 PM Department Name or Service Area, Website and E-Mail Address Country (City) International Access Code Country Code City Code Latin America Area Codes, Local Numbers, and Toll-Free Numbers Customer Technical Support (Austin, Texas, U.S.A.) 512 728-4093 Customer Service (Austin, Texas, U.S.A.) 512 728-3619 Fax (Technical Support and Customer Service) (Austin, Texas, U.S.A.) 512 728-3883 Sales (Austin, Texas, U.S.A.
1100-OM_EN.
www.dell.com | support.dell.com 1100-OM_EN.book Page 56 Friday, May 20, 2005 3:14 PM Department Name or Service Area, Website and E-Mail Address Country (City) International Access Code Country Code City Code Area Codes, Local Numbers, and Toll-Free Numbers Norway (Lysaker) Website: support.euro.dell.com International Access Code: 00 E-mail: support.euro.dell.
1100-OM_EN.book Page 57 Friday, May 20, 2005 3:14 PM Department Name or Service Area, Website and E-Mail Address Country (City) International Access Code Country Code City Code Area Codes, Local Numbers, and Toll-Free Numbers Singapore (Singapore) Website: support.ap.dell.
www.dell.com | support.dell.com 1100-OM_EN.book Page 58 Friday, May 20, 2005 3:14 PM Department Name or Service Area, Website and E-Mail Address Country (City) International Access Code Country Code City Code Area Codes, Local Numbers, and Toll-Free Numbers Spain (Madrid) Website: support.euro.dell.com International Access Code: 00 E-mail: support.euro.dell.
1100-OM_EN.book Page 59 Friday, May 20, 2005 3:14 PM Country (City) International Access Code Country Code City Code Department Name or Service Area, Website and E-Mail Address Area Codes, Local Numbers, and Toll-Free Numbers Taiwan Website: support.ap.dell.com International Access Code: 002 E-mail: ap_support@dell.
www.dell.com | support.dell.com 1100-OM_EN.book Page 60 Friday, May 20, 2005 3:14 PM Country (City) International Access Code Country Code City Code Department Name or Service Area, Website and E-Mail Address Area Codes, Local Numbers, and Toll-Free Numbers U.K. (Bracknell) Website: support.euro.dell.com International Access Code: 00 Customer Care website: support.euro.dell.com/uk/en/ECare/Form/Home.asp Country Code: 44 City Code: 1344 E-mail: dell_direct_support@dell.
1100-OM_EN.book Page 61 Friday, May 20, 2005 3:14 PM Appendix U.S Terms and Conditions of Sales These terms and conditions ("Agreement") apply to your purchase of computer systems and/or related products and/or services and support sold in the United States ("Product") by the Dell entity named on the invoice or acknowledgement ("Dell") provided to you. By accepting delivery of the Product, you accept and are bound to the terms and conditions of this Agreement.
1100-OM_EN.book Page 62 Friday, May 20, 2005 3:14 PM www.dell.com | support.dell.com 4 Warranties. THE LIMITED WARRANTIES APPLICABLE TO DELL-BRANDED HARDWARE PRODUCT CAN BE FOUND AT http://www.dell.com/policy/legal/warranty.htm OR IN THE DOCUMENTATION DELL PROVIDES WITH THE PRODUCT. DELL MAKES NO WARRANTIES FOR SERVICE, SOFTWARE, OR NON-DELL BRANDED PRODUCT. SUCH PRODUCT IS PROVIDED BY DELL "AS IS.
1100-OM_EN.book Page 63 Friday, May 20, 2005 3:14 PM 8 Service and Support. Service offerings may vary from Product to Product. If you purchase optional services and support from Dell, Dell and/or your third-party service provider will provide such service and support to you in the United States in accordance with the terms and conditions located at http://www.dell.com/us/en/gen/services/service_service_contracts.htm or as mailed to you. You may contact Dell for more information, see http://www1.us.dell.
1100-OM_EN.book Page 64 Friday, May 20, 2005 3:14 PM www.dell.com | support.dell.com 13 Binding Arbitration.
1100-OM_EN.book Page 65 Friday, May 20, 2005 3:14 PM Limited Warranties and Return Policy Dell-branded hardware products purchased in the U.S. or Canada come with either a 90-day, 1-year, 2-year, 3-year, or 4-year limited warranty. To determine which warranty came with your hardware product(s), see your packing slip or invoice. The following sections describe the limited warranties and return policy for the U.S.
1100-OM_EN.book Page 66 Friday, May 20, 2005 3:14 PM www.dell.com | support.dell.com SOME STATES DO NOT ALLOW THE EXCLUSION OR LIMITATION OF INCIDENTAL OR CONSEQUENTIAL DAMAGES, SO THE ABOVE LIMITATION OR EXCLUSION MAY NOT APPLY TO YOU. How long does this limited warranty last? This limited warranty lasts for the time period indicated on your packing slip or invoice, except for the following Dell-branded hardware: • Portable computer batteries carry a 1-year limited warranty.
1100-OM_EN.book Page 67 Friday, May 20, 2005 3:14 PM What will Dell do? During the 90 days of the 90-day limited warranty and the first year of all other limited warranties: During the 90 days of the 90-day limited warranty and the first year of all other limited warranties, we will repair any Dellbranded hardware products returned to us that prove to be defective in materials or workmanship. If we are not able to repair the product, we will replace it with a comparable product that is new or refurbished.
1100-OM_EN.book Page 68 Friday, May 20, 2005 3:14 PM www.dell.com | support.dell.com May I transfer the limited warranty? Limited warranties on systems may be transferred if the current owner transfers ownership of the system and records the transfer with us. The limited warranty on Dell-branded memory may not be transferred. You may record your transfer by going to Dell's website: • If you are an Individual Home Consumer, go to www.dell.com/us/en/dhs/topics/sbtopic_015_ccare.
1100-OM_EN.book Page 69 Friday, May 20, 2005 3:14 PM How to Return — To return products, e-mail or call Dell customer service to receive a Credit Return Authorization Number within the return policy period applicable to the product you want to return. You must obtain a Credit Return Authorization Number in order to return the product. See "Contacting Dell" or "Getting Help" in your customer documentation (or go to www.dell.com/us/en/gen/contact.
1100-OM_EN.book Page 70 Friday, May 20, 2005 3:14 PM www.dell.com | support.dell.com SOME PROVINCES DO NOT ALLOW THE EXCLUSION OF CERTAIN IMPLIED WARRANTIES OR CONDITIONS, OR LIMITATIONS ON HOW LONG AN IMPLIED WARRANTY OR CONDITION LASTS. THEREFORE, THE FOREGOING EXCLUSIONS AND LIMITATIONS MAY NOT APPLY TO YOU.
1100-OM_EN.book Page 71 Friday, May 20, 2005 3:14 PM What will Dell do? During the 90 days of the 90-day limited warranty and the first year of all other limited warranties: During the 90 days of the 90-day limited warranty and the first year of all other limited warranties, we will repair any Dellbranded hardware products returned to us that prove to be defective in materials or workmanship. If we are not able to repair the product, we will replace it with a comparable product that is new or refurbished.
1100-OM_EN.book Page 72 Friday, May 20, 2005 3:14 PM www.dell.com | support.dell.com May I transfer the limited warranty? Limited warranties on systems may be transferred if the current owner transfers ownership of the system and records the transfer with us. The limited warranty on Dell-branded memory may not be transferred. You may record your transfer by going to Dell’s website. • For Canada-purchased computers (in-country transfers) and to transfer from one customer to another, go to www.dell.
1100-OM_EN.book Page 73 Friday, May 20, 2005 3:14 PM Dell™ Software and Peripherals (Canada Only) Third-Party Software and Peripherals Products Similar to other resellers of software and peripherals, Dell does not warrant third-party products. Third-party software and peripheral products are covered by the warranties provided by the original manufacturer or publisher only. Thirdparty manufacturer warranties vary from product to product. Consult your product documentation for specific warranty information.
1100-OM_EN.book Page 74 Friday, May 20, 2005 3:14 PM www.dell.com | support.dell.com Limitation and Statutory Rights Dell makes no other warranty, guarantee or like statement other than as explicitly stated above, and this Guarantee is given in place of all other guarantees whatsoever, to the fullest extent permitted by law.
1100-OM_EN.book Page 75 Friday, May 20, 2005 3:14 PM Dell Inc. Ink and Toner Cartridges Limited Warranties The following sections describe the limited warranty for ink and toner cartridges for the U.S., Canada, and Latin America. Refer to the appropriate limited warranty accordingly. Ink and Toner Cartridges Limited Warranty (U.S. and Canada Only) Dell Inc.
1100-OM_EN.book Page 76 Friday, May 20, 2005 3:14 PM www.dell.com | support.dell.com Ink and Toner Cartridges Limited Warranty (Latin America Only) Dell Inc. warrants to the original purchaser of genuine Dell-branded toner cartridges that the cartridges will be free from defects resulting from material or manufacturing process for the life of the cartridge.
1100-OM_EN.book Page 77 Friday, May 20, 2005 3:14 PM Dette skema er alene anvendeligt for norske konsumenter ANGREFRISTSKJEMA Kjære Kunde. Du har kjøpt produkt fra DELL (Produkt) som vi har sendt deg med frakt. Dette defineres som en distansavtale og underlegges normalt angrefristloven som gir deg 14 dagers returrett. Dersom du ikke er fornøyd med de Produkt du har mottatt, eller av andre årsaker ikke ønsker å beholde din Produkt ber vi deg fylle ut skjemaet nedenfor og legger dette i returpakken.
1100-OM_EN.book Page 78 Friday, May 20, 2005 3:14 PM www.dell.com | support.dell.com Regulatory Notices Electromagnetic Interference (EMI) is any signal or emission, radiated in free space or conducted along power or signal leads, that endangers the functioning of a radio navigation or other safety service or seriously degrades, obstructs, or repeatedly interrupts a licensed radio communications service.
1100-OM_EN.book Page 79 Friday, May 20, 2005 3:14 PM FCC Notices (U.S. Only) Most Dell printers are classified by the Federal Communications Commission (FCC) as Class B digital devices. To determine which classification applies to your printer, examine all FCC registration labels located on the bottom, side, or back panel of your printer, on card-mounting brackets, and on the cards themselves.
1100-OM_EN.book Page 80 Friday, May 20, 2005 3:14 PM www.dell.com | support.dell.com NOM Information (Mexico Only) The following information is provided on the device(s) described in this document in compliance with the requirements of the official Mexican standards (NOM): Exporter: Dell Inc. One Dell Way Round Rock, TX 78682 Importer: Dell Computer de México, S.A. de C.V. Paseo de la Reforma 2620 - 11° Piso Col. Lomas Altas 11950 México, D.F. Ship to: Dell Computer de México, S.A. de C.V.
1100-OM_EN.book Page 81 Friday, May 20, 2005 3:14 PM Dell™ Software License Agreement This is a legal agreement between you, the user, and Dell Products L.P ("Dell"). This agreement covers all software that is distributed with the Dell product, for which there is no separate license agreement between you and the manufacturer or owner of the software (collectively the "Software"). This agreement is not for the sale of Software or any other intellectual property.
1100-OM_EN.book Page 82 Friday, May 20, 2005 3:14 PM www.dell.com | support.dell.com Limited Warranty Dell warrants that the Software disks will be free from defects in materials and workmanship under normal use for ninety (90) days from the date you receive them. This warranty is limited to you and is not transferable. Any implied warranties are limited to ninety (90) days from the date you receive the Software.
1100-OM_EN.book Page 83 Friday, May 20, 2005 3:14 PM General This license is effective until terminated. It will terminate upon the conditions set forth above or if you fail to comply with any of its terms. Upon termination, you agree that the Software and accompanying materials, and all copies thereof, will be destroyed. This agreement is governed by the laws of the State of Texas. Each provision of this agreement is severable.
www.dell.com | support.dell.com 1100-OM_EN.
1100-OM_EN.
86 1100-OM_EN.
1100-OM_EN.