
Manual


Using the Tape Drive: Dell PowerVault 110T DLT VS160 Tape Drive User's Guide
file:///C|/Users/rishi_sood/Desktop/Temp/MissingDocsPosted/110t_dlt/UG/usage.htm[3/8/2013 11:46:13 AM]
Back to Contents Page
Using the Tape Drive: Dell™ PowerVault™ 110T DLT VS160 Tape
Drive User's Guide
Operating the Tape Drive
Caring for Tape Cartridges
Cleaning the Tape Mechanism
Operating the Tape Drive
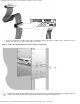
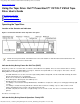
Location of the Controls and Indicators
Figure 1. PowerVault 110T DLT VS160 Tape drive front panel
NOTE: The front panel controls and indicators are in the same locations on both the internal and external drives. The
internal drive does not have a Power LED.
Indicator Activity During Power-On Self-Test (POST)
Every time you turn on or reset the drive, it conducts a Power-On Self-Test (POST). This test ensures that the drive is working
properly and is ready to use. While POST is in progress, watch the front panel LEDs to see the progress and results of the test.
During POST, the following actions take place:
The LEDs illuminate one at a time, from left to right, starting with the Ready LED, next the Fault LED, and finally the Clean
LED, at approximately one second intervals
About four seconds later, the Media LED illuminates
Each LED signals a different part of the POST process
All LEDs then turn off momentarily
If a cartridge is not loaded, the Ready LED illuminates and POST is complete, the entire process taking approximately eight
seconds
If a cartridge is loaded, the Ready LED flashes while the drive mounts the cartridge, a process that can take several
minutes depending upon the position of the media in the tape path
As POST completes, the drive makes a slight buzzing noise for several seconds. This noise is normal and should be
ignored
The drive is now ready to use.
Indicator Activity During Normal Operation - Ready LED